READ THIS MANUAL CAREFULLY! It contains important safety information. OWNER’S MANUAL YFM90RY WARNING LIT-11626-22-13 This A This ATV should not be ridden by anyone under 12 years of age.
Read this manual carefully before operating this vehicle.This manual should stay with this vehicle if it is sold.
INTRODUCTION Congratulations on your purchase of the Yamaha YFM90RY. This ATV represents the result of many years of Yamaha experience in the production of fine sporting, touring, and pacesetting racing machines. With the purchase of this Yamaha, you can now appreciate the high degree of craftsmanship and reliability that have made Yamaha a leader in these fields. This manual will provide you with a good basic understanding of the features and operation of this ATV.
in skills, physical abilities and judgment. Some children may not be able to operate an ATV safely. Parents should supervise their child’s use of the ATV at all times. Parents should permit continued use only if they determine that the child has the ability to operate the ATV safely. Your ATV was delivered with an adjustable speed limiter . Yamaha recommends that all beginners start off to limit the amount of speed available while they learn.
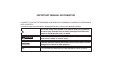
IMPORTANT MANUAL INFORMATION FAILURE TO FOLLOW THE WARNINGS CONTAINED IN THIS MANUAL CAN RESULT IN SERIOUS INJURY OR DEATH. Particularly important information is distinguished in this manual by the following notations: This is the safety alert symbol. It is used to alert you to potential personal injury hazards. Obey all safety messages that follow this symbol to avoid possible injury or death. WARNING A WARNING indicates a hazardous situation which, if not avoided, could result in death or serious injury.
IMPORTANT NOTICE Welcome to the Yamaha world of motor sports! This ATV is designed and manufactured for OFF-ROAD use only. It is illegal and unsafe to operate this ATV on any public street, road or highway. This ATV complies with all applicable OFF-ROAD noise level and spark arrester laws and regulations in effect at the time of manufacture. Please check your local riding laws and regulations before operating this ATV. YFM90RY OWNER’S MANUAL ©2008 by Yamaha Motor Corporation, U.S.A.
WARNING A WARNING indicates a hazardous situation which, if not avoided, could result in death or serious injury. TABLE OF CONTENTS SAFETY INFORMATION..............................1-1 LOCATION OF THE WARNING AND SPECIFICATION LABELS............................2-1 DESCRIPTION ..............................................3-1 Left view.....................................................3-1 Right view...................................................3-1 Controls and instruments...........................
RIDING YOUR ATV ...................................... 7-1 GETTING TO KNOW YOUR ATV...............7-2 RIDE WITH CARE AND GOOD JUDGEMENT............................................ 7-2 BE CAREFUL WHERE YOU RIDE...........7-11 TURNING YOUR ATV..............................7-15 CLIMBING UPHILL....................................7-17 RIDING DOWNHILL..................................7-20 CROSSING A SLOPE................................7-21 CROSSING THROUGH SHALLOW WATER ..........................................
SPECIFICATIONS ..................................... 10-1 CONSUMER INFORMATION ..................... 11-1 Identification numbers ............................ 11-1 Noise regulation ..................................... 11-3 Maintenance record ............................... 11-4 YAMAHA MOTOR CORPORATION, U.S.A. ATV LIMITED WARRANTY ...... 11-5 YAMAHA EXTENDED SERVICE (Y.E.S.) .................................................
1 SAFETY INFORMATION – A child under 12 years old should never operate an ATV with engine size greater than 70 cc. – A child under 16 years old should never operate an ATV with engine size greater than 90 cc. Never allow a child under age 16 to operate an ATV without adult supervision, and never allow continued use of an ATV by a child if he or she does not have the abilities to operate it safely. Never carry a passenger on an ATV.
speeds and never turn at excessive speeds. Never operate the ATV on hills too steep for the ATV or for your abilities. Practice on smaller hills before attempting larger hills. Always follow proper procedures for climbing hills as described in this manual. Check the terrain carefully before you start up any hill. Never climb hills with excessively slippery or loose surfaces. Shift your weight forward. Never open the throttle suddenly or make sudden gear changes.
1 reduced stopping ability. Test your brakes after leaving water. If necessary, apply them several times to let friction dry out the linings. Always use the size and type of tires specified in this manual. Always maintain proper tire pressure as described in this manual. Never modify an ATV through improper installation or use of accessories. Never exceed the stated load capacity for an ATV. Cargo should be properly distributed and securely attached.
HOW TO AVOID THE HAZARD Always turn off the engine when refueling. Do not refuel right after the engine has been running and is still very hot. Do not spill gasoline on the engine or exhaust pipe/muffler when refueling. Never refuel while smoking, or in the vicinity of sparks, open flames, or other sources of ignition such as the pilot lights of water heaters and clothes dryers. When transporting the ATV in another vehicle, be sure it is kept upright and that the fuel cock is in the “OFF” position.
LOCATION OF THE WARNING AND SPECIFICATION LABELS 2 1 5 2 3 4 Read and understand all of the labels on your ATV. These labels contain important information for safe and proper operation. Never remove any labels from your ATV. If a label becomes difficult to read or comes off, request a replacement label from your Yamaha dealer.
1 2 I I I I I I l l 2 l I l ll l l l ll l l l l ll l l I l 2-2 I l l I ll
3 4 I 2 l I 5 2-3 l l
DESCRIPTION Left view Right view 1 4 1. 2. 3. 4. 1 3 2 2 3 3 Fuel cock Rear wheel Footrest Front wheel 1. Spark arrester 2. Seat 3.
Controls and instruments 2 1 TIP The ATV you have purchased may differ slightly from the figures shown in this manual. 3 3 8 7 1. 2. 3. 4. 5. 6. 7. 8.
INSTRUMENT AND CONTROL FUNCTIONS WARNING A WARNING indicates a hazardous situation which, if not avoided, could result in death or serious injury. ON OFF OF The positions of the main switch are as follows: IG ON All electrical systems are supplied with power, and the engine can be started. The key cannot be removed. I T ON N 1. Main switch OFF All electrical systems are off. The key can be removed.
Handlebar switches Start switch “START” Push this switch to crank the engine with the starter. See the starting instructions on page 6-1 prior to starting the engine. 1 4 2 1. Engine stop switch “ENG. STOP” 2. Start switch “START” Engine stop switch “ENG. STOP” Set this switch to “RUN” before starting the engine. The engine stop switch controls the ignition and stops the engine when it is running. Use this switch to stop the engine in an emergency situation.
Throttle lever WARNING Once the engine is running, movement of the throttle lever will increase the engine speed. Regulate the speed of the ATV by varying the throttle position. Because the throttle is springloaded, the ATV will decelerate, and the engine will return to an idle any time the hand is removed from the throttle lever. POTENTIAL HAZARD Malfunction of throttle. WHAT CAN HAPPEN The throttle could be hard to operate, making it difficult to speed up or slow down when you need to.
4 4 The vehicle speed limiter keeps the throttle from fully opening, even when the throttle lever is pushed to the maximum. The adjusting screw may be gradually turned out as the beginner becomes more familiar with operating the ATV. Parents should decide when to adjust the ATV for more power as their youngster’s riding skills improve. Once the ATV rider can operate with skill at the top speed permitted by adjusting the vehicle speed limiter alone, the engine speed limiter plate can be removed.
4. Tighten the screw. 5. Install the seat. WARNING POTENTIAL HAZARD Improper adjustment of the speed limiter and throttle. WHAT CAN HAPPEN The throttle cable could be damaged. Improper throttle operation could result. The child could lose control, have an accident or be injured. HOW TO AVOID THE HAZARD Do not turn the adjusting screw out more than 5 mm (0.2 in). 2 1 Engine speed limiter plate 1. Speed limiter plate 2. Screws With this plate installed, the engine speed is limited to 4800 r/min.
Front brake lever Rear brake lever The front brake lever is located on the right handlebar. To apply the front brake, pull the brake lever toward the handlebar grip. The rear brake lever is located on the left handlebar. To apply the rear brake, pull the brake lever toward the handlebar grip. 1 1 4 1. Rear brake lever 1.
Parking brake WARNING Use the parking brake before starting the engine or parking the ATV, especially on a slope. Apply the front bake lever and push down the lock button to apply the parking brake. Squeeze the front brake lever to release the parking brake. POTENTIAL HAZARD Improper use of the parking brake. WHAT CAN HAPPEN The ATV could start moving unexpectedly if the parking brake is not applied before starting the engine. This could cause loss of control or a collision.
Fuel tank cap 1 Remove the fuel tank cap by turning it counterclockwise. 2 1 4 1. Fuel level 2. Filler tube Recommended fuel: UNLEADED GASOLINE ONLY Fuel tank capacity: 4.8 L (1.27 US gal) (1.06 Imp.gal) 1. Fuel tank cap Fuel reserve amount: 1.0 L (0.26 US gal) (0.22 Imp.gal) Fuel Make sure that there is sufficient fuel in the tank. Fill the fuel tank to the bottom of the filler tube as shown.
NOTICE WARNING Use only unleaded gasoline. The use of leaded gasoline will cause severe damage to internal engine parts, such as the valves and piston rings, as well as to the exhaust system. POTENTIAL HAZARD Improper care when refueling. WHAT CAN HAPPEN Fuel can spill, which can cause a fire and severe injury. Fuel expands when it heats up. If the fuel tank is overfilled, fuel could spill out due to heat from the engine or the sun. HOW TO AVOID THE HAZARD Do not overfill the fuel tank.
RES Fuel cock The fuel cock supplies fuel from the tank to the carburetor while also filtering it. The fuel cock lever positions are explained as follows and shown in the illustrations. RES 1 RE S OFF OFF RE S OFF 54 RES 1 NO 1. Lever positioned over “OFF” FUEL With the fuel cock lever in this position, fuel will not flow. Always turn the fuel cock lever to this position when the engine is not running. ON NO 1. Lever positioned over “ON” FUEL This indicates reserve.
Choke Seat The choke is used to start a cold engine. Move the choke in direction (a) to turn on the choke. Move the choke in direction (b) to turn off the choke. See the “Starting a cold engine” section on page 6-1 for proper operation. To remove the seat Pull the seat lock lever upward and pull up the seat at the rear. 4 1 (a) 1 2 3 (b) 1. 2. 3. 4. 1.
To install the seat Insert the projection on the front of the seat into the seat holder and push down on the seat at the rear. 2. Move the kickstarter lever down lightly with your foot until the gears engage, and then push it down smoothly but forcefully. TIP Make sure that the seat is securely fitted. 4 1 1 2 1. Kickstarter NOTICE 1. Projection 2. Seat holder Do not use the kickstarter if there is no battery installed or if the battery leads are disconnected.
PRE-OPERATION CHECKS Pre-operation check list Before operating this ATV, be sure to check the items listed in the following table. WARNING POTENTIAL HAZARD Failure to inspect the ATV before operating. Failure to properly maintain the ATV. WHAT CAN HAPPEN Increases the possibility of an accident or equipment damage. HOW TO AVOID THE HAZARD Always inspect your ATV each time you use it to make sure it is in safe operating condition.
ITEM T Fuel Engine oil Final transmission oil 9 9 2 5 Front brake Rear brake Throttle lever Control cables Wheels and tires Brake levers Chassis fasteners Instruments and switches ROUTINE Check fuel level in fuel tank, and add recommended fuel if necessary. Check fuel line for leakage. Correct if necessary. Check oil level in engine, and add recommended oil to specified level if necessary. Check A TV for oil leakage. Correct if necessary. Check ATV for oil leakage. Correct if necessary.
Final transmission oil Fuel Make sure that the final transmission oil is at the specified level. Add oil as necessary. (See page 8-14.) Make sure that there is sufficient fuel in the tank. (See page 4-8.) Front and rear brakes WARNING Brake levers Check for correct free play in the brake levers. If the free play is incorrect, adjust it. (See pages 8-23 and 8-26.) 6 513 Check operation of the levers. They should move smoothly and there should be a firm feeling when the brakes are applied.
Brake operation Test the brakes at slow speed after starting out to make sure they are working properly. If the brakes do not provide proper braking performance, check the brakes for wear. (See pages 8-22 and 8-25.) Tires WARNING POTENTIAL HAZARD Operating this ATV with improper tires, or with improper or uneven tire pressure. WHAT CAN HAPPEN Use of improper tires on this ATV, or operation of this ATV with improper or uneven tire pressure, may cause loss of control, increasing your risk of accident.
Rear: Manufacturer/model: MAXXIS/M940 Size: AT18 x 9-8 Type: Tubeless The tires should be set to the recommended pressure: Recommended tire pressure: Front: 25 kPa (3.6 psi) (0.25 kgf/cm 2 ) Rear: 25 kPa (3.6 psi) (0.25 kgf/cm 2 ) Check and adjust tire pressures when the tires are cold. Tire pressures must be equal on both sides. Tire pressure below the minimum specified could cause the tire to dislodge from the rim under severe riding conditions. Minimum tire pressure: Front: 22 kPa (3.2 psi) (0.
dirt in the gauge could cause the first reading to be incorrect. Recommended pressure: Front 25 kPa (3.6 psi) (0.25 kgf/cm2) Rear 25 kPa (3.6 psi) (0.25 kgf/cm2) Minimum: Front 22 kPa (3.2 psi) (0.22 kgf/cm2) Rear 22 kPa (3.2 psi) (0.22 kgf/cm2) 1 5 1. Low-pressure tire gauge Tire wear limit Set the tire pressure when the tires are cold. Set the tire pressures to the following specifications: Replace the tire when the tire groove decreases to 3 mm (0.12 in).
5 1. Tire wear limit Chassis fasteners Make sure that all nuts, bolts and screws are properly tightened. Instruments and switches Check that all instruments and switches are working properly. Correct if necessary.
OPERATION Starting a cold engine WARNING A WARNING indicates a hazardous situation which, if not avoided, could result in death or serious injury. WARNING POTENTIAL HAZARD Frozen control cables in cold weather. WHAT CAN HAPPEN You could be unable to control the ATV, which could lead to an accident or collision. HOW TO AVOID THE HAZARD When riding in cold weather, always make sure all control cables work smoothly before you begin riding.
Ambient temp./choke position TIP This model is equipped with an ignition circuit cutoff system. The engine can be started only when the rear brake lever is applied. 1 0° 10° 20° 30° °C 30° 50° 70° 90° °F 3 4. Use the choke in reference to the figure: Position (1): Cold engine start with ambient temperature below 30 °C (90 °F). 1 Position (2): Warming up position. 1. 2. 3. 4. Position (3): Cold engine start with ambient temperature above 25 °C (80 °F).
crank the engine more than 10 seconds on each attempt. To start out and accelerate 1. Squeeze the front brake lever to release the parking brake. 2. Gradually open the throttle while slowly releasing the rear brake lever. 6. If the engine is started with the choke in position (1), the choke should be returned to position (2) to warm up the engine. If the engine is started with the choke in position (2), keep the choke in this position to warm up the engine.
0–160 km (0–100 mi) or 0–10 hours Avoid prolonged operation above 1/2 throttle. Vary the speed of the ATV regularly. Do not operate it at one set throttle position. 160–320 km (100–200 mi) or 10–20 hours Avoid prolonged operation above 3/4 throttle. Rev the engine freely, but do not use full throttle at any time. 320 km (200 mi) or 20 hours and beyond The ATV can now be operated normally. NOTICE Do not tow the ATV for long distances. The transmission is properly lubricated only when the engine is running.
Parking on a slope 1 WARNING 6 POTENTIAL HAZARD Parking on a hill or other incline. WHAT CAN HAPPEN The ATV could roll out of control, increasing the chance of an accident. HOW TO AVOID THE HAZARD Avoid parking on hills or other inclines. If you must park on an incline, place the ATV transversely across the incline, stop the engine, apply the parking brake, and then block the front and rear wheels with rocks or other objects.
Yamaha accessories, nor control over their quality or suitability. Choose a genuine Yamaha accessory, or one that is equivalent in design and quality. Accessories should be rigidly and securely mounted. An accessory which can shift position or come off while you are riding could affect your ability to control the ATV. Do not mount an accessory where it could interfere with your ability to control the ATV.
speeds. Avoid hills and rough terrain. Choose terrain carefully. Added weight affects the stability and handling of the ATV. the following points in mind: Never exceed the weight limits shown. An overloaded ATV can be unstable. MAXIMUM LOADING LIMIT ATV loading limit (total weight of rider, cargo, accessories, and tongue): 70.0 kg (154 lb) 6 WARNING POTENTIAL HAZARD Overloading this ATV or carrying or towing cargo improperly.
RIDING YOUR ATV 7 7-1
RIDE WITH CARE AND GOOD JUDGEMENT WARNING A WARNING indicates a hazardous situation which, if not avoided, could result in death or serious injury. 7 Get training if you are inexperienced. Beginners should get training from a certified instructor. Become familiar with this ATV at slow speeds first, even if you are an experienced operator. Do not attempt to operate at maximum performance until you are totally familiar with the ATV’s handling and performance characteristics.
Not recommended for children under 12 years of age. WARNING POTENTIAL HAZARD Operating this ATV without proper instruction. WHAT CAN HAPPEN The risk of an accident is greatly increased if the operator does not know how to operate the ATV properly in different situations and on different types of terrain. HOW TO AVOID THE HAZARD Beginning and inexperienced operators should complete the certified training course offered by Yamaha.
This ATV is designed to carry operator only – passengers prohibited. WARNING 7 POTENTIAL HAZARD Carrying a passenger on this ATV. WHAT CAN HAPPEN Greatly reduces your ability to balance and control this ATV. Could cause an accident, resulting in harm to you and/or your passenger. HOW TO AVOID THE HAZARD Never carry a passenger. The long seat is to allow the operator to shift position as needed during operation. It is not for carrying passengers.
Apparel HOW TO AVOID THE HAZARD Always wear an approved motorcycle helmet that fits properly. You should also wear: eye protection (goggles or face shield) gloves boots long-sleeved shirt or jacket long pants WARNING POTENTIAL HAZARD Operating this ATV without wearing an approved motorcycle helmet, eye protection and protective clothing. WHAT CAN HAPPEN Operating without an approved motorcycle helmet increases your chances of a severe head injury or death in the event of an accident.
Do not operate after consuming alcohol or drugs. The operator’s performance capability is reduced by the influence of alcohol or drugs. HOW TO AVOID THE HAZARD Never consume alcohol or drugs before or while driving this ATV. Pre-operation checks Always perform the pre-operation checks listed on page 5-1 before riding for proper care of the ATV and to ensure safety. WARNING POTENTIAL HAZARD Failure to inspect the ATV before operating. Failure to properly maintain the ATV.
WARNING WARNING POTENTIAL HAZARD Operating this ATV at speeds too fast for your skills or the conditions. WHAT CAN HAPPEN Increases your chances of losing control of the ATV, which can result in an accident. HOW TO AVOID THE HAZARD Always go at a speed that is proper for the terrain, visibility and operating conditions, and your experience. POTENTIAL HAZARD Operating this ATV with improper tires, or with improper or uneven tire pressure.
7 Loading and accessories Use extra caution when riding the ATV with additional loads, such as accessories or cargo. The ATV’s handling may be adversely affected. Reduce your speed when adding additional loads. engine speed limiter plate installed to limit the amount of speed available while they learn. The vehicle speed limiter may be gradually adjusted to increase maximum speed as the beginner becomes more familiar with operating the ATV.
Cargo should be properly distributed and securely attached. Reduce speed when carrying cargo or pulling a trailer. Allow greater distance for braking. Always follow the instructions in your Owner’s Manual for carrying cargo or pulling a trailer. WARNING POTENTIAL HAZARD Removing hands from handlebars or feet from footboards during operation. WHAT CAN HAPPEN Removing even one hand or foot can reduce your ability to control the ATV or could cause you to lose your balance and fall off of the ATV.
Modifications WARNING WARNING POTENTIAL HAZARD Attempting wheelies, jumps, and other stunts. WHAT CAN HAPPEN Increases the chance of an accident, including an overturn. HOW TO AVOID THE HAZARD Never attempt stunts, such as wheelies or jumps. Don’t try to show off. POTENTIAL HAZARD Operating this ATV with improper modifications. WHAT CAN HAPPEN Improper installation of accessories or modification of this ATV may cause changes in handling which in some situations could lead to an accident.
WARNING POTENTIAL HAZARD Hot exhaust system. WHAT CAN HAPPEN Dry grass or brush or other combustible material accumulated around the engine area could catch fire. Someone touching the exhaust system during or after operation could be burned. HOW TO AVOID THE HAZARD Do not operate, idle, or park the ATV in dry grass or other dry ground cover. Keep the engine area free of dry grass, brush, or other combustible material. Do not touch the hot exhaust system.
HOW TO AVOID THE HAZARD Always avoid paved surfaces, including sidewalks, driveways, parking lots and streets. WARNING POTENTIAL HAZARD Operating this ATV on public streets, roads or highways. WHAT CAN HAPPEN You can collide with another vehicle. HOW TO AVOID THE HAZARD Never operate this ATV on any public street, road or highway, even a dirt or gravel one. In many states it is illegal to operate ATVs on public streets, roads and highways. 7 Do not ride on any public road, street, or highway.
Know the terrain where you ride. Ride cautiously in unfamiliar areas. Stay alert for holes, rocks, or roots in the terrain, and other hidden hazards which may cause the ATV to upset. WARNING POTENTIAL HAZARD Failure to use extra care when operating this ATV on unfamiliar terrain. WHAT CAN HAPPEN You can come upon hidden rocks, bumps, or holes, without enough time to react. Could result in the ATV overturning or going out of control.
HOW TO AVOID THE HAZARD Do not operate on excessively rough, slippery or loose terrain until you have learned and practiced the skills necessary to control the ATV on such terrain. Always be especially cautious on these kinds of terrain. 7 WARNING POTENTIAL HAZARD Operating in areas where you might not be seen by other off-road vehicles. WHAT CAN HAPPEN You could be in a collision. You could be injured. HOW TO AVOID THE HAZARD Always mount a caution flag on the ATV to make you more visible.
member that the engine and exhaust pipe will be hot when riding and afterwards; do not allow skin or clothing to come in contact with these components. With the engine idling, release the parking brake. Apply the throttle slowly and smoothly. You will start to accelerate. If the throttle is applied too abruptly, the front wheels may lift off the ground, resulting in a loss of directional control. Avoid higher speeds until you are thoroughly familiar with the operation of your ATV.
low speed. 1 WARNING 7 POTENTIAL HAZARD Turning improperly. WHAT CAN HAPPEN The ATV could go out of control, causing a collision or overturn. HOW TO AVOID THE HAZARD Always follow proper procedures for turning as described in this Owner’s Manual. Practice turning at low speeds before attempting to turn at faster speeds. Do not turn at speeds too fast for your skills or the conditions. 2 1. Lean towards inside of turn. 2. Support your weight on the outer footboard.
curves. Improper riding procedures such as abrupt throttle changes, excessive braking, incorrect body movements, or too much speed for the sharpness of the turn may cause the ATV to tip. If the ATV begins to tip over to the outside while negotiating a turn, lean more to the inside. It may also be necessary to gradually let off on the throttle and steer to the outside of the turn to avoid tipping over. Remember: Avoid higher speeds until you are thoroughly familiar with the operation of your ATV.
7 HOW TO AVOID THE HAZARD Always follow proper procedures for climbing hills as described in this Owner’s Manual. Always check the terrain carefully before you start up any hill. Never climb hills with excessively slippery or loose surfaces. Shift your weight forward. Never open the throttle suddenly. The ATV could flip over backwards. Never go over the top of any hill at high speed. An obstacle, a sharp drop, or another vehicle or person could be on the other side of the hill.
WARNING OK POTENTIAL HAZARD Improperly crossing hills or turning on hills. WHAT CAN HAPPEN Could cause loss of control or cause the ATV to overturn. HOW TO AVOID THE HAZARD Never attempt to turn the ATV around on any hill until you have mastered the turning technique as described in the Owner’s Manual on level ground. Be very careful when turning on any hill. Avoid crossing the side of a steep hill if possible.
WARNING 7 POTENTIAL HAZARD Stalling, rolling backwards or improperly dismounting while climbing a hill. WHAT CAN HAPPEN Could result in the ATV overturning. HOW TO AVOID THE HAZARD Maintain a steady speed when climbing a hill. If you lose all forward speed: Keep weight uphill. Apply the brakes. Lock the parking brake after you are stopped. If you begin rolling backwards: Keep weight uphill. Never apply the rear brake while rolling backwards. Apply the front brake.
hill. Avoid sharp angles which could allow the ATV to tip or roll over. Carefully choose your path and ride no faster than you will be able to react to obstacles which may appear. OK WARNING POTENTIAL HAZARD Going down a hill improperly. WHAT CAN HAPPEN Could cause loss of control or cause the ATV to overturn. HOW TO AVOID THE HAZARD Always follow proper procedures for going down hills as described in this Owner’s Manual. TIP: a special technique is required when braking as you go down a hill.
slopes, be sure not to make sharp turns either up or down hill. If your ATV does begin to tip over, gradually steer in the downhill direction if there are no obstacles in your path. As you regain proper balance, gradually steer again in the direction you wish to travel. When crossing the side of a hill: Always follow proper procedures as described in the Owner’s Manual. Avoid hills with excessively slippery or loose surfaces. Shift your weight to the uphill side of the ATV.
carefully. Enter where there is no sharp drop off, and avoid rocks or other obstacles which may be slippery or upset the ATV. Drive slowly and carefully. WARNING POTENTIAL HAZARD Operating this ATV through deep or fast flowing water. WHAT CAN HAPPEN Tires may float, causing loss of traction and loss of control, which could lead to an accident. HOW TO AVOID THE HAZARD Never operate this ATV in fast flowing water or in water deeper than that specified in your Owner’s Manual.
1 1. Air filter case check hose 7 RIDING OVER ROUGH TERRAIN Riding over rough terrain should be done with caution. Look out for obstacles which could cause damage to the ATV or could lead to an upset or accident. Be sure to keep your feet firmly mounted on the footboards at all times. Avoid jumping the ATV as loss of control and damage to the ATV may result. NOTICE After riding your ATV in water, be sure to drain the trapped water by removing the check hose at the bottom of the air filter case.
WARNING POTENTIAL HAZARD Improperly operating over obstacles. WHAT CAN HAPPEN Could cause loss of control or a collision. Could cause the ATV to overturn. HOW TO AVOID THE HAZARD Before operating in a new area, check for obstacles. Never attempt to ride over large obstacles, such as large rocks or fallen trees. When you go over obstacles, always follow proper procedures as described in the Owner’s Manual.
WHAT CAN HAPPEN You may lose control of this ATV. You may also regain traction unexpectedly, which may cause the ATV to overturn. HOW TO AVOID THE HAZARD Learn to safely control skidding or sliding by practicing at low speeds and on level, smooth terrain. On extremely slippery surfaces, such as ice, go slowly and be very cautious in order to reduce the chance of skidding or sliding out of control. 7 WHAT TO DO IF... This section is designed to be a reference guide only.
Lean more into the turn to regain balance. If necessary, gradually let off the throttle and/or steer to the outside of the turn. (See page 7-15.) If your ATV starts to slide sideways: Steer in the direction of the slide if you have the room. Applying the brakes or accelerating is not recommended until you have corrected the slide. (See page 7-25.) If your ATV can’t make it up a hill you are trying to climb: Turn the ATV around if you still have forward speed.
PERIODIC MAINTENANCE AND MINOR REPAIR 8 HOW TO AVOID THE HAZARD Turn off the engine when performing maintenance unless otherwise specified. Have a Yamaha dealer perform the service if you are not familiar with maintenance work. Safety is an obligation of the owner. Periodic inspection, adjustment and lubrication will keep your ATV in the safest and best operating condition possible. The most important points of inspection, adjustment, and lubrication are explained on the following pages.
TIP 3 If you do not have the tools or experience required for a particular job, have a Yamaha dealer perform it for you. 1 WARNING W Y! n. io ULL at REF form CA in L ty UA safe AN t M an IS rt TH po D im ns REAntai co It POTENTIAL HAZARD Operating this ATV with improper modifications. WHAT CAN HAPPEN Improper installation of accessories or modification of this ATV may cause changes in handling which in some situations could lead to an accident.
Periodic maintenance chart for the emission control system TIP For ATVs not equipped with an odometer or an hour meter, follow the month maintenance intervals. For ATVs equipped with an odometer or an hour meter, follow the km (mi) or hours maintenance intervals. However, keep in mind that if the ATV isn’t used for a long period of time, the month maintenance intervals should be followed.
INITIAL NO. ITEM Whichev- month CHECK OR MAINTENANCE er comes km JOB first (mi) hours 6 7 * Exhaust system Spark arrester Check for leakage and replace gasket(s) if necessary. Check for looseness and tighten all screw clamps and joints if necessary. Clean.
General maintenance and lubrication chart INITIAL NO. 1 * 2 3 4 * * ITEM Timing chain Check chain tension. Adjust if necessary. Air filter element Clean and replace if necessary. Clutch Check operation.
INITIAL NO. ITEM 9 * Wheel hub bearings 10 * Chassis fasteners 11 * 12 * 13 * Shock absorber assemblies Front knuckle pivots Steering shaft 14 * Steering system 15 Engine oil 16 Engine oil strainer 17 18 * 1 3 6 6 12 320 (200) 1300 (800) 2500 (1600) 2500 (1600) 5000 (3200) 20 80 160 160 320 √ √ √ √ √ √ √ √ √ Lubricate with lithium-soap-based grease. √ √ √ Lubricate with lithium-soap-based grease. Check operation and repair or replace if damaged.
INITIAL NO. 8 ITEM 19 * Drive select lever safety system cable 20 * Throttle lever housing and cable 21 * Front and rear brake switches 22 * Lights and switches 23 * V-belt CHECK OR MAINTENANCE JOB Whichever comes first month 1 3 km (mi) 320 (200) 1300 (800) hours 20 80 • Check operation and adjust or replace if necessary. • Check operation and correct if necessary. • Check throttle cable free play and adjust if necessary. • Lubricate throttle lever housing and cable.
TIP The air filter needs more frequent service if you are riding in unusually wet or dusty areas. Hydraulic brake service Regularly check and, if necessary, correct the brake fluid level. Every two years replace the internal components of the brake master cylinder and caliper, and change the brake fluid. Replace the brake hoses every four years and if cracked or damaged.
1 WARNING A WARNING indicates a hazardous situation which, if not avoided, could result in death or serious injury. Checking the spark plug The spark plug is an important engine component, which is easy to check. Since heat and deposits will cause any spark plug to slowly erode, the spark plug should be removed and checked in accordance with the periodic maintenance and lubrication chart. In addition, the condition of the spark plug can reveal the condition of the engine. 8 1. Spark plug cap 2.
replace it if necessary. Specified spark plug: NGK/CR7HSA To install the spark plug 1. Measure the spark plug gap with a wire thickness gauge and, if necessary, adjust the gap to specification. Spark plug gap: 0.6–0.7 mm (0.024–0.028 in) 1 1. Spark plug wrench To check the spark plug 1. Check that the porcelain insulator around the center electrode of the spark plug is a medium-to-light tan (the ideal color when the ATV is ridden normally).
To check the engine oil level 1. Place the ATV on a level surface. 2. Check the engine oil level on a cold engine. 2. Clean the surface of the spark plug gasket and its mating surface, and then wipe off any grime from the spark plug threads. 3. Install the spark plug with the spark plug wrench, and then tighten it to the specified torque.
To change the engine oil 1. Place the ATV on a level surface. 2. Start the engine, warm it up for several minutes, and then turn it off. 3. Place an oil pan under the engine to collect the used oil. 4. Remove the engine oil filler cap, and then remove the engine oil drain bolt to drain the oil from the crankcase. 4. Insert the dipstick into the filler hole (without screwing it in), and then remove it again to check the oil level. 1 2 4 1. Maximum level mark 2.
minutes while checking it for oil leakage. If oil is leaking, immediately turn the engine off and check for the cause. 9. Turn the engine off, wait at least ten minutes, and then check the oil level and correct it if necessary. Tightening torque: Engine oil drain bolt: 8 Nm (0.8m·kgf, 5.8 ft·lbf) 7. Add the specified amount of the recommended engine oil, and then install and tighten the engine oil filler cap. Recommended oil: See page 10-1. Oil quantity: 0.8 L (0.84 US qt) (0.70 Imp.
1 Final transmission oil The final transmission case must be checked for oil leakage before each ride. If any leakage is found, have a Yamaha dealer check and repair the ATV. In addition, the final transmission oil must be changed at the intervals specified in the periodic maintenance and lubrication chart. To change the final transmission oil 1. Place the ATV on a level surface. 2. Place an oil pan under the final transmission. 3.
Tightening torque: Final transmission oil drain bolt: 15 Nm (1.5 m·kgf, 10.8 ft·lbf) 5. Add the specified amount of the recommended final transmission oil, and then check the oil level. Recommended final transmission oil: See page 10-1. Oil quantity: 0.30 L (0.32 US qt) (0.27 Imp.qt) 8 Cleaning the air filter element The air filter element should be cleaned at the intervals specified in the periodic maintenance and lubrication chart.
1 2 2 1 2 1. Air filter case check hose (right) 1. Air filter case cover (right) 2. Bolts 1. Remove the air filter case cover by removing the bolts. 2 2 8 1 2 1. Air filter case cover (left) 2.
2. Remove the air filter element by removing the screw, and then pull off the sponge material from the air filter element holder. WHAT CAN HAPPEN Low-flash-point solvents or gasoline can catch fire or explode. HOW TO AVOID THE HAZARD Use parts cleaning solvent to clean the sponge material. 2 1 4. Squeeze the excess solvent out of the sponge material and let it dry. NOTICE Do not twist the sponge material when squeezing it. 8 1. Air filter element holder 2. Sponge material 3.
ement removed. This will allow unfiltered air to enter the engine, causing rapid engine wear and possible engine damage. Additionally, operation without the air filter element will affect carburetor jetting with subsequent poor performance and possible engine overheating. 6. Apply Yamaha foam air filter oil or other quality foam air filter oil to the sponge material. TIP The sponge material should be wet but not dripping. 7. Install the sponge material onto the air filter element holder. 8.
Cleaning the spark arrester 2. Remove the spark arrester by pulling it out of the muffler. 3. Tap the spark arrester lightly, and then use a wire brush to remove any carbon deposits. 4. Insert the spark arrester into the muffler and align the screw holes. 5. Install the screw and nut, and then tighten the nut. Be sure the exhaust pipe and muffler are cool before cleaning the spark arrester. 1. Remove the screw and nut. 2 1 8 3 1. Spark arrester 2. Screw 3.
Adjusting the carburetor WARNING The carburetor should be checked and, if necessary, adjusted at the intervals specified in the periodic maintenance and lubrication chart. The carburetor is an important part of the engine and requires very sophisticated adjustment. Therefore, most carburetor adjustments should be left to a Yamaha dealer, who has the necessary professional knowledge and experience.
tion chart. TIP A diagnostic tachometer is needed to make this adjustment. (a) (b) 1 1. Start the engine and warm it up. TIP The engine is warm when it quickly responds to the throttle. 8 2. Attach the tachometer to the spark plug lead. 3. Check the engine idling speed and, if necessary, adjust it to specification by turning the throttle stop screw at the carburetor.
The throttle cable free play should measure 1.0– 3.0 mm (0.04–0.12 in) at the throttle lever. Periodically check the throttle cable free play and, if necessary, have a Yamaha dealer adjust it. Valve clearance The valve clearance changes with use, resulting in improper air-fuel mixture and/or engine noise. To prevent this from occurring, the valve clearance must be adjusted by a Yamaha dealer at the intervals specified in the periodic maintenance and lubrication chart.
to check the brake shoe wear without having to disassemble the brake. To check the brake shoe wear, there are two adjusting bolts to indicate brake shoe wear. If the positions of adjusting bolts reach to 12mm (0.47in), the brake shoes should be replaced as a set by Yamaha dealer. 3 TIP Before adjusting the brake lever free play, check the front brake shoes for wear. The brake lever free play should measure 4.0– 6.0 mm (0.16–0.24 in) as shown. If the free play is incorrect, adjust it as follows.
1 2 1 (a) (b) (a) (b) 3 4 1. 2. 3. 4. 1. Cable joint Upper locknut Upper adjusting bolt Lower locknut Lower adjusting bolt 6. Tighten the upper locknut. WARNING 4. Tighten the lower locknut. 5. While applying the front brake, turn out the upper adjusting bolt until the upper and lower cable lengths are equal. The cable joint will become vertical. POTENTIAL HAZARD Operating with improperly serviced or adjusted brakes. WHAT CAN HAPPEN You could lose braking ability, which could lead to an accident.
HOW TO AVOID THE HAZARD After servicing: Make sure the brakes operate smoothly and that the free play is correct. Make sure the brakes do not drag. Replacement of brake components requires professional knowledge. These procedures should be performed by a Yamaha dealer. 1 1. Wear indicator groove Checking the rear brake pads 8 The rear brake pads must be checked for wear at the intervals specified in the periodic maintenance and lubrication chart.
Checking the rear brake lever free play LOWER The brake lever free play must be checked at the intervals specified in the periodic maintenance and lubrication chart. The brake lever free play should measure 0 –1.5 mm (0 –0.06 in) as shown. If the free play is incorrect, have a Yamaha dealer check the brake system. 1 1.
WARNING POTENTIAL HAZARD Recommended lubricant: Engine oil Operating with improperly serviced or adjusted brakes. WARNING POTENTIAL HAZARD WHAT CAN HAPPEN You could lose braking ability, which could lead to an accident. Damaged control cables. WHAT CAN HAPPEN HOW TO AVOID THE HAZARD 8 Corrosion can result when the cable sheaths become damaged, and cables can also become frayed or kinked, which could restrict the operation of controls and lead to an accident or injury.
Battery Recommended lubricant: Front brake lever: Lithium-soap-based grease Rear brake lever: Silicone grease This model is equipped with a VRLA (Valve Regulated Lead Acid) battery. There is no need to check the electrolyte or to add distilled water. However, the battery lead connections need to be checked and, if necessary, tightened. NOTICE 1 Never attempt to remove the battery cell seals, as this would permanently damage the battery. WARNING 1.
Avoid contact with skin, eyes or clothing. Always shield eyes when working near batteries. Keep out of reach of children. Antidote: EXTERNAL: Flush with water. INTERNAL: Drink large quantities of water or milk. Follow with milk of magnesia, beaten egg or vegetable oil. Get prompt medical attention. EYES: Flush with water for 15 minutes and get prompt medical attention. Keep batteries away from sparks, flames, cigarettes or other sources of ignition. Ventilate when charging or using in a closed space.
NOTICE Always keep the battery charged. Storing a discharged battery can cause permanent battery damage. To charge a VRLA (Valve Regulated Lead Acid) battery, a special (constant-voltage) battery charger is required. Using a conventional battery charger will damage the battery. If you do not have access to a constant-voltage battery charger, have a Yamaha dealer charge your battery. (See page 4-11.) If the fuse is blown, replace it as follows. 1. Turn the key to “OFF” and turn off all electrical circuits.
3. Turn the key to “ON” and turn on the electrical circuits to check if the devices operate. 4. If the fuse immediately blows again, have a Yamaha dealer check the electrical system.
Removing a wheel 2. Elevate the ATV and place a suitable stand under the frame. 3. Remove the nuts from the wheel. 4. Remove the wheel. 1. Loosen the wheel nuts. 1 8 1.
Installing a wheel 2. Lower the ATV to the ground. 3. Tighten the wheel nuts to the specified torques. 1. Install the wheel and the nuts. TIP When installing the wheel, make sure its arrow mark points toward the rotating direction of the wheel. Front 1 8 1. Arrow mark 8-33 Tightening torques: Front wheel nut: 45 Nm (4.5 m·kgf, 33 ft·lbf) Rear wheel nut: 45 Nm (4.
HOW TO AVOID THE HAZARD Do not smoke when checking the fuel system. Make sure there are no open flames or sparks in the area, including pilot lights from water heaters or furnaces. Troubleshooting Although Yamaha ATVs receive a thorough inspection before shipment from the factory, trouble may occur during operation. Any problem in the fuel, compression, or ignition systems, for example, can cause poor starting and loss of power.
Troubleshooting chart 1. Fuel There is enough fuel. Check the compression. There is no fuel. Supply fuel. There is compression. Check the ignition. There is no compression. Have a Yamaha dealer check the ATV. Check the fuel level in the fuel tank. The engine does not start. Check the compression. 2. Compression Operate the electric starter. 3. Ignition 8 Wet Wipe off with a dry cloth and correct the spark plug gap, or replace the spark plug.
CLEANING AND STORAGE applications such as those available in coinoperated car washers. Cleaning Frequent, thorough cleaning of your ATV will not only enhance its appearance but will improve its general performance and extend the useful life of many components. 1. Before cleaning the ATV: a. Block off the end of the exhaust pipe to prevent water entry. A plastic bag and strong rubber band may be used. b. Make sure the spark plug and all filler caps are properly installed. 2.
nia) and areas where strong chemicals are stored. WARNING POTENTIAL HAZARD Operation with wet brakes after washing. WHAT CAN HAPPEN Wet brakes may have reduced stopping ability, increasing the chance of an accident. HOW TO AVOID THE HAZARD Test the brakes after washing. Apply the brakes several times at slow speeds to let friction dry out the linings. Long-term Before storing your ATV for several months: 1. Follow all the instructions in the “Cleaning” section of this chapter. 2.
6. 7. 8. 9. plug, and then place the spark plug on the cylinder head so that the electrodes are grounded. (This will limit sparking during the next step.) d. Turn the engine over several times with the starter. (This will coat the cylinder wall with oil.) e. Remove the spark plug cap from the spark plug, and then install the spark plug and the spark plug cap. Lubricate all control cables and the pivoting points of all levers and pedals.
SPECIFICATIONS Compression ratio: Dimensions: 10.2 : 1 Overall length: 1490 mm (58.7 in) Overall width: 885 mm (34.8 in) Overall height: 910 mm (35.8 in) Seat height: 654 mm (25.7 in) Wheelbase: 1010 mm (39.8 in) Ground clearance: 100 mm (3.
Transmission: Engine oil quantity: Periodic oil change: 0.8 L (0.84 US qt) (0.70 Imp.qt) Primary reduction system: V-belt Primary reduction ratio: 2.47-0.61:1 Secondary reduction system: Spur Secondary reduction ratio: 41/15 × 45/13 (9.462) Third reduction system: Chain drive Third reduction ratio: 28/13(2.154) Transmission type: V-belt automatic Final transmission oil: Type: SAE80 API GL-4 Hypoid gear oil Quantity: 0.30 L (0.32 US qt) (0.27 Imp.
Front wheel: Rear tire: Wheel type: Panel wheel Rim size: 8 x 5.5AT Type: Tubeless Size: AT18 x 9-8 Manufacturer/model: MAXXIS/M940 Rear wheel: Wheel type: Panel wheel Rim size: 8 x 7AT Loading: Maximum loading limit: 70.0 kg (154 lb) (Total weight of rider, cargo, accessories, and tongue) Front brake: Type: Drum brake Operation: Right hand operation Tire air pressure (measured on cold tires): Recommended: Front: 25 kPa (3.6 psi) (0.25 kgf/cm2) Rear: 25 kPa (3.6 psi) (0.
Wheel travel: 111 mm (4.4 in) Rear suspension: Type: Swingarm Spring/shock absorber type: Coil spring/oil damper Wheel travel: 83 mm (3.3 in) Electrical system: Ignition system: CDI Charging system: AC magneto Battery: Model: GTX5L-BS Voltage, capacity: 12 V, 4.
CONSUMER INFORMATION Identification numbers Key identification number The key identification number is stamped into the key. Record this number in the space provided and use it for reference when ordering a new key. Record the key identification number, vehicle identification number and model label information in the spaces provided below for assistance when ordering spare parts from a Yamaha dealer or for reference in case the ATV is stolen.
1 1 1. Vehicle identification number 1. Model label TIP The vehicle identification number is used to identify your ATV. Model label The model label is affixed at the location in the illustration. Record the information on this label in the space provided. This information will be needed when ordering spare parts from a Yamaha dealer.
Noise regulation TAMPERING WITH NOISE CONTROL SYSTEM PROHIBITED: Federal law prohibits the following acts or the causing thereof: (1) The removal or rendering inoperative by any person other than for purposes of maintenance, repair, or replacement of any device or element of design incorporated into any new vehicle for the purpose of noise control prior to its sale or delivery to the ultimate purchaser or while it is in use or (2) the use of the vehicle after such device or element of design has been remove
Maintenance record Copies of work orders and/or receipts for parts you purchase and install will be required to document maintenance done in accordance with the warranty. The chart below is printed only as a reminder to you that the maintenance work is required. It is not acceptable proof of maintenance work.
YAMAHA MOTOR CORPORATION, U.S.A. ATV LIMITED WARRANTY Yamaha Motor Corporation, U.S.A. hereby warrants that new Yamaha ATVs purchased from an authorized Yamaha ATV dealer in the continental United States will be free from defects in material and workmanship for the period of time stated herein, subject to certain stated limitations. THE PERIOD OF WARRANTY for Yamaha ATVs shall be six (6) months from the date of purchase.
WARRANTY QUESTIONS AND ANSWERS CUSTOMER SERVICE Q. What costs are my responsibility during the warranty period? A. The customer’s responsibility includes all costs of normal maintenance services, non-warranty repairs, accident and collision damages, and oil, oil filters, air filters, spark plugs, and brake shoes. If your machine requires warranty service, you must take it to any authorized Yamaha ATV dealer within the continental United States.
YAMAHA EXTENDED SERVICE (Y.E.S.) In addition, Travel and Recreation Interruption Protection (TRIP) is included at no extra cost. TRIP gives you up to $150 reimbursement per occurrence for any reasonable expenses you incur because your Yamaha needs covered service: replacement vehicle rental, emergency towing, phone calls, even food and lodging when you are away from home. This superb coverage goes into effect when you purchase Y.E.S.
We urge you to act now. You’ll get the excellent benefits of TRIP coverage right away, and you’ll rest easy knowing you’ll have strong factory-backed protection even after your Yamaha Limited Warranty expires. You can also save money: Y.E.S. costs less within the first 90 days after you buy your Yamaha. See your dealer today! A special note: If visiting your dealer isn’t convenient, contact Yamaha with your Primar y ID number (your frame number). We’ll be happy to help you get the Y.E.S. coverage you need.
11 11-9
INDEX A Engine oil............................................................5-3, 8-11 Engine, starting a warm................................................6-3 Engine stop switch.......................................................4-2 Engine speed limiter plate............................................ 4-5 Accessories and loading ................................................ 6-6 Air filter element, cleaning............................................ 8-15 B Battery..............................
O Owner’s manual and tool kit........................................... 8-1 P Parking ........................................................................... 6-4 Parking brake ................................................................. 4-7 Parking on a slope ......................................................... 6-5 Part locations ................................................................. 3-1 Pre-operation check list..................................................
WARNING Improper ATV use can result in SEVERE INJURY or DEATH. BEER BEER ALWAYS USE AN APPROVED HELMET AND PROTECTIVE GEAR NEVER operate: NEVER USE ON PUBLIC ROADS NEVER CARRY PASSENGERS NEVER USE WITH DRUGS OR ALCOHOL ALWAYS: without proper training or instruction. use proper riding techniques to avoid at speeds too fast for your skills or the vehicle overturns on hills and rough conditions. terrain and in turns.
NO POSTAGE NECESSARY IF MAILED IN THE UNITED STATES FIRST CLASS PERMIT NO. 4 CYPRESS, CA POSTAGE WILL BE PAID BY ADDRESSEE YAMAHA MOTOR CORPORATION U.S.A. P.O.