Introduction D I G I TA L P I A N O Reference P-125 P-121 Appendix Owner’s Manual Before using the instrument, be sure to read “PRECAUTIONS” on pages 5 – 6.
OBSERVERA! Apparaten kopplas inte ur växelströmskällan (nätet) så länge som den ar ansluten till vägguttaget, även om själva apparaten har stängts av. ADVARSEL: Netspændingen til dette apparat er IKKE afbrudt, sålænge netledningen sidder i en stikkontakt, som er tændt — også selvom der er slukket på apparatets afbryder. VAROITUS: Laitteen toisiopiiriin kytketty käyttökytkin ei irroita koko laitetta verkosta.
Information for users on collection and disposal of old equipment: This symbol on the products, packaging, and/or accompanying documents means that used electrical and electronic products should not be mixed with general household waste. For proper treatment, recovery and recycling of old products, please take them to applicable collection points, in accordance with your national legislation.
PRECAUTIONS PLEASE READ CAREFULLY BEFORE PROCEEDING Please keep this manual in a safe and handy place for future reference. For AC adaptor WARNING CAUTION • This AC adaptor is designed for use with only Yamaha electronic instruments. Do not use for any other purpose. • Indoor use only. Do not use in any wet environments. • When setting up, make sure that the AC outlet is easily accessible.
CAUTION Always follow the basic precautions listed below to avoid the possibility of physical injury to you or others, or damage to the instrument or other property. These precautions include, but are not limited to, the following: Power supply/AC adaptor Connections • Do not connect the instrument to an electrical outlet using a multiple-connector. Doing so can result in lower sound quality, or possibly cause overheating in the outlet.
Contents Panel Controls and Terminals Setting Up 9 10 Power Requirements ............................................ 10 Turning the Power On/Standby............................. 10 Auto Power Off Function....................................... 10 Adjusting the Master Volume ................................ 11 Operation Confirmation Sounds............................ 11 Using Headphones ............................................... 11 Using a Pedal (Sustain) ........................................
Thank you for purchasing this Yamaha Digital Piano! This instrument provides exceptionally high-quality sound and expressive control for your playing enjoyment. We recommend that you read this manual carefully so that you can fully take advantage of the advanced and convenient functions of the instrument. We also recommend that you keep this manual in a safe and handy place for future reference. About the Manuals This instrument has the following documents and instructional materials.
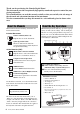
Panel Controls and Terminals Introduction w e r t y !0 C0 C1 !1 o i !2 !3 !4 Shows the jacks and terminals as seen when viewed from the rear of the instrument. * This illustration is of the P-125. A-1 u Introduction q C2 C3 C4 C5 C6 C7 P-121 Please note that the P-125 and P-121 have different numbers of keys: the P-125 has 88 keys, and the P121 has 73 keys.
Setting Up Power Requirements Connect the AC adaptor in the order shown in the illustration. The [ ] (Standby/On) switch lights up. Adjust the volume as desired while playing the keyboard. e Press and hold the [ ] (Standby/On) switch for about a second to turn the power to standby mode. Introduction CAUTION • Even when the power switch is turned off, electricity is still flowing to the product at the minimum level.
Setting Up Operation Confirmation Sounds To adjust the volume of the entire keyboard sound, use the [MASTER VOLUME] while playing the keyboard. When a setup is changed using a button and key combination, an operation sound (“On,” “Off,” click, tempo value input) is sounded. This confirmation sound can be enabled (On) or disabled (Off) as desired.
Setting Up Using a Pedal (Sustain) Introduction You can produce a natural sustain as you play by pressing the included footswitch plugged into the [SUSTAIN] jack. Also an optional FC3A foot pedal or FC4A or FC5 footswitch can be connected to this jack. The FC3A lets you use the Half Pedal function. Damper Resonance When you select a Piano Voice, pressing the footswitch activates the Damper Resonance/ Sustain sampling effect (when on) to accurately recreate the resonance of an acoustic piano’s strings.
Selecting & Playing Voices The instrument has a wide variety of Voices, or instrument sounds, for your enjoyment, including Piano and Organ. NOTE Selecting a Voice The Voices of the instrument are conveniently divided into specific groups and each of them are assigned to the Voice buttons. 1 Press a Voice button (page 9). A Voice is called up from the selected group. Try playing the keyboard and listening to the sound.
Selecting & Playing Voices To adjust the balance between two Voices: Layering Two Voices (Dual) You can layer two Voices and play them simultaneously to create a more richly textured sound. 1 C0 C2 C3 C4 C5 C6 C1 C2 C3 C4 C5 C6 C7 P-121 Engage Dual. Choose two desired Voices, then press those Voice buttons simultaneously.
Selecting & Playing Voices Splitting the Keyboard (Split) Playing Duo Split mode enables you to play two different Voices on the keyboard — for example, acoustic bass with your left hand and piano with your right. This function allows two different players to play the instrument, one on the left and the other on the right, over the same octave range. 1 1 Press [+BASS] to engage Split. The keyboard is divided into the two sections with the F#2 key as the Split Point. Play the keyboard. Engage Duo.
Using the Metronome The Metronome is convenient for practicing with an accurate tempo. 1 Press [METRONOME] to start the Metronome. To specify a three-digit value: For example to specify “80,” press the relevant G1 (8) and A1 (0) keys in order. A numeric value is read out when a relevant key is pressed. C0 2 Press [METRONOME] again to stop the Metronome.
Setting Various Items for Performances To set items shown in the tables below, hold down the corresponding buttons or button, and press the corresponding keys on the keyboard. Refer to the separate “Quick Operation Guide.” Tuning C0 Transpose C1 C3 C2 C1 C#1 C4 C5 C6 C7 F#2 B2 C#3 F#3 C3 P-121 P-125 Item Description Using the Tuning setting, you can fine tune the pitch of the entire instrument.
Playing Back Songs Listening to the Voice Demo Songs Special individual Demo Songs are provided for all of the Voices of the instrument (except the Bass Voice Variations 1 – 3). 1 While holding down [DEMO/SONG], press one of the Voice buttons as necessary times to select a desired Voice. The Demo Songs for all Voices will play back in sequence. During playback, you can change the Demo Song by selecting a different Voice.
Song Playback and Practice of Each Part Using Quick Play Second lowest key: On This Quick Play feature enables you to specify whether a Song should play back immediately from the very first note, or play back any silence or rests that exist before the first note. While holding down [DEMO/SONG], press the lowest key to turn this function off or second lowest key to turn on.
Adding Accompaniment to Your Performance (Rhythm) You can select a Rhythm (drums and bass accompaniment) from a variety of musical genres, such as Pop and Jazz, and play along with it. Refer to the Rhythms on page 28. 1 While holding [RHYTHM], press one of the C3 – G4 keys to select the desired Rhythm. For details on which Rhythm is assigned to each key, see separate “Quick Operation Guide.” NOTE • For details on how to play Chords, refer to commercially available chord books.
Recording Your Performance You can record your keyboard performance as a User Song in SMF format. Up to two Parts (L and R) can be recorded separately. NOTICE • Note that the Recording operation replaces already recorded data with the newly recorded data, since only one User Song is available. To save the recorded data, transfer it to a computer as an SMF file. For details, refer to “Computer-related Operations” on page 8.
Recording Your Performance To record the right part ([R]): Deleting the User Song 1 q w While holding down 2 To record the left part ([L]): While holding down [], press [DEMO/ SONG]. The [] and [/] lamps flash (in alternation). To exit from this status, press []. Press [/] to delete the data of the entire Song. After the operation is completed, [] and [/] lamps turn off.
Connecting Other Equipment CAUTION • Before connecting the instrument to other electronic components, turn off the power to all the components. Before turning the power on or off to all components, set all volume levels to minimum (0). Otherwise, electrical shock or damage to the components may result. Use these jacks to connect your digital piano to powered speakers and the like in order to play at higher volumes. Refer to the diagram below and use audio cables for connection.
Data Backup and Initializing Playback/Recording of Audio Data (USB audio interface) [USB TO HOST] terminal Instrument Computer USB cable NOTICE • Use an AB type USB cable of less than 3 meters. USB 3.0 cables cannot be used. Types of file that can be exchanged with a computer Reference Songs: • User Song (USERSONG00 .mid) • External Songs: files with a .
Troubleshooting Appendix Problem Possible Cause and Solution When the instrument is turned on or off, a popping sound is temporarily produced. This is normal and indicates that the instrument is receiving electrical power. The instrument does not turn on. The instrument has not been plugged in properly. Securely connect the AC adaptor to the DC IN jack on the instrument and to the AC outlet (page 10). When the instrument is turned on, the power turns off suddenly and unexpectedly.
Voice List (Detailed) Voice Button (Group) Variation Voice Name Grand Piano This sound was sampled from a concert grand piano. It uses different samples depending on the strength of your playing and produces smoother tonal changes. Even the tonal changes produced by the damper pedal and the subtle sounds of releasing a key are reproduced. The sympathetic vibration (string resonance) that occurs among the strings of an acoustic piano has also been simulated.
Index Numerics P 50 Preset Songs .....................................................18, 28 AC adaptor ..................................................................10 Accessories ...................................................................8 Accompaniment ..........................................................20 Audio Loop Back .......................................................24 Auto Power Off ...........................................................10 Part .......................
List 50 Preset Songs (50 Classical Music Masterpieces) No. Key 1 2 3 4 C2 C#2 D2 D#2 5 E2 6 7 8 9 10 11 12 13 14 15 F2 F#2 G2 G#2 A2 A#2 B2 C3 C#3 D3 16 D#3 17 18 E3 F3 19 F#3 20 G3 21 G#3 22 A3 23 A#3 Appendix 24 B3 25 C4 26 C#4 27 D4 28* 29 30 D#4 E4 F4 31 F#4 32* G4 33* G#4 34 A4 35 A#4 36 B4 37* C5 38* C#5 39* D5 40 D#5 41 E5 42 F5 43 F#5 44 G5 45 G#5 46 A5 47 A#5 48* B5 49* C6 50 C#6 Song Name Composer Arrangements Canon D dur J. Pachelbel Air On the G String J.
Memo
For details of products, please contact your nearest Yamaha representative or the authorized distributor listed below. FRANCE NORTH AMERICA CANADA Yamaha Canada Music Ltd. 135 Milner Avenue, Toronto, Ontario M1S 3R1, Canada Tel: +1-416-298-1311 U.S.A. Yamaha Corporation of America 6600 Orangethorpe Avenue, Buena Park, CA 90620, U.S.A. Tel: +1-714-522-9011 CENTRAL & SOUTH AMERICA MEXICO Yamaha de México, S.A. de C.V. Av. Insurgentes Sur 1647 Piso 9, Col.
Yamaha Global Site https://www.yamaha.com/ Yamaha Downloads https://download.yamaha.com/ Manual Development Group © 2018 Yamaha Corporation Published 07/2018 POTY*.