PJP-50USB Conference Microphone Speaker VOL 3 CLEAR 1 4 7 2 5 6 MIC MUTE 9 8 0 STANDBY ENTER MENU User’s Manual
Contents INTRODUCTION INTRODUCTION Introduction ................................................................................2 Controls and Functions..............................................................3 Top panel..................................................................................3 Side panel .................................................................................4 Bottom panel ............................................................................4 Top screen ......
Introduction Thank you for purchasing Yamaha PJP-50USB. This product is a microphone/speaker unit to be connected to a video or web conference system for use as its audio terminal. Before operating this unit, please read this manual carefully.
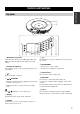
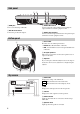
Controls and Functions INTRODUCTION Top panel 1 2 VOL 3 2 1 5 CLEAR 4 8 7 6 MIC MUTE 9 # 0 STANDBY ENTER MENU 3 4 5 6 78 1 Microphone indicators When this unit is turned on, the LEDs light in blue. The LEDs are turned off while the microphones are being muted. 9 0 A 7 / Press either key to select a setting item or move the cursor up or down. 8 ENTER/MENU 2 Arrayed microphones • Press the key to enter a setting. The eight microphones on the top panel pick up the voices of the talkers.
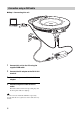
Side panel 1 2 DC IN 12V 3 4 IN AUDIO OUT 1 USB port 3 AUDIO IN terminal Connect to the PC using a USB cable. Connect to the line output terminal or the headphone output terminal of an audio equipment or PC. 2 DC IN 12V terminal 4 AUDIO OUT terminal Connect the provided AC adapter. Connect to the line input terminal or the microphone input terminal of an audio equipment or PC. Bottom panel 1 Serial label 2 The label carries the following information. • MODEL No.: Model number of this unit.
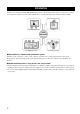
Connection Check the following before connecting this unit to the PC ■System requirement Prepare the supplied USB cable. • USB port: USB 1.1 or later (USB 2.0 recommended) Note Notes Be sure to use the supplied USB cable. Otherwise operation failure may be caused. • You can not connect more than one conference microphone speaker to the PC at the same time.
Connection using a USB cable ■Step 1: Connecting this unit To USB port 4 1 3 1 Connect this unit to the PC using the supplied USB cable. 2 Connect the AC adapter to the DC IN 12V terminal. 3 Connect the power cable to the AC adapter. 4 Connect the power cable to the AC outlet. This unit is turned on. The start-up sound plays and the microphone indicators light up. y You do not need to install the USB driver separately because this unit is recognized as a basic audio device by the PC.
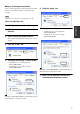
■Step 2: Checking the connection After connecting this unit to the PC, follow the procedure below to check whether the PC recognizes this unit properly. 6 Click the "Voice" tab. Click Note The items in the setting screen vary depending on the PC. When using Windows XP 1 Click [Start] - [Control Panel]. Devices". 3 Click "Sounds and Audio Devices". 7 Configure the settings as shown below.
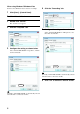
When using Windows 7/Windows Vista In this section, Windows Vista is used as an example. 6 Click the "Recording" tab. 1 Click [Start] - [Control Panel]. 2 Click "Classic View". Click 3 Double-click "Sound". The "Sound" screen appears. 4 Click the "Playback" tab. 7 Configure the setting as shown below. Select "Yamaha PJP-50USB" in "Microphone", and then click "Set Default". Click 5 Configure the setting as shown below. Select "Yamaha PJP-50USB" in "Speakers", and then click "Set Default".
Connection using audio connection cables ■Step 1: Connecting this unit 5 3 2 1 PREPARATION To audio input terminal To audio output terminal 4 1 Connect the AUDIO IN terminal of this unit to the audio output terminal of the PC or video conference system. 2 Connect the AUDIO OUT terminal of this unit to the audio input terminal of the PC or video conference system. 3 Connect the AC adapter to the DC IN 12V terminal. 4 Connect the power cable to the AC adapter.
■Step 2: Changing the settings of the PC When you connect this unit to a PC for use as a microphone/speaker of a conference system, you need to change the setting so that the audio input from this unit to the PC is not output to this unit. It is also necessary to change the setting so that the audio input from the connected terminal is accepted. 6 In the "Mic Volume" field, select the "Mute" checkbox. Note The items in the setting screen vary depending on the PC.
When using Windows 7/Windows Vista 8 In the "Mic Volume" field, clear the In this section, Windows Vista is used as an example. "Mute" checkbox. 1 Click [Start] - [Control Panel]. 2 Click "Classic View". 3 Double-click "Sound". The "Sound" screen appears. PREPARATION 4 Click the "Playback" tab. Click Clear Notes • Which item to mute depends on the connection method. Configure the settings depending on your operating environment. • The name of the checkbox may be "Select" on some PCs.
6 Click the "Levels" tab. 9 Select "Microphone" depending on the connection method, and then click "Properties". The "Microphone Properties" screen appears. Click 7 In the "Microphone" field, click to set the mute function. Click Click 8 Click the "Recording" tab. 10 Click the "Levels" tab. Click Click 11 In the "Microphone" field, click to cancel the mute function. Click Note The items displayed in the screen vary depending on the connection method and PC.
Installation Read the following notes and install this unit where you actually use it, such as a conference room. Notes for installation ■Installation environment ■Position of the talkers This unit can pick up the audio from 360-degree direction. The audio pickup area varies depending on the talkers and settings. For details, refer to "Selecting the audio pickup area (Mic Area)" (page 15).
Changing the Settings of This Unit You can change the settings of this unit using the operation keys on this unit Note For the composition of the setting menus and the content of each setting item, see "Setting Menu List" (page 15). Changing the settings using the keys on this unit Follow the procedure below to change the settings using the operation keys on this unit. 4 Press or to select a setting item, and then press ENTER. For the composition of the setting menus, see "Setting Menu List" (page 15).
Setting Menu List Selecting the audio pickup area (Mic Area) This unit automatically tracks the talker's voice. The talker's voice can be picked up with very narrow directivity so that background noise can be significantly reduced. The voice of only one talker can be picked up at a time. Today... Configuring the acoustic echo cancellation setting (AEC Effect) Configure the acoustic echo cancellation setting depending on your operating environment.
Configuring the environment setting (Environment) Utilize this function to use this unit in multiple environments. Selecting "Environment 1", "Environment 2" or "Environment 3" switches the settings of this unit. To save the settings Before using this function, you need to save the settings to "Environment 1", "Environment 2" or "Environment 3". Follow the procedure below to save the settings. 1 Select "Environment 1", "Environment 2" or "Environment 3".
Troubleshooting Refer to the following tables when this unit does not function properly. If the problem you are experiencing is not listed or the instruction does not solve, please contact the retailer or dealer who you purchased the product from. Q1: LED indicator does not light up Problem The power is not turned on. Cause Remedy The power cable is disconnected or connected improperly. Connect the power cable to the AC outlet and AC adapter firmly.
Using the Latest Features You can download the firmware (program to control the functions of this unit) to use the latest features. For details, refer to "PJP-50USB Writer Instruction Manual" included in the supplied CD-ROM.
Specifications General Audio Interface: Microphones: USB 2.0 (full), Analog I/O (stereo-mini), AC adapter (DC 12V IN) 8 units Speakers: Power consumption (max): 4 units Approx. 9.
November 2010, 3rd edition