BAVL DVD PLAYER DVD-S30 Downloaded From Disc-Player.
CAUTION: READ THIS BEFORE OPERATING YOUR UNIT. 1 2 3 4 5 6 7 8 9 10 11 12 13 14 15 16 17 18 19 To assure the finest performance, please read this manual carefully. Keep it in a safe place for future reference. Install this sound system in a well ventilated, cool, dry, clean place with at least 10 cm on the top, 10 cm on the left and right, and 10 cm at the back of DVD-S30 — away from direct sunlight, heat sources, vibration, dust, moisture, and/or cold.
CAUTION: READ THIS BEFORE OPERATING YOUR UNIT. CAUTION Use of controls or adjustments or performance of procedures other than those specified herein may result in hazardous radiation exposure. ● The name plate is located on the bottom of the unit. MODEL NO. DVD-S30 MADE IN MALAYSIA CAUTION - VISIBLE AND / OR INVISIBLE LASER RADIATION WHEN OPEN. AVOID EXPOSURE TO BEAM. VARNING - SYNLIG OCH / ELLER OSYNLIG LASERSTRÅNING NÄR DENNA DEL ÄR Ö PPNAD. STRÅLEN ÄR FARLIG. VARO ! MODEL NO.
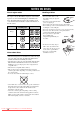
NOTES ON DISCS About region codes Handling of discs The region code (an ID number assigned to each market region) is set for normal DVD players and DVD video discs. The DVD-S30 supports the discs with the region codes shown below. For details, read the information on the disc jacket. • Do not touch the surface of the disc. Hold a disc by its edge and center hole. • Do not leave a disc in the unit when you are not playing it. • Do not write on the disc with a pencil or other marker.
CONTENTS PREPARATION Supplied Parts ........................................................ 2 Controls and Functions ......................................... 3 Front panel ................................................................ 3 Remote control .......................................................... 4 Connections ............................................................ 6 Using the Remote Control ..................................... 7 Replacing the batteries ..............................
PREPARATION PREPARATION Supplied Parts This product consists of the following parts. Before connecting an amplifier or a TV to this product, make sure you received all of the following parts.
PREPARATION Controls and Functions ■ Front panel 2 3 4 PREPARATION 1 5 s STANDBY/ON p e 6 1 STANDBY/ON Turn this unit on or set it to the standby mode. y When the unit is in the standby mode, the unit consumes a small amount of power. 2 Front panel display Displays playback information or settings. 3 (Eject) Ejects a disc in the unit. 7 8 6 Disc loading slot Insert a disc to be played. Note Place the disc with the data side facing down.
PREPARATION ■ Remote control Read the following for the function of each button. The buttons shaded in the illustration below are used to control the YAMAHA AV amplifier “AVC-S30” (included if you purchase DVX-S30). For details on AVC-S30 operations, refer to the “AVX-S30 OWNER’S MANUAL”. 5 TV INPUT* Switches the TV inputs. 1 STANDBY/ON STANDBY/ON 2 DVD F 6 TV CH +/–* Switches the TV channels.
PREPARATION H AUDIO Selects the audio language of the DVD video or the audio channel setting of the video CD and super video CD. (page 15) L/R buttons While a test tone is output volume on the AVC-S30, press L to set the orientation of the virtual surround speaker (L), and press R to set the orientation of the virtual surround speaker (R). SW +/–: Adjusts the subwoofer channel volume on the AVC-S30. CENTER +/–: Adjusts the center speaker channel volume on the AVC-S30.
PREPARATION Connections This section explains how to connect the DVD-S30 to your TV or external AV amplifier (AVC-S30 etc.). For connections related to external AV amplifier, refer to the manual for it. Note Connect the power cord of the DVD player or external components after connection of all cables are complete. SCART (U.K. model only) TV (monitor) VIDEO INPUT Video pin cable (supplied) to AC outlet AV amplifier (AVC-S30 etc.
PREPARATION Using the Remote Control Use the remote control within 6 m (20 feet) of the DVD player and point it toward the remote control sensor. PREPARATION Notes s STANDBY/ON p Within 6 m (20 feet) e 30˚ 30˚ • Be careful not to spill liquid on the remote control. • Be careful not to drop the remote control.
OPERATION OPERATION Getting Started Before starting playback operation, follow the procedure below to set up the DVD player settings. STANDBY/ON STANDBY/ON DVD ANGLE Number buttons 1 2 3 SW CENTER SURR STANDBY/ON (DVD) 4 ZOOM 5 6 7 8 REPEAT A-B AUDIO SUBTITLE 9 0 SHIFT ■ Step 2: Setting the TV color system This unit is compatible with both NTSC and PAL. Select the color system that matches your TV. (The default setting is “PAL” for U.K.
OPERATION 4 Press or to select “OK”, and then press ENTER. Repeat step 4 in the re-confirmation screen. CHANGING MULTI TO PAL: OK If you set the disc language, this unit will automatically switch to the selected language (for audio, subtitle and disc menu) when a disc is loaded. If the selected language is not available on the disc, the disc’s default language will be used instead. (The default setting is “ENGLISH” for audio and disc menu and “OFF” for subtitle.
OPERATION Supported Disc Types You can enjoy movie or music discs with this unit. Since some disc operations are limited to specific disc types, the supported disc types are indicated using the icons shown below. Each icon means that the operation is limited to the corresponding disc type. Operations with no icon indicated are available for all disc types.
OPERATION Basic Playback Operations Follow the procedures below to carry out basic disc playback operations. Notes To advance frame-by-frame DVD • If the inhibit icon ( or ) appears on the TV when a button is pressed, it means the function is not available on the current disc or the current status. • Depending on the disc, some operations may be different or restricted. Press to pause playback, then press repeatedly. Each time you press , playback advances one frame at a time.
OPERATION Repeating Playback (Repeat Play) You can repeat single chapter (track), single title, or entire disc. Also, you can set two points to repeat the specified section of a title (track) with A-B Repeat. ■ To repeat between two points (A-B Repeat) Notes • Repeat Play may not work depending on DVD disc types. • The Shuffle feature is not available for DVD-VRs. • Repeat Play does not work while playing back a VCD or SVCD using the Playback Control feature (page 16).
OPERATION Specifying an elapsed time for playback (Time Search) Press or to select “TT TIME” or “CH TIME”, and then press . TT TIME: Select this if you want to specify an elapsed time for the current title. CH TIME: Select this if you want to specify an elapsed time for the current chapter. 3 Use the Number buttons to enter hours, minutes, and seconds. Playback skips to the specified position. You can specify an elapsed time where you want playback to start.
OPERATION ■ Time Search on CD 1 Press ON SCREEN repeatedly to select “DISC GO TO”, “TRACK GO TO” or “SELECT TRACK”. ↓ DISC GO TO: (Specify an elapsed time for the entire disc) ↓ TRACK GO TO: (Specify an elapsed time for the current track) ↓ SELECT TRACK: (Specify a track number) Customizing Playback Order (Program Play) You can customize the playback order for chapters or tracks stored in the disc. This unit can memorize playback order of 10 discs (20 chapters or 20 tracks for each disc).
OPERATION 6 Zooming the Picture To start playback with the Program Play feature, press , , or to select “START”, and then press ENTER. DVD VCD You can zoom in or zoom out the picture during disc playback. y , , or to STANDBY/ON STANDBY/ON DVD OPERATION • To cancel the Program Play feature, press , , or select “Exit” in the program list, then press ENTER. • To remove a chapter or track from Program Play, press ANGLE to select the program number, then press ENTER.
OPERATION Selecting a Viewing Angle ■ To operate the DVD menu DVD 1 You can select the desired viewing angle during DVD playback. DVD Press MENU to display the DVD menu on the TV. y Note This selection is available only with multi-angle compatible discs. Also, viewing angles available for each disc may vary. For information on your disc, refer to the operating instructions in the disc’s menu or on its jacket.
OPERATION Restricting Playback DVD You can set playback restrictions for certain discs using Parental Control. Only users who know the password (page 18) can access the locked discs. ■ Setting the Parental Control level STANDBY/ON STANDBY/ON Press the number buttons to enter the 6-digit password, then press ENTER. Notes • The default password is “000000”. To change the password, carry out the “Changing the password” procedure (page 18).
OPERATION To disable a lock applied to a disc Select “UNLOCK” in step 3. y • To return to the previous menu, press . To close the Setup menu, press SETUP. • To unlock the Disc Lock temporarily for playback, use the Number buttons to enter the password in the password input area (displayed when the locked disc is loaded), and then press ENTER. ■ Changing the password Follow the procedure below to change the password to access locked disc temporarily. 1 Press SETUP to display the Setup menu on the TV.
OPERATION y Setting the Remote Control Code If you set the remote control code (page 29) for your TV on the remote control of this unit, you can operate the specific functions of your TV with the remote control. Note Depending on the product, this unit’s remote control may not be able to operate some TVs. In this case, use the remote control supplied with the TV.
OPERATION Changing Playback Settings on the TV (On-Screen Menu) You can view and change the settings for the current DVD or VCD (SVCD) playback using the TV (On-Screen menu). Note Displaying the On-Screen menu for a VCD or SVCD automatically closes the Playback Control menu (page 16). y Although the On-Screen menu is shown in English in the procedure below, you can display the menu in other language by setting the OSD language (page 9).
OPERATION Configuring the Various Parameters (Setup Menu) STANDBY/ON Press SETUP to display the Setup menu on the TV. 2 Press or to select “GENERAL SETUP PAGE”, “AUDIO SETUP PAGE”, “VIDEO SETUP PAGE” or “PREFERENCE PAGE”. Note “PREFERENCE PAGE” is available only when no disc is inserted or the unit is in the Stop mode (page 11). STANDBY/ON DVD ANGLE Number buttons 1 2 3 SW CENTER SURR 5 6 7 REPEAT A-B AUDIO 9 0 4 3 Press or to select the desired menu, then press .
OPERATION ■ Setup menu items Page Menu Submenu GENERAL DISC LOCK SETUP PAGE DISPLAY DIM PROGRAM See page 17 for details. (Default: UNLOCK) You can set brightness for the front panel display. (Default: 100%) 100%: Full brightness 70%: Medium brightness 40%: Dimming the front panel display INPUT MENU See page 14 for details. OSD LANGUAGE See page 9 for details. (Default: ENGLISH) SCREEN SAVER The screen saver function allows you to prevent the TV screen from burn-in.
OPERATION Page Menu Submenu VIDEO SETUP TV TYPE PAGE *2 Parameter See page 8 for details. (Default: PAL for U.K. and Australia models, MULTI for Taiwan and Asia models) You can set the aspect ratio of this unit according to the TV. When the selected format is not available on the disc, this setting will not affect the disc playback. (Default: 4:3 PAN SCAN) 4:3 PAN SCAN: Select this if you have a normal TV and want both sides of the picture to be trimmed or formatted to fit your TV screen.
ADDITIONAL INFORMATION ADDITIONAL INFORMATION Troubleshooting If there is any problem with your system, check the following items. If you cannot solve your problem with the following remedies or if your problem is not listed below, turn off and unplug the unit, then consult the nearest authorized YAMAHA dealer or service center. ■ General Problem Power turns on but immediately shuts off Cause Solution The power cable may be connected improperly.
ADDITIONAL INFORMATION ■ Disc playback Problem A disc cannot be inserted into this unit Cause Solution Turn on this unit and insert the disc after “NO DISC” appears on the front panel display. This unit is in the initialization process. Wait for a while and insert the disc after “NO DISC” appears on the front panel display. This unit is not ready for disc loading. Wait for a while and insert the disc after “NO DISC” appears on the front panel display. Another disc is already inserted into this unit.
ADDITIONAL INFORMATION Glossary ■ Channel (ch) ■ PCM (Pulse Code Modulation) A channel is an audio type that has been divided based on range and other characteristics. Ex. 5.1 channel • Front speakers, Left (1ch), Right (1ch) • Center speaker (1 ch) • Surround speakers, Left (1ch), Right (1ch) • Subwoofer (1 ch x 0.1* = 0.1 ch) A signal that is changed to digital format without compression. A CD is recorded with 16-bit sound at 44.
ADDITIONAL INFORMATION Copyright and Logo Marks ADDITIONAL INFORMATION This product incorporates copyright protection technology that is protected by method claims of certain U.S. patents and other intellectual property rights owned by Macrovision Corporation and other rights owners. Use of this copyright protection technology must be authorized by Macrovision Corporation, and is intended for home and other limited viewing uses only unless otherwise authorized by Macrovision Corporation.
ADDITIONAL INFORMATION Language Codes If your desired language for “AUDIO” “SUBTITLE” and “DISC MENU” is not listed in the Setup menu (page 9), select “OTHER”, then enter the 4-digit language code for your desired language.
ADDITIONAL INFORMATION Remote Control Codes If you set the remote control code for your TV on the remote control of this unit (page 19), you can operate the specific functions of your TV with the remote control. Notes • Depending on the product, this unit’s remote control may not be able to operate some TVs. In this case, use the remote control supplied with the TV. • If there are multiple choices of remote control codes for your TV, try them in order until you find the proper code.
ADDITIONAL INFORMATION Specifications AUDIO SECTION GENERAL • • • • • • Power Supply U.K. model .......................................................... AC 230 V, 50 Hz Australia model ................................................... AC 240 V, 50 Hz Korea model......................................................... AC 220 V, 60 Hz Taiwan model.......................................... AC 110–120 V, 50/60 Hz Asia model..............................................
© 2005 YAMAHA ELECTRONICS CORPORATION, USA 6660 ORANGETHORPE AVE., BUENA PARK, CALIF. 90620, U.S.A. YAMAHA CANADA MUSIC LTD. 135 MILNER AVE., SCARBOROUGH, ONTARIO M1S 3R1, CANADA YAMAHA ELECTRONIK EUROPA G.m.b.H. SIEMENSSTR. 22-34, 25462 RELLINGEN BEI HAMBURG, GERMANY YAMAHA ELECTRONIQUE FRANCE S.A. RUE AMBROISE CROIZAT BP70 CROISSY-BEAUBOURG 77312 MARNE-LA-VALLEE CEDEX02, FRANCE YAMAHA ELECTRONICS (UK) LTD. YAMAHA HOUSE, 200 RICKMANSWORTH ROAD WATFORD, HERTS WD18 7GQ, ENGLAND YAMAHA SCANDINAVIA A.B.