
Conference Phone User Manual


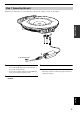
Table Of Contents
- Important Safety Instructions
- Caution: Read This Before Operating Your Unit.
- Contents
- Features
- About this Manual
- Preparation Procedure
- Configuring the Settings
- Setting the Menu List
- Registering the IP network information
- Setup of telephone function
- Configuring the sound settings
- Configuring the general settings
- Adjusting the ring tone volume
- Controlling the system using the remote operation function
- Configuring the backlight off setting
- Adjusting the LCD contrast
- Selecting the menu language (Language)
- Setting the date and time manually
- Setting the time zone
- Setting the daylight saving time
- Selecting the SNTP server for synchronization
- Selecting the SNTP synchronization interval
- Call history management
- Setting the password
- Calling a ProjectPhone system in the same subnet
- Setting the Date and Time
- Editing the Address Book
- Using the SIP Server
- Hierarchical Connection of Multiple ProjectPhone (Cascade Connection)
- Interlocked Connection of ProjectPhone Systems
- Connection Using Audio Connection Cables
- Updating the Firmware
- Troubleshooting
- Resetting this Unit
- Obtaining the Setting Information for Support on this Unit
- Confirming the System Log Message of This Unit (Syslog)
- Specifications
- Notes on Transferring/Disposing this Unit

PREPARATION PROCEDURE
4
The following preparation steps should be completed before using this unit.
Step 1: (page 5)
Connecting this unit to the network and turning
this unit on
ª
Step 2: (page 6)
Registering the network settings of this unit
• To perform communications through an IP network
such as a LAN, see “LAN: Acquiring the network
information from a DHCP server” (page 6) or “LAN:
Setting the network information manually” (page 6).
• For communication through the telephone circuit, see
“Telephone circuit: Setting the telephone circuit type”
(page 10).
ª
Step 3: (page 11)
Installing this unit in the conference room
■ To configure the settings from a PC
This section describes the preparation steps using the keys
on this unit, but the same settings are also available by
accessing the “Web Settings Page” from a PC. See
“Configuring the settings using the Web menu” (page 13).
• Some functions such as the address book cannot be set using the
keys on this unit alone.
• A connection through the IP network is required to access the
“Web Settings Page” of this system.
■ To use this unit with a SIP server
You must enter the settings by accessing the “Web
Settings Page” from a PC. See “Configuring the SIP server
setting” (page 15).
■ Notes on system connection
Please check the following before proceeding to
preparation.
LAN cable
(For use in the connection to a IP network)
• Prepare the supplied LAN cable.
• When using a commercially available LAN cable,
prepare a 10BASE-T or 100BASE-TX compatible
LAN cable.
Modular cable
(For use in the connection to a telephone
circuit)
• Prepare the supplied modular cable.
• When using a commercially available modular cable,
prepare a modular cable with RJ-11C 6P2C or 6P4C
plug.
Audio connection cable
(For use in the connection to a PC, etc.)
• Prepare a pair of commercially available audio
connection cables (stereo mini-jack cables).
• The designs of the line input/output terminals of TV
conference systems vary depending on the models.
Always use audio connection cables having the plugs
matching the line input/output terminals of the
connected TV conference system. Note that the plugs
connected to the ProjectPhone system of the audio
connection cables should always be the stereo mini-
plugs.
Caution regarding the connection to an IP
network
• When using this unit in the Internet, a global IP address
need to be obtained.
• When using this unit in a corporate LAN, it cannot be
connected to equipment outside the firewall. However,
as calls may become possible by changing the settings
of the router, please consult your network administrator
for details. This unit uses a port number of 5060 (UDP)
for SIP, and 57000 to 57010 (UDP) for RTP/RTCP.
• Obtain or decide the following information prior to the
installation of this unit.
– IP address and subnet mask settings of this unit
– IP addresses of the default gateway and DNS server
used by this unit
• To prevent the audio from being interrupted, it is
recommended that a network that can offer enough
transmission bandwidth is used. See “Specifications”
(page 46) for details.
• (For European customers only) Use the supplied LAN
cable to connect a network hub or router and this unit.
If you use a commercially available LAN cable, select
STP (Shielded Twisted Pair) cable.
Telephone system requirements
This system can be connected to the following type of
telephone system.
• Analog circuit (The system is incompatible with digital
circuits such as ISDN.)
• Telephone socket with an RJ-11C modular jack (if your
telephone socket is not equipped with an RJ-11C
modular jack, use a commercially available converter).
Preparation Procedure
Notes
Telephone connection through a PBX
(Private Branch Exchange)
This system can be connected only to a 2-wire RJ-11 analog
PBX circuit. If you are unsure about your telephone circuit,
consult the manager in charge of the telephone circuit.