
User`s manual

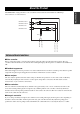
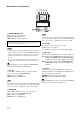
Table Of Contents
- Contents
- Introduction
- CONFIRMATION SOFTWARE LICENSE AGREEMENT
- About the Product
- Controls and Functions
- Installation and Initial Setup
- Automatic Setup by Auto Analyzer
- Using the Web Menu
- Setting the Password
- Setting the Date and Time
- Configuring the Network Settings
- Limiting Access to the Web Menu
- Controlling Echoes
- Controlling Acoustic Feedback
- Controlling Noises
- Adjusting the Input Gain Automatically (Auto Gain Controller)
- Adjusting the Input Gain for MIC/LINE INPUT
- Adjusting the Volume Level
- Using the Internal Mixer
- Configuring the Phantom Power Settings
- Configuring This Unit's Settings Automatically (Auto Analyzer)
- Turning On/Off the Audio Guidance
- Maintenance and Management
- Special Functions
- Changing the Screen Color
- Using the Latest Features
- Troubleshooting
- List of Error Messages
- Resetting the Settings of This Unit
- Support Information
- Specifications

10
■ Functions of the DIP switch
1
PHANTOM (DC+48V)
Turns on/off the phantom power.
ON: Turn on the phantom power.
OFF: Turns off the phantom power.
• Set this switch to ON when an XLR-type microphone which
requires a phantom power is connected to MIC/LINE INPUT.
• To protect the speakers, turn off the speakers or set the speaker
volume to the minimum before turning on/off the phantom
power.
• For your safety, the phantom power is not supplied unless it is
enabled on the web menu even if this switch is set to ON.
y
While the phantom power is supplied, the PHANTOM
LEDs on the front and rear panels turn on.
2 IN1 & 2
Selects MIC or LINE according to the output level of
devices connected to MIC/LINE INPUT.
MIC: Switch to the MIC level.
LINE: Switch to the LINE level.
The signal level differs between MIC level and LINE level. When
you connect a device to a MIC jack, set this switch to MIC. When
you connect a device to a LINE jack, set this switch to LINE.
3 CONF.OUT
Selects MIC or LINE according to the input level of a
device connected to CONFERENCE OUT.
MIC: Switch to the MIC level.
LINE: Switch to the LINE level.
The signal level differs between MIC level and LINE level. When
you connect a device to a MIC jack, set this switch to MIC. When
you connect a device to a LINE jack, set this switch to LINE.
4 EC TYPE
Sets the effectiveness of the echo canceller.
2: Higher the echo reduction.
1: Lower the echo reduction to prioritize audio quality.
5 MIX & FS
Turns on/off the internal mixing and feedback suppressor.
ON: Output audio to LINE OUTPUT after audio input
through CONFERENCE IN and MIC/LINE INPUT
are mixed. Also, the feedback suppressor is enabled.
OFF: Output audio input through CONFERENCE IN to
LINE OUTPUT. Also, the feedback suppressor is
disabled.
6 DIP SW
Selects the setting priority (DIP switch or web menu).
Setting items that are not available by the DIP switch are
always decided by the web menu.
ETHER: Prioritize the web menu settings.
DIP SW: Prioritize the DIP switch settings.
y
While the DIP switch settings are prioritized, the DIP SW
LEDs on the front and rear panels turn on.
OFFON
LINE
MIC
ETHER
LINE
MIC
1
2
OFF
ON
PHANTOM
IN1 & 2
CONF.OUT
EC TYPE
MIX & FS
DIP SW
SETTING
①②③④⑤⑥
Make sure you set this switch to OFF when a device which does not
require a phantom power is connected. Incorrect settings may cause
a malfunction of the external devices.
Notes
Note
Note