
Owner's Manual


E-9
English
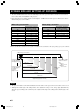
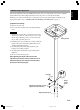
PMT-H35 height adjustment
The height adjustment pole for the PMT-H35 has holes spaced 3 cm apart that can be used to adjust the
height. When the bracket is shipped from the factory, the pole is set at the shortest height.
Follow the procedure described below to adjust the pole to the appropriate height. For details on the
appropriate height, refer to “SCREEN SIZE AND SETTING-UP DISTANCE” on page 8.
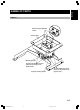
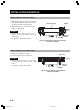
[Adjustment Procedure]
1
Remove the safety pin.
2 Loosen the nut, and then remove the height locking
screw.
Caution
• Removing the height locking screw will unlock the height
adjustment pole from the ceiling bracket. In order to ensure
that the height adjustment pole does not fall, always hold
the pole while performing this work.
3
Determine the correct position in accordance with the
height of the screen, insert the height locking screw,
and then hand-tighten the nut.
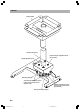
4 Securely tighten the four height adjustment pole
locking screws (M5) provided.
5 Securely tighten the nut that was previously hand-
tightened.
6 Be sure to insert the safety pin.
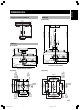
After adjusting the height, make sure that the
adjustment pole locking screws and the nut are all
tightened securely. Also make sure that the safety
pin has been inserted properly.
1
2
3
4
Safety pin
Nut
Adjustment pole locking screws
(Tighten the other side also.)
Height
locking
screw
Hight adjustment pole
Ceiling bracket
12PMT_BODY_E 2002.10.16, 17:379