OWNER’S OWNER’S MANUAL MANUAL Before using the PSR-A1000, be sure to read “Precautions„ on pages 3-4.
The serial number of this product may be found on the bottom of the unit. You should note this serial number in the space provided below and retain this manual as a permanent record of your purchase to aid identification in the event of theft. Model No. Serial No.
Introduction PRECAUTIONS PLEASE READ CAREFULLY BEFORE PROCEEDING * Please keep this manual in a safe place for future reference. WARNING Always follow the basic precautions listed below to avoid the possibility of serious injury or even death from electrical shock, short-circuiting, damages, fire or other hazards. These precautions include, but are not limited to, the following: Power supply/AC power adaptor Water warning • Only use the voltage specified as correct for the instrument.
Connections Saving data • Before connecting the instrument to other electronic components, turn off the power for all components. Before turning the power on or off for all components, set all volume levels to minimum. Also, be sure to set the volumes of all components at their minimum levels and gradually raise the volume controls while playing the instrument to set the desired listening level.
Thank you for purchasing the Yamaha PSR-A1000! We recommend that you read this manual carefully so that you can fully take advantage of the advanced and convenient functions of the PSR-A1000. We also recommend that you keep this manual in a safe and handy place for future reference.
Accessories ■ PA-300 AC Adaptor* ■ Floppy Disk [includes style files, song files and MIDI Driver (page 138)] ■ Music Stand (page 17) ■ Data List ■ Owner’s Manual * May not be included in your area. Please check with your Yamaha dealer. About this Owner’s Manual and Data List This manual consists of four main sections: Introduction, Quick Guide, Basic Operation, and Reference. Also, a separate Data List is provided. Introduction (page 3): Please read this section first.
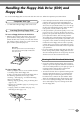
Handling the Floppy Disk Drive (FDD) and Floppy Disk Be sure to handle floppy disks and treat the disk drive with care. Follow the important precautions below. Compatible Disk Type • 3.5" 2DD and 2HD type floppy disks can be used. Inserting/Ejecting Floppy Disks To insert a floppy disk into the disk drive: • Hold the disk so that the label of the disk is facing upward and the sliding shutter is facing forward, towards the disk slot.
About the Floppy Disks To handle floppy disks with care: • Do not place heavy objects on a disk or bend or apply pressure to the disk in any way. Always keep floppy disks in their protective cases when they are not in use. • Do not expose the disk to direct sunlight, extremely high or low temperatures, or excessive humidity, dust or liquids. • Do not open the sliding shutter and touch the exposed surface of the floppy disk inside.
Table of Contents Introduction ............................ 3 Reference PRECAUTIONS .......................................................... 3 Accessories ............................................................... 6 About this Owner’s Manual and Data List .............. 6 Handling the Floppy Disk Drive (FDD) and Floppy Disk..................................................... 7 About the Display Messages.................................... 8 Application Index .......................................
Using Oriental Scales – Scale Setting/Scale Tuning/ Scale Memory ........................ 72 Setting an Oriental Scale — Scale Setting............. 72 Adjusting the Scale Tuning — Scale Tuning ......... 72 Memorizing the Scale Setting – Scale Memory .... 74 Saving Your Scale Settings .................................... 74 Recalling the Scale Setting .................................... 75 Saving and Recalling Custom Panel Setups — Registration Memory ........
Maintaining Panel Settings — Freeze .....................126 Changing the Automatically Selected Voice Settings — Voice Set...........................................127 Setting Harmony and Echo.................................. 127 Setting the MIDI Parameters ............................... 129 Making Overall System Settings (Local Control, Clock, etc.) — System.................129 Transmitting MIDI Data — Transmit ......................130 Receiving MIDI Data — Receive .............................
Application Index Use this index to find reference pages that may be helpful for your particular application and situation. Listening Listening to the internal songs ................................................................................................................ page 67 Listening to disk songs ....................................................................... “Playing Back Songs on Disk” on page 69 Listening to demo songs.................................................................
Application Index Settings Registering Panel Setups......................................................................................................................... page 76 Tuning the pitch/Selecting a scale ........................................................................................................ page 120 Making detailed settings for playing back songs ...................................................................................
What can you do with the PSR-A1000? SONG Playback previously recorded songs (page 21, 32, 66) Enjoy a wide variety of preset songs as well as songs on commercially available disks. 14 SCALE SETTING/ SCALE MEMORY DEMO The Scale Setting feature lets you easily lower the pitches of specific notes by 50 cents to create your own oriental scales. Up to six scale settings can be stored for instant recall (Scale Memory), whenever you need them.
LCD SCALE TUNING VOICE The large LCD (together with the various panel buttons) provides comprehensive and easy-to-understand control of the PSR-A1000’s operations. You can select a desired scale template including oriental scales and create your own scales by fine tuning the scale notes. Enjoy a huge variety of realistic voices (page 25, 51) TO HOST terminal Make music with a computer — quickly and easily (page 138) Dive in and take advantage of the wide world of computer music software.
Setting Up the PSR-A1000 Power Supply Power-on Procedure sure that the PSR-A1000’s STANDBY/ON 1 Make switch is at the STANDBY (off) position. 2 Connect one end of the AC cable to the PA-300. the PA-300’s DC plug to the PSR-A1000’s 3 Connect DC IN terminal on the instrument’s rear panel. When you have made all the necessary connections (page 136) between your PSR-A1000 and any other devices, make sure that all volume settings are turned down all the way to zero.
Powering Up Music Stand CAUTION In order to avoid possible damage to the speakers or other connected electronic equipment, always switch on the power of the PSR-A1000 before switching on the power of the amplified speakers or mixer and amplifier. Likewise,always switch off the power of the PSR-A1000 after switching off the power of the amplified speakers or mixer and amplifier. CAUTION Even when the switch is in the "STANDBY" position,electricity is still flowing to the instrument at a minimum level.
Panel Controls and Terminals 5 6 7 10 9 73 72 71 51 4 8 38 32 11 12 13 33 14 34 35 36 15 37 18 16 40 17 39 41 42 19 21 20 22 23 24 25 26 27 28 29 30 31 1 2 3 C1 CLICK 36 D1 T 37 E1 38 S 39 POWER 1 [STANDBY/ON] switch ......................................................... P. 17 WHEEL 2 PITCH BEND ....................................................................... P. 55 PHONES 3 [PHONES] jack................................................................... P.
74 75 77 76 78 43 44 53 54 55 56 57 58 52 38 59 45 46 70 47 61 60 64 66 65 48 49 50 62 63 69 67 68 A3 68 C 69 2 B3 70 R 71 2 C4 H 72 D4 L 73 E4 74 H 75 F4 L 76 H 77 G4 L 78 H 79 A4 L 80 B4 81 82 H 83 C5 L 84 D5 S 85 L 86 E5 87 H 88 F5 L 89 G5 M 90 O 91 A5 92 DISPLAY CONTROL 38 39 40 41 42 43 44 45 46 47 48 49 50 51 [A] - [J] buttons ..................................................................... P. 37 [DIRECT ACCESS] button .................................
Quick Guide . . . . . . . . . . . . . . . . . . . . . . . . . Playing the Demos Reference on page 49 The PSR-A1000 features an extensive variety of Demo songs, that showcase its rich, authentic voices and its dynamic rhythms and styles. Demo button What’s more, there’s a special selection of Demo functions. These take you through a hands-on journey of all the important features and functions of the instrument — letting you see firsthand how to effectively use the PSR-A1000 in your own music.
Song Playback Song Playback Reference on page 67 Here’s where all of the amazing voices, effects, rhythms, styles and other sophisticated features of the PSR-A1000 come together — in songs! Song related buttons Make sure that the Language setting for the instrument (page 135) is the same as that of the file name of the song that you are playing back. BALANCE and CHANNEL buttons Floppy disk drive The following songs are compatible for playback on the PSR-A1000.
Song Playback 2 Press the [A] button to call up the Song Open display. If the MAIN screen is not displayed, press the [DIRECT ACCESS] button followed by the [EXIT] button. From the MAIN display (the display shown when the power is turned on), you can select songs, voices, accompaniment styles, etc. A B C D E FLOPPY DISK (commercially available songs, your own songs, etc.) PRESET (Songs for Demos) Press the [BACK]/[NEXT] button to select the drive.
Song Playback 4 5 Press one of the [A] to [J] buttons to select the song file. Press the SONG [START/STOP] button to start playback. REC TOP NEW SONG 6 START/STOP • To rewind or fast forward to the playback point of the song, press the [REW] or [FF] button. • With song data software (Standard MIDI format 0) that includes lyrics, you can view the lyrics on the display during playback. See page 71 for details. SYNC.
Song Playback 7 Finally, take the producer’s seat and try your hand at mixing. These Balance controls let you adjust the levels of the individual parts — the song, the style, and your playing. 1) Press the [BALANCE] button. 2) Press the [1 - 8▲▼] button corresponding to the part of which the volume you wish to adjust. BALANCE You can call up a full set of mixing controls by pressing the [MIXING CONSOLE] button (page 112). 1 8 3 4 5 6 7 8 Press the SONG [START/STOP] button to stop playback.
Playing Voices Playing Voices Reference on page 51 The PSR-A1000 features a stunning variety of over 700 dynamic, rich and realistic voices. Try playing some of these voices now and hear what they can do for your music. Here, you’ll learn how to select individual voices, combine two voices in a layer, and split two voices between your left and right hands.
Playing Voices 3 Select a voice. • You can instantly jump back to the Main display by “double-clicking” on one of the [A] - [J] buttons. A B C For this example, ”Strings” is selected. D E Press the corresponding buttons to select the other pages — and discover even more voices. 4 Press the [8▲] button to start the Demo for the selected voice. To stop the Demo, press this button again. There’s more to the Demo features than just voices, though–for more information, see page 49. Play the voices.
Playing Voices Playing Different Voices with the Left and Right Hands 1 Press the VOICE PART ON/OFF [LEFT] button to turn the LEFT part on. MAIN LAYER LEFT 2 3 4 5 Press the [H] button to select the LEFT part. Select a voice group. Here, we’ll select the “STRINGS” group — so that you can play rich, orchestral chords with your left hand. Select a voice, then press the [EXIT] button to return to the MAIN display. For example, select “Symphon. Str.” Call up the SPLIT POINT display (page 122).
Playing Styles Playing Styles The PSR-A1000 has a huge variety of musical “styles” that you can call upon to back up your own performance. They give you anything from a simple, yet effective piano backing or percussion accompaniment to a full band or orchestra. Reference on page 56 Style related buttons Playing a style 1 Select a style group and a style. A B C D E For this example, DANCE & BALLROOM is selected. 2 For this example, VienneseWaltz is selected. Turn ACMP on.
Playing Styles 3 Turn SYNC.START on. SYNC. START 4 As soon as you play a chord with your left hand, the style starts. For this example, play a C major chord (as shown below). Split Point Auto Accompaniment area 5 6 7 Change the tempo by using the TEMPO[ ] [ ] buttons if necessary. Simultaneously press the TEMPO [ ] [ ] buttons to return the tempo to its original setting. Press the [EXIT] button to leave the TEMPO display. The Tempo can also be adjusted by using the [TAP TEMPO] button (page 48).
Playing Styles Style Sections Each style in the auto accompaniment is made up of “sections.” Since each section is a rhythmic variation of the basic style, you can use them to add spice to your performance and mix up the beats — while you’re playing. Intros, Endings, Main patterns, and Breaks — they’re all here, giving you the dynamic elements you need to create professionalsounding arrangements. INTRO MAIN BREAK ENDING 1-3 4 This is used for the beginning of the song.
Playing Styles ■ Accompaniment Structure INTRO (page (page 63) xx) INTRO A INTRO B INTRO C INTRO D (max. four patterns) MAIN VARIATION via BREAK MAIN VARIATION B via BREAK MAIN VARIATION A MAIN VARIATION C via BREAK MAIN VARIATION D via BREAK Press the [ENDING] button. ENDING ENDING(page (page xx) 63) ENDING A ENDING B ENDING C ENDING D You can have the ending gradually slow down (ritardando) by pressing the [ENDING] button again while the ending is playing back. (max.
Playing with the Songs Playing with the Songs Reference on page 66 Song related buttons Playing Along with the PSR-A1000 In this section, try using the PSR-A1000’s song playback features to cancel or mute the right-hand melody while you play the part yourself. It’s like having a very talented and versatile playing partner accompany you while you perform. 1-4 5 Use the same operations as in “Song Playback” on pages 21 - 23. Press the [TRACK 1] button to cancel the right hand melody part.
Playing with the Songs Recording The PSR-A1000 lets you record, too — quickly and easily. Try out the Quick Recording feature now and capture your keyboard performance. 1-3 4 Select a voice for recording. Use the same operations as in “Playing a Voice” on pages 25, 26. Press the [REC] and [TOP] buttons simultaneously to select “New Song” for recording. REC TOP NEW SONG 5 START/STOP REW FF SYNC. START Simultaneously hold down the [REC] button and press the [TRACK1] button.
Setting an Oriental Scale Setting an Oriental Scale The Scale Setting feature lets you easily lower the pitches of specific notes by 50 cents to create your own oriental scales. Up to six scale settings can be stored for instant recall (Scale Memory), whenever you need them. Reference on page 72 Scale related buttons 1 2 The [SCALE SETTING] buttons simulate an one-octave keyboard (C through B). Press the button corresponding to the key whose pitch you want to lower (the button lights).
Basic Operations — Organizing Your Data The PSR-A1000 utilizes a variety of data types — including voices, accompaniment styles, songs, multi pads and registration memory settings. Much of this data is already programmed and contained in the PSR-A1000; you can also create and edit your own data with some of the functions on the instrument. All this data is stored in separate files — just as is done on a computer.
Basic Operations — Organizing Your Data Example — Open/Save display for Voice Each Open/Save display consists of PRESET, USER, and FLOPPY DISK drive pages. PRESET drive The files that are preprogrammed and installed internally to the PSR-A1000 are kept here. Preset files can be loaded but cannot be re-written. However, you can use a preset file as a basis for creating your own original file (which can be saved in the USER or FLOPPY DISK drive).
Basic Operations — Organizing Your Data Selecting Files and Folders Select a file shown in the display. In this example, we’ll select a voice file. First, press the VOICE [PIANO] button to call up the display containing the files. This display (“Open/Save” display) is typical of those used to call up and store files (voice files). The PSR-A1000 already contains a variety of voices in the PRESET section.
Basic Operations — Organizing Your Data File/Folder-related Operations Naming Files/Folders You can assign names to files and folders. Any file/folder in the USER and FLOPPY DISK sections can be named or renamed. Execute the following steps when there is data in the User drive. If there are Preset files/folders you wish to rename, copy them beforehand (page 40) and use them as User files/folders. 1 Press the [1▼] (NAME) button (page 35).
Basic Operations — Organizing Your Data Moving Files/Folders You can move files and folders as desired, for organizing your data. Any file/folder in the USER and FLOPPY DISK sections can be moved, using the cut-and-paste operation described below. 1 Press the [2▼] (CUT) button (page 35). The CUT display appears. This operation cannot be used to directly move a file/ folder from one floppy disk to another.
Basic Operations — Organizing Your Data Copying Files/Folders You can also copy files and folders as desired, for organizing your data. Any file/folder in the PRESET, USER and FLOPPY DISK sections can be copied, using the copy-and-paste operation described below. 1 Press the [3▼] (COPY) button (page 35). Please note that the copy functions are intended for your personal use only. The COPY display appears. 2 Select the desired file/folder.
Basic Operations — Organizing Your Data Saving Files This operation lets you save the data (such as song and voice) you created in current memory (page 36) to files. The files can be saved only to the USER and FLOPPY DISK drives. If the Open/Save display for the type of data you wish to save is not shown, first return to the MAIN display by pressing the [DIRECT ACCESS] button followed by the [EXIT] button.
Basic Operations — Organizing Your Data Entering Characters The instructions that follow show you how to enter characters in naming your files and folders. The method is much the same as inputting names and numbers to your cell phone. 1 2 3 Move the cursor to the desired position by using the [DATA ENTRY] dial. Press the appropriate button, [2▲] - [7▲] and [2▼]- [6▼], corresponding to the character you wish to enter.
Basic Operations — Organizing Your Data Changing the Icon You can also change the icon that appears at the left of the file name. Call up the ICON SELECT display by pressing the [1▼] (ICON) button from the character input display (page 42). Select the desired icon by using the [A] - [J] buttons, or by using the [3▲▼] - [5▲▼] buttons, then enter the selected icon by pressing the [8▲] (OK) button. BACK A F B G C H D I E J NEXT Turns pages for icon selection. Enters the selected icon.
Basic Operations — Organizing Your Data Direct Access — Instant Selection of Displays DIRECT ACCESS With the convenient Direct Access function, you can instantly call up the desired display — with just a single additional button press. Press the [DIRECT ACCESS] button and a message appears in the display prompting you to press the appropriate button. Then, simply press the button corresponding to the desired setting display to instantly call up that display.
Basic Operations — Organizing Your Data Direct Access Chart Operation: [DIRECT ACCESS] button + button listed below SONG Corresponding LCD display and function [TRACK1] TRACK1 CHANNEL selection [TRACK2] [EXTRA TRACKS] FUNCTION TRACK2 CHANNEL selection SONG SETTING STYLE 121 121 121 [REPEAT] [METRONOME] See pages UTILITY [REC] — [TOP] — [START/STOP] — [REW] — [FF] — METRONOME settings 132 SPLIT POINT (ACMP) setting 122 [POP & ROCK] [LATIN & JAZZ] [DANCE & BALLROOM] [ ] [ [ ] [
Basic Operations — Organizing Your Data Help Messages The Help messages give you explanations and descriptions of all the main functions and features of the PSR-A1000. HELP 1 MENU DEMO 2 Help messages can be displayed in any one of the following languages: ENGLISH GERMAN FRENCH HELP FUNCTION The language can also be selected in the FUNCTION “LANGUAGE” (page 135) display. 1 2-1 2 3 4 5 6 7 2-2 Select the desired Help topic. 8 Call up the topic. Select the Language, if necessary.
Basic Operations — Organizing Your Data Using the Metronome The metronome provides a click sound, giving you an accurate tempo guide when you practice, or letting you hear and check how a specific tempo sounds. METRONOME The metronome starts by pressing the [METRONOME] button. Adjust the tempo by using the TEMPO[ ] [ ] buttons (see below). To stop the metronome, press the [METRONOME] button again. The sound, volume level, and the beat (time signature) of the metronome can all be changed (page 132).
Basic Operations — Organizing Your Data Tap Tempo This useful feature lets you tap out the tempo for a song or an accompaniment style. Simply tap the [TAP TEMPO] button at the desired speed, and the tempo of the song or the accompaniment style changes to match your tapping. the song or the 1 Playback accompaniment style (page 56, 67). 2 TAP TEMPO TEMPO RESET Tap the [TAP TEMPO] button twice to change the tempo.
Playing the Demos The PSR-A1000 is an extraordinarily versatile and sophisticated instrument, featuring a wide variety of dynamic voices and rhythms, plus a wealth of advanced functions. Three different types of Demo songs have been specially prepared showcasing the stunning sound and features of the PSR-A1000. Reference MENU DEMO HELP FUNCTION 1 MENU DEMO Pressing the [DEMO] button automatically plays back the Demo songs at random.
Playing the Demos 3 For the Function demos, an introduction screen appears in the display and the Demo starts playing. BACK This example shows the Sound System in the FUNCTION demo. NEXT n Press the SONG [START/ STOP] button to stop the Demo song. To start the Demo again from the point at which it was stopped, press the SONG [START/ STOP] button again. Rewind and fast-forward can also be used with the Demo songs (page 69).
Voices The PSR-A1000 gives you an enormous selection of authentic voices, including various keyboard instruments, strings and brass — and many, many more. Selecting a Voice 1 Press the [MAIN] button to turn the MAIN part on, then press [F] button to call up the menu for selecting the MAIN voice. MAIN Turn MAIN on. The voice you’re selecting here belongs to the MAIN part, and is called the MAIN voice. (See page 53 for more information.
Voices 3 Indicates that the display is for selecting the MAIN voice (page 25). BACK 3-1 A F B G C H D I E J NEXT Select the memory location of the voice (PRESET/ USER/ FLOPPY DISK). Selecting a voice automatically selects the best-suited effect and other settings for that particular voice. You can disable this so that settings are not automatically selected (page 127). n You can set how much the volume of the voice changes according to your playing strength (page 125).
Voices Layer/Left — Playing Several Sounds Simultaneously The PSR-A1000 lets you set three voices for simultaneous play: MAIN, LAYER, and LEFT. By effectively combining these three, you can create richly textured, multi-instrument setups for your performance.
Voices Left — Setting Separate Voices for the Left and Right Sections of the Keyboard 1 Set the LEFT to ON. Press this button again to set it to OFF. MAIN 2 Select LEFT with the [H] button. Press the same button to call up the VOICE display, from which you can select the specific voice you want to play in a left. How to select the voice is the same as the way of VOICE (MAIN) screen (page 51). LAYER The split point can be freely set to any key on the keyboard. (page 122).
Voices ■ VARIATION This control changes the Variation effect settings, letting you alter some aspect of the effect, depending on the selected type. For example, when the Rotary Speaker effect is selected (page 115), this lets you switch the rotor speed between slow and fast. ■ HARMONY/ECHO This control adds Harmony or Echo effects to the voices played on the right hand section of the keyboard (page 127). The Portamento effect creates a smooth pitch glide between successively played notes.
Styles The PSR-A1000 features styles (accompaniment patterns) in a variety of different musical genres including pops, jazz, Latin and dance. To use it, all you have to do is play the chords with your left hand as you perform and the selected Accompaniment Style (style) matching your music will automatically play along, instantly following the chords you play. Try selecting some of the different styles (refer to separate Data List (Style List) ) and play them. STYLE CONTROL ACMP MAIN BREAK SYNC.
Styles 3 When the [ACMP] button is set to on, you can play/indicate chords from the auto accompaniment area of the keyboard. (Depending on the settings, this may be the range of the Left voice, or the entire keyboard.) STYLE CONTROL ACMP BREAK MAIN INTRO ENDING / rit. SYNC. STOP AUTO FILL IN 4 START/STOP FADE IN/OUT Turn SYNC. (SYNCHRONIZED) START on. STYLE CONTROL ACMP SYNC. START You can set the key range for auto accompaniment (page 122). MAIN BREAK INTRO SYNC. STOP ENDING / rit.
Styles Playing a Style’s Rhythm Channels only 1 The Rhythm channels are part of the styles. Each style has different rhythm patterns. Select a style (page 56). 2 You can also start the rhythm simply by playing a key on the keyboard, if Sync Start is enabled (turn on the [SYNC.START] button). Rhythm starts. STYLE CONTROL ACMP MAIN INTRO BREAK ENDING / rit. SYNC. STOP AUTO FILL IN SYNC. START START/STOP FADE IN/OUT Set to off. 3 Play along with the rhythm playback.
Styles Chord Fingerings The style playback can be controlled by the chords you play in the keys to the left of the split point. There are 7 types of fingerings as described below. Go to the CHORD FINGERING page (page 123), and select the Chord Fingerings. The page shows how to play chords with your left hand.
Styles Chord Types Recognized in the Fingered Mode (Example for “C” chords) CmM7 CmM7 9 ( ) ( ( C 5 CM7 5 Cm7 9 Cm7 11 ) CM7aug 11 ( Caug CM7 ) Csus4 CM7 9 CM7 ) C6 ) C9 ( C6 9 C Cm9 Cm6 Cm7 Cm7 5 CmM7 5 Cdim Cdim7 C7 C7 13 C7 9 C7 5 C7aug C7sus4 Normal Voicing Display for root “C” Major [M] 1-3-5 C Ninth [9] 1-2-3-5 C9 Sixth [6] 1 - (3) - 5 - 6 C6 Sixth ninth [69] 1 - 2 - 3 - (5) - 6 or 3 - 6 - 2* C69 1 - 3 - (5) - 7 CM7 Major seventh [M7]
Styles Arranging the Style Pattern (SECTIONS: MAIN A/B/C/D, INTRO, ENDING, BREAK) The PSR-A1000 features various types of Auto Accompaniment Areas that allow you to vary the arrangement of the Style. They are: Intro, Main, Break and Ending. By switching among them as you play, you can easily produce the dynamic elements of a professionalsounding arrangement in your performance. 1 2 Select a style (page 56). 2-1 Turn the ACMP function on. STYLE CONTROL ACMP MAIN BREAK SYNC. STOP ENDING / rit.
Styles This switches to the ending section. When the ending is finished, the Style stops automatically. You can have the ending gradually slow down (ritardando) by pressing the same [ENDING/rit.] button again while the ending is playing back. 5 STYLE CONTROL BREAK ACMP MAIN INTRO SYNC. STOP ENDING / rit. AUTO FILL IN SYNC.
Styles Selecting Intro and Ending Types (INTRO/ENDING) 1 To call up the [MAIN] display, first press the [DIRECT ACCESS] button, then press the [EXIT] button. A B C D E 2 3 D E Select a Intro Play the style using the Intro or Ending section (page 30, 31). Select a Ending Playing Fill-in patterns automatically when changing accompaniment sections — Auto Fill In 1 2 STYLE CONTROL ACMP BREAK MAIN INTRO SYNC. STOP ENDING / rit. AUTO FILL IN SYNC.
The Multi Pads The PSR-A1000 Multi Pads can be used to play a number of short pre-recorded rhythmic and melodic sequences that can be used to add impact and variety to your keyboard performances. Multi Pads Playing the Multi Pads 1 2 Select the desired bank in the MULTI PAD Bank display (page 35). Press any of the Multi Pads. STOP MULTI PAD The corresponding phrase (in this case, for Pad 4) starts playing back in its entirety as soon as the pad is pressed.
The Multi Pad Multi Pad Edit This function lets you copy individual Multi Pad settings from one Multi Pad bank to another. Select the desired Multi Pad(s). Open/Save display for Multi Pads (page 35) A F B G C H D I E J The same as the Open/Save display on pages 38 and 41. 1 2 3 4 5 6 7 Calls up the upper level directory page.
Song Playback Here you’ll learn how to play back songs. Songs include the internal songs of the instrument, performances you’ve recorded yourself using the recording functions (page 83), and commercially available song data. You can use this highly versatile feature in a variety of ways — playing along on the keyboard with the recorded song. You can also display the lyrics in the LCD. SONG EXTRA TRACKS (STYLE) TRACK 2 TRACK 1 (L) (R) REC NEW SONG TOP START/STOP REPEAT REW METRONOME FF SYNC.
Song Playback Song Playback Playing the Internal Songs 1 BACK NEXT If the MAIN screen (at left) is not displayed, press the [DIRECT ACCESS] button followed by the [EXIT] button. A F B G C H D I E J 2 2-1 2-2 Open a folder and select a song to be played back. 3 The song starts. SONG EXTRA TRACKS (STYLE) You can also make a variety of other settings (such as tempo, voice selection, etc.) and have them automatically called up when you play back the song (page 95).
Song Playback Simultaneously Playing a Song and an Accompaniment Style When playing back a song and an accompaniment style at the same time, channels 9 16 of the song data are replaced with accompaniment style channels — allowing you to use the auto accompaniment styles and features in place of the accompaniment parts of the song. Make the settings below and play your own chord substitutions in place of the song’s chord data. • [ACMP] button .................. ...ON • [AUTO FILL IN] button ..... ...
Song Playback Playing Back Songs on Disk Before proceeding, make sure to read the section “Handling the Floppy Disk Drive (FDD) and Floppy Disk” (page 7). Insert the disk into the drive. n Insert the disk shutter side first and label face up. The method for playing back is the same as in the “Playing the Internal Songs” instructions (page 67), except that you should select FLOPPY DISK page in the SONG display.
Song Playback Muting Specific Parts — Track1/Track2/Extra Tracks This feature lets you mute certain parts of the song (Track1, Track2, Extra Tracks), and play back only those parts you want to hear. For example, if you want to practice the melody of a song, you can mute just the right-hand part and play that part yourself. 1 Select the song to be played back (page 66).
Song Playback Displaying the Lyrics This function lets you display the lyrics while the song is playing back — making it easy to sing along with your performance or song playback. 1 Select the desired song (page 67, 69). 2 A B C D E 3 If the selected song does not contain lyric data, lyrics are not displayed. In this example, select “Lyrics” in the Function folder of the PRESET (SONG) page. If the selected song contains chord data, chord names are displayed with the lyrics. 4 SONG Start the song.
Using Oriental Scales – Scale Setting/Scale Tuning/Scale Memory The Oriental Scales feature lets you simply and easily raise or lower the pitches of specific notes and create your own scales. You can change the scale settings at any time — even when you are playing. Up to six scale settings can be stored for instant recall, whenever you need them. Setting an Oriental Scale — Scale Setting The [SCALE SETTING] buttons simulate an one-octave keyboard (C through B).
Using Oriental Scales – Scale Setting/Scale Tuning/Scale Memory Scale ■ Equal Temperament The pitch range of each octave is divided equally into twelve parts, with each half-step evenly spaced in pitch. This is the most commonly used tuning in music today. ■ Bayat/Rast Use these tunings when playing Arabic music. ■ Pure Major/Pure Minor These tunings preserve the pure mathematical intervals of each scale, especially for triad chords (root, third, fifth).
Using Oriental Scales – Scale Setting/Scale Tuning/Scale Memory Memorizing the Scale Setting – Scale Memory The scale settings you set (using the [SCALE SETTING] buttons or in the SCALE TUNE display) are memorized by the Scale Memory function. Up to six scale settings can be stored for instant recall, whenever you need them. 1 Set up the scale settings as desired using the [SCALE SETTING] buttons or in the SCALE TUNE display.
Using Oriental Scales – Scale Setting/Scale Tuning/Scale Memory 2 Save the settings you’ve made to the SCALE MEMORY buttons as a single Scale Tune Bank file (page 41). 1 2 3 4 5 6 7 8 The SCALE TUNE EDIT display appears. For details on this display, see below. SCALE TUNE EDIT display The contents of the current Scale Tune Bank are listed in the SCALE TUNE EDIT screen. The names of the stored Scale Settings are shown in the display.
Saving and Recalling Custom Panel Setups — Registration Memory Registration Memory is a powerful feature that lets you set up the PSR-A1000 just as you want — selecting specific voices, styles, effect settings etc. — and save your custom panel setup for future recall. Then, when you need those settings, simply press the appropriate REGISTRATION MEMORY button.
Saving and Recalling Custom Panel Setups — Registration Memory Saving Your Registration Memory Setups The settings registered to the REGISTRATION MEMORY [1]-[8] buttons are saved as a single file. All settings registered to buttons [1][8] are referred to as a “bank.” The banks can be saved to “USER” or “FLOPPY DISK” as Registration bank files. BANK 01 Keep in mind that the size of the Registration bank files and the memory space they occupy depends on the amount of functions set in each.
Saving and Recalling Custom Panel Setups — Registration Memory Recalling a Registration Memory Setup You can recall all of the panel settings you’ve made — or only those you specifically want or need. For example, if you de-select “STYLE” in the REGISTRATION MEMORY display, you can keep the currently selected style even when you change the Registration Memory preset. Recalling the Registered Settings Select the desired bank in the REGISTRATION BANK display (page 77).
Editing Voices — Sound Creator The PSR-A1000 has a Sound Creator feature that allows you to create your own voices by editing some parameters of the existing voices. Once you’ve created a voice, you can save it as a USER voice for future recall. DIGITAL STUDIO SOUND CREATOR • The Voice can be edited in realtime while playing back a song/style. • Keep in mind that adjustments made to the parameters may not make much change in the actual sound depending on the original settings of the voice.
Editing the voice -SOUND CREATOR- Sound Creator Parameters COMMON Determines the common settings such as voice volume or octave. SOUND Determines the timbre/EG (Envelope Generator)/vibrato of the voice. EFFECT Determines the effect depth/type and equalizer settings. HARMONY Determines the Harmony/Echo settings. Keep in mind that there are certain parameters whose Sound Creator settings affect only the Main part’s voice. The following parameters are linked to the ones in each display.
Editing the voice -SOUND CREATORSOUND The explanations here apply to step #3 on page 79. 1 2 3 4 5 6 7 Determines the filter, EG, and vibrato settings (see below). 8 ■ FILTER FILTER settings determine the overall timbre of the sound by boosting or cutting a certain frequency range. • BRIGHTNESS Determines the cutoff frequency or effective frequency (resonance) range of the filter (see diagram). Higher values result in a brighter sound.
Editing the voice -SOUND CREATOR■ VIBRATO • DEPTH........ Determines the intensity of the Vibrato effect (see diagram). Higher settings result in a more pronounced Vibrato. VIBRATO Creates a wavering in the sound by periodically changing the pitch. • SPEED......... Determines the speed of the Vibrato effect (see diagram). • DELAY ........ Determines the amount of time that elapses between the playing of a key and the start of the Vibrato effect (see diagram).
Recording Your Performances and Creating Songs — Song Creator With these powerful yet easy-to-use song creating features, you can record your own keyboard performances and store them for future recall. Several different recording methods are available: Quick Recording (page 84), which lets you record easily and quickly; Multi Recording (page 85), which lets you record several different parts; and Step Recording (page 87), which lets you enter notes one by one.
Recording Your Performances and Creating Songs — Song Creator Quick Recording This is the easiest recording method — perfect for quickly recording and playing back a piano song you’re practicing, so you can check your progress. ■ When recording over the part of an internal song or a song on disk with your own performance: ■ When creating a new song: 1 REC NEW SONG TOP START/STOP REW FF 1 SYNC. START Select the desired song (page 67, 69).
Recording Your Performances and Creating Songs — Song Creator Multi Recording This lets you record a song with several different instrument sounds on up to sixteen channels, and create the sound of a full band or orchestra. The structure of the channels and parts are shown in the chart below.
Recording Your Performances and Creating Songs — Song Creator 3 Select the part you want to assign to the channel to be recorded. This determines which of the keyboard-played parts (Main/Layer/Left) and the accompaniment style parts (RHYTHM 1/2, BASS, etc.) are recorded to the recording channels selected in step #2. For a list of the initial default assignments, see page 85. C D 4 5 6 Recording starts as soon as you play the keyboard.
Recording Your Performances and Creating Songs — Song Creator Recording Individual Notes — Step Record This method lets you create a song by entering notes one by one, without having to perform them in real time. This is also convenient for recording the chords and the melody separately. Operation 1 Select an existing song (page 67, 69) to which you want to add parts or re-record. If you want to create a new song, simultaneously press the [RECORD] button and the [TOP] button.
Recording Your Performances and Creating Songs — Song Creator 6 First, select the desired voice. To enter the note, first specify the length and loudness in this display, then enter the pitch by actually playing the note on the keyboard. Moves the cursor position up and down. Returns the cursor to the beginning of the song (the first note of the first measure). Use these to move the selected event, in units of measures (BAR), beat, and clocks. For information on measure/beat/clock settings, see below.
Recording Your Performances and Creating Songs — Song Creator Recording Melodies — Step Record (Note) In this section, we’ll show you how to use Step Recording by guiding you through this actual music example, shown at right. The operations here apply to step 6 on page 88. 1 1-1 1-2 Select this note. 1-3 2 While holding down this note... ...press this (to input a tie). 2-2 2-3 2-4 2-1 Select this note. 3 3-1 Press this button to display the dotted notes. 3-3 3-2 Select this note.
Recording Your Performances and Creating Songs — Song Creator Recording Chord Changes for the Auto Accompaniment — Step Record (Chord) The Chord Step recording feature makes it possible to record auto accompaniment chord changes one at a time with precise timing. Since the changes don’t have to be played in real time, you can easily create complex, tight chord changes — over which you can record the melody in normal fashion. The operations here apply to step 6 on page 88.
Recording Your Performances and Creating Songs — Song Creator 3 Press the MAIN [B] button to specify the section and enter the chord indicated at right. MAIN A BREAK MAIN B MAIN C F G F G7 C C 003:1:000 Select this note value and play the chords indicated at right. ■ Play back the newly created chord progression Use the [C] ( ▲ ) button to move the cursor to the beginning of the song, and press the SONG [START/STOP] button to hear the newly entered notes.
Recording Your Performances and Creating Songs — Song Creator Select the Recording Options: Starting, Stopping, Punching In/Out — Rec Mode From this display you can set up how recording is started and stopped for either Quick Recording or Multi Recording. To call up these settings, select the REC MODE display by using the [BACK][NEXT] button, after performing operation steps 1 - 3 on page 87. These settings determine how recording will start.
Recording Your Performances and Creating Songs — Song Creator Editing a Recorded Song Whether you’ve recorded a song using Quick Recording, Multi Recording, or Step Recording, you can use the editing features to change the song data. Editing Channel-related Parameters — Channel Calling up the operations here apply to step 4 on page 87. To call up the display shown below, use the [BACK]/[NEXT] buttons. Quantize Quantize lets you “clean up” or tighten the timing of a previously recorded channel.
Recording Your Performances and Creating Songs — Song Creator Delete This lets you delete recorded data in the specified channel. Use these to select the desired edit operation. Deletes all data in the selected channel. After the operation is completed, this button changes to [UNDO], letting you restore the original data. The Undo function only has one level; only the previous operation can be undone.
Recording Your Performances and Creating Songs — Song Creator Channel Transpose This allows you to transpose the recorded data of individual channels up or down by a maximum of two octaves in semitone increments. Use these to select the desired edit operation. Executes the Channel Transpose operation. After the operation is completed, this button changes to [UNDO], letting you restore the original data if you’re not satisfied with the Channel Transpose results.
Recording Your Performances and Creating Songs — Song Creator Editing Note Events — 1 - 16 From this display, you can edit individual note events (see below). Calling up operations here apply to step 4 on page 87. Use the [BACK]/[NEXT] buttons to call up the display below. Use these to move the cursor up/down and select the desired event. Determines the channel to be edited. A F Returns to the beginning position of the current song (the first note of the first measure).
Recording Your Performances and Creating Songs — Song Creator Editing Chord Events — CHD From this display, you can edit the chord events you’ve recorded to the song. Calling up operations here apply to step 4 on page 87. Use the [BACK]/[NEXT] buttons to call up the display below. With the exception of the [F] (EXPAND) button, the operations here are the same as those in Editing Note Events (page 96).
Recording Your Performances and Creating Songs — Song Creator Inputting and Editing Lyrics This convenient function lets you enter the song name and the lyrics for the song. It also lets you change or correct already existing lyrics. For more information on lyric events, see the chart below. Calling up operations here apply to step 4 on page 87. Use the [BACK]/[NEXT] buttons to call up the display below. The operations here are the same as those in Editing Note Events (page 96).
Creating Accompaniment Styles — Style Creator This powerful feature lets you create your own original styles, which can then be used for auto accompaniment — just as with the preset styles. DIGITAL RECORDING STYLE CONTROL ACMP BREAK MAIN ENDING / rit. INTRO SYNC. STOP AUTO FILL IN SYNC. START START/STOP FADE IN/OUT About Creating Accompaniment Styles The chart at right shows the basic parts (or “channels”) that make up each section of an accompaniment style.
Creating Accompaniment Styles — Style Creator Style File Format These are the patterns recorded to the accompaniment styles (page 107). Source Pattern The Style File Format (SFF) combines all of Yamaha’s auto accompaniment know-how into a single unified format. By using the edit functions, you can take full advantage of the SFF format and freely create your own styles. The chart at right indicates the process by which the accompaniment is played back. (This does not apply to the rhythm tracks.
Creating Accompaniment Styles — Style Creator Realtime Recording — Basic You can use the Realtime Recording features to create your own accompaniment style — either from scratch or based on the preset accompaniment data. The operations here apply to step 4 on page 100. 1 Select the desired channel for recording by simultaneously holding down the [F] (REC CH) button and pressing the appropriate [1▲▼] - [8▲▼] button.
Creating Accompaniment Styles — Style Creator Other Parameters in the Basic Display [I] (SAVE) button Calls up the Style display for saving the accompaniment style data. [3▲▼][4▲▼] (Section) buttons Determines the section to be recorded. [5▲▼][6▲▼] (Pattern Length) buttons Determines the length of the selected section’s pattern in measures (1 - 32). The Fill In/Break section is fixed at a length of one measure. [D] (Execute) button Executes the Pattern Length change.
Creating Accompaniment Styles — Style Creator Assembling an Accompaniment Style —Assembly This convenient function lets you combine accompaniment elements — such as rhythm, bass, and chord patterns — from existing styles, and use them to create your own original accompaniment styles. The operations here apply to step 4 on page 100. 1 These let you select the accompaniment style that will be used for each channel of your original style.
Creating Accompaniment Styles — Style Creator Edit the Created Accompaniment Style Change the Rhythmic Feel — Groove and Dynamics These versatile features give you a wide variety of tools for changing the rhythmic feel of your created accompaniment style. The operations here apply to step 4 on page 100. ■ Groove Use these to select the desired edit operation. A F B G C H D I E J Executes the Groove operation.
Creating Accompaniment Styles — Style Creator ■ Dynamics Use these to select the desired edit operation. A F B G C H D I E J Executes the Dynamics operation. After the operation is completed, this button changes to [UNDO], letting you restore the original data if you’re not satisfied with the Dynamics results. The Undo function only has one level; only the previous operation can be undone. 1 2 3 Select the desired channel to which Dynamics is to be applied.
Creating Accompaniment Styles — Style Creator Editing the Channel Data In this display, there are five different channel-related edit functions, including Quantize, for editing the recorded accompaniment style data. The operations here apply to step 4 on page 100. See the explanations below. Preset channel BASSPHRASE 2 can not be edited. ■ Quantize Refer to page 93.
Creating Accompaniment Styles — Style Creator Making Style File Format Settings —Parameter This display provides a variety of style controls— such as determining how the pitch and sound of the recorded style change when playing the chords in the left-hand range of the keyboard. For details about the relationship between the parameters, refer to “Style File Format” on page 100. The operations here are the same as described in step 4 on page 100.
Creating Accompaniment Styles — Style Creator • NTT (Note Transposition Table) This sets the note transposition table for the source pattern. Six transposition types are available. Bypass No transposition. Melody Suitable for melody line transposition. Use this for melody channels such as Phrase 1 and Phrase 2. Chord Suitable for chord transposition. Use for the Chord 1 and Chord 2 channels, especially when they contain piano or guitar-like chordal parts. Bass Suitable for bass line transposition.
Creating Multi Pad — Multi Pad Creator The PSR-A1000 lets you create your own original Multi Pad phrases — which you can use in your performances in the same way as the preset Multi Pads. STOP MULTI PAD Operation 1 Select the desired Multi Pad Bank for editing. To record a new Multi Pad from scratch, call up the RECORD page in the Multi Pad Creator display and select “New Bank” by pressing the [C] (NEW BANK) button.
Creating Multi Pad — Multi Pad Creator Multi Pad Realtime Recording — Record The operations here apply to step 4 on page 109. Select the desired Multi Pad for recording or editing. You can also select it by pressing the MULTI PAD [1] to [4] button. A F B G C H D I E J Select this to engage the Record standby mode (synchronized standby). Select this to save the recorded pad data to USER or FLOPPY DISK drive. Selects an empty Multi Pad bank, allowing you to create a new Multi Pad from scratch.
Creating Multi Pad — Multi Pad Creator Step Recording or Editing Multi Pads — Edit With this method, you can create a Multi Pad by entering notes and other data individually, without having to perform them in real time. The operations here apply to step 4 on page 109. F F G G H H I I J J The actual recording process is the same as in Step Recording of songs (page 87), with the exception of the points described below.
Adjust the Volume Balance and Changing Voices — Mixing Console Set up just like a real mixing console, this display gives you comprehensive control over the sound. Mixing Console This set of controls lets you adjust the balance of the voices and their stereo position, as well as the amount of effect that is applied to each voice. MIXING CONSOLE PART You can call up additional basic mixing controls by using the [BALANCE] button and the [CHANNEL ON/OFF] button (page 58).
Adjust the Volume Balance and Changing Voices — Mixing Console Setting the Level Balance and Voice — Volume/Voice The operations for this page apply to step 2 of the procedure on page 112. 1 Set this to ON to enable automatic replacement of the XG voices (in XG song data) with the special voices of the PSR-A1000. To use the normal XG voice set, turn this off. Use these to select the VOICE, PANPOT, or VOLUME parameter rows.
Adjust the Volume Balance and Changing Voices — Mixing Console Changing the Tone of the Voice — Filter The operations for this page apply to step 2 of the procedure on page 112. Switches between the HARMONIC and BRIGHTNESS parameters. For details about the Filter, see page 81. DIGITAL STUDIO SOUND CREATOR n A F B G C H D I E J DIGITAL RECORDING MIXING CONSOLE PART Be careful with these controls. Depending on the selected voice, extreme settings may result in noise or distortion.
Adjust the Volume Balance and Changing Voices — Mixing Console Adjusting the Effects The operations for this page apply to step 2 of the procedure on page 112. 1 Indicates the type name for each effect block. Press this to edit and store the effect (page 115, 116). DIGITAL STUDIO SOUND CREATOR A F B G C H There are three effect sections: Reverb, Chorus, and DSP (which contains a variety of effect types). For details, refer to the Effect Block list (page 116).
Adjust the Volume Balance and Changing Voices — Mixing Console 3 A F B G C H D I E J Switches between the upper/lower parameters. For the lower parameter, the depth can be changed when the [VARIATION] button is on. Calls up the display for storing the effect. Determines the level of the effect (return level). This is not available when BLOCK is set to “DSP,” PARAMETER is set to “CONNECTION,” and VALUE is set to “Insertion.” 1 2 3 4 5 6 7 8 Determines the effect block.
Adjust the Volume Balance and Changing Voices — Mixing Console Effect Structure The PSR-A1000 features the following digital effect systems. The effect type, depth, and various parameters can be set with the panel controls. About the Effect Connections – System and Insertion All the effect blocks are connected or routed in one of two ways: System or Insertion. System applies the selected effect to all parts, while Insertion applies the selected effect to one specific part.
Making Global and Other Important Settings — Function The Function mode gives you access to various advanced functions related to the instrument as a whole. These sophisticated functions let you customize the PSR-A1000 to your own musical needs and preferences. FUNCTION Operation 1 MENU DEMO 2 Select the desired function. HELP FUNCTION 3 Set the parameters of the selected function. The operations for each function are covered in the following explanations.
Making Global and Other Important Settings — Function Making Settings for the Pedals and Keyboard — Controller ■ Pedal (page 123) These settings determine how the connected foot pedals (including foot controllers and footswitches) are used. They can be assigned to a variety of functions, letting you control operations with your feet — such as turning the accompaniment style on/ off, or triggering Fill In patterns.
Making Global and Other Important Settings — Function Fine Tuning the Pitch — Master Tune The explanations here apply to step #3 of the procedure on page 118. Tuning the Overall Pitch — Master Tune Hz (Hertz) This unit of measurement refers to the frequency of a sound, and represents the number of times a sound wave vibrates in a second. n The Tune function does not affect the Drum Kit or SFX Kit voices. 1 120 PSR-A1000 2 3 4 5 6 7 8 Determines the overall pitch of the PSRA1000, from 414.
Making Global and Other Important Settings — Function Setting Song-related Parameters — Song Settings The explanations here apply to step #3 of the procedure on page 118. Allows you to play back all songs from the same folder continuously. Turns Quick Start on/off (see note). A F B G C H D I E J Quick Start On some commercially available song data, certain settings related to the song (such as voice selection, volume, etc.) are recorded to the first measure, before the actual note data.
Making Global and Other Important Settings — Function Setting Auto Accompaniment-related Parameters — Style Setting, Split Point, and Chord Fingering The explanations here apply to step #3 of the procedure on page 118. Setting Auto Accompaniment-related Parameters — Style Setting and Split Point F G H I J These select the part to which the split point setting is applied: accompaniment, left-hand range, or both. Press the desired key for the split point while holding down one of these buttons.
Making Global and Other Important Settings — Function Setting the Fingering Method — Chord Fingering This determines how the notes you play on the keyboard indicate or play the chords of the accompaniment. To learn how to play certain chords, use the convenient Chord Tutor function (see note below). Indicates the note that belongs to a chord. Some notes can be omitted. The chord name is indicated next to “CHORD NAME.” .. Required .. Can be omitted .. Either note can be omitted ..
Making Global and Other Important Settings — Function Pedal-controllable Functions VOLUME* Allows you to use a foot controller (FOOT PEDAL 2 only) to control the volume. SUSTAIN When the pedal is pressed notes played have a long sustain. Releasing the pedal immediately stops (damps) any sustained notes. SOSTENUTO If you press and hold the pedal here, only the first note will be sustained (the note that you played and held when pressing the pedal).
Making Global and Other Important Settings — Function Changing the Touch Sensitivity and Transpose — Keyboard/Panel Keyboard Touch The Touch feature lets you control the volume of the voices by your playing strength. These settings allow you to customize the keyboard’s touch response (sensitivity) to your personal playing preferences. Selects the desired parameter: Keyboard Touch or Transpose Assign. HARD 2 Requires strong playing to produce high volume. Best for players with a heavy touch.
Making Global and Other Important Settings — Function Setting the Registration Sequence, Freeze, and Voice Set The explanations here apply to step #3 of the procedure on page 118. Specifying the Order for Calling Up Registration Memory Presets — Registration Sequence You can save your custom panel settings to the Registration Memory presets, and call them up by pressing the appropriate REGISTRATION MEMORY buttons [1] - [8].
Making Global and Other Important Settings — Function Changing the Automatically Selected Voice Settings — Voice Set When changing voices (selecting a voice file), the settings best matching the voice — the same as those set in the Sound Creator — are always and automatically called up. From this page, you can set the on/off status for each part.
Making Global and Other Important Settings — Function About the Harmony Types When a normal Harmony type (“Standard Duet” through “Strum”) is selected Split point Chords played to the left of the split point control the harmony. Harmony notes (based on the chord and the selected type) are automatically added to the melody played to the right of the split point.
Making Global and Other Important Settings — Function Setting the MIDI Parameters In this section, you can make MIDI-related settings for the instrument. These settings can be stored all together from the USER display, for future recall.For general information and details about MIDI, see “What is MIDI?” (page 139). The explanations here apply to step #3 of the procedure on page 118. 1 A F B G C H D I E J 1 3 Preset MIDI Templates (Factory Set) Select the desired template.
Making Global and Other Important Settings — Function Clock, Transmit Clock, Receive Transpose, Start/Stop ■ Clock Determines whether the PSR-A1000 is controlled by its own internal clock or a MIDI clock signal received from an external device. “INTERNAL” is the normal Clock setting when the PSR-A1000 is being used alone.
Making Global and Other Important Settings — Function Receiving MIDI Data — Receive This determines which parts will receive MIDI data and over which MIDI channel the data will be received. The MIDI IN/OUT terminals and Port A of the TO HOST terminal (Port A of the CBX driver) correspond to channels 1 - 16. Port B of the TO HOST terminal (Port B of the CBX driver) corresponds to channels 17 - 32. A Determines the channel for changing receive settings.
Making Global and Other Important Settings — Function Other Settings — Utility The explanations here apply to step #3 of the procedure on page 118. Making Settings for Fade In/Out, Metronome, Parameter Lock, and Tap — CONFIG 1 Fade In Time, Fade Out Time, Fade Out Hold Time These determine how long it takes for the accompaniment style and song to fade in or fade out. Determines the time it takes for the volume to fade in, or go from minimum to maximum (range of 0 - 20.0 seconds).
Making Global and Other Important Settings — Function Parameter Lock This function is used to “lock” the specified parameters so that they can only be changed directly via the panel controls — in other words, instead of via Registration Memory, or song and sequence data. Selects the desired parameter for locking/ unlocking. 1 2 3 4 5 6 7 8 Determines whether the selected parameter is locked (checkmarked) or unlocked (empty).
Making Global and Other Important Settings — Function Copying and Formatting Disks — Disk This function copies all the data from one disk to another, letting you back up all your important data before editing. For instructions, see “Copying from Disk to Disk” below. F G H I This function formats a floppy disk (see below). J 1 2 3 4 5 6 7 8 Turns the Song Auto Open function on or off. When this is set to “ON,” the PSR-A1000 automatically calls up the first disk song when a disk is inserted.
Making Global and Other Important Settings — Function Entering Your Name and Language Preference — Owner F G H Press this button to enter an Owner name (for instructions on naming see page 42). This name is automatically shown when you turn the power on. I J Determines the language used for the display messages. Once you change this setting, all messages will be shown in the selected language.
Using Your PSR-A1000 with Other Devices CAUTION Before connecting the PSR-A1000 to other electronic components, turn off the power to all the components. Before turning the power on or off to all components, set all volume levels to minimum (0). Otherwise, electrical shock or damage to the components may occur.
Using Your PSR-A1000 with Other Devices 3 Using the Pedal (footswitch) or Foot Controller (FOOT PEDAL 1/2 jack) By connecting a Foot Switch (the FC4 or FC5) to one of the FOOT PEDAL jacks, you can replicate the function of some panel buttons, doing things like starting and stopping accompaniment.
Using Your PSR-A1000 with Other Devices 5 Connecting to a Computer (MIDI terminals/TO HOST terminal) Connect your PSR-A1000 to computer and take advantage of the wide range of powerful and versatile software for creating and editing music. The PSR-A1000 can be connected in three ways.
Using Your PSR-A1000 with Other Devices Using the MIDI terminals Using the USB terminal on your computer with a USB/MIDI interface (UX256/UX96, etc.) When using a MIDI interface device installed in the personal computer, connect the MIDI terminals of the personal computer and the PSR-A1000 with standard MIDI cables. Connect the UX256/UX96 and the computer with a USB cable. Install the included UX256/UX96 driver to the computer, and connect the UX256/UX96 to the PSRA1000 with a MIDI cable.
Using Your PSR-A1000 with Other Devices Now let’s examine what happens when we play back a recording. When you playback a music CD (for example, a solo piano recording), you’re hearing the actual sound (vibrations in air) of the acoustic instrument. This is called audio data, to distinguish it from MIDI data.
Using Your PSR-A1000 with Other Devices ■ Example Keyboard Data Voice number (with what voice) 01 (grand piano) Note number (with which key) 60 (C3) Note on (when was it pressed) and note off (when was it released) Timing expressed numerically (quarter note) Velocity (about how strong) 120 (strong) Panel operations on the PSR-A1000, such as playing the keyboard and selecting voices, are processed and stored as MIDI data. The auto accompaniment styles and songs also consist of MIDI data.
Using Your PSR-A1000 with Other Devices As you can see, it is essential to determine which data is to be sent over which MIDI channel when transmitting MIDI data (page 130). The PSR-A1000 also allows you to determine how the received data is played back. (page 131). ■ System Messages This is data that is used in common by the entire MIDI system.
Using Your PSR-A1000 with Other Devices Sequence Format Voice Allocation Format The system which records song data is called “sequence format.” Playback is only possible when the sequence format of the disk matches that of the MIDI device. The PSR-A1000 is compatible with the following formats. With MIDI, voices are assigned to specific numbers, called “program numbers.” The numbering standard (order of voice allocation) is referred to as the “voice allocation format.
Troubleshooting Problem 144 Possible Cause and Solution • The PSR-A1000 does not turn on; there is no power. Make sure that the PSR-A1000 has been plugged in properly (page 16). • A click or pop is heard when the power is turned on or off. This is normal when electrical current is applied to the instrument. • Noise is heard from the PSR-A1000’s speakers. Using a mobile phone in close proximity to the PSR-A1000 may produce interference.
Troubleshooting Problem Possible Cause and Solution • Certain notes sound at the wrong pitch. The Scale parameter has probably been set to something other than “Equal,” changing the tuning system of the keyboard. Make sure “Equal” is selected as the Scale in the Scale Tune page (page 72). • Some channels do not properly play back when playing back song data. Make sure that playback of the relevant channel(s) is turned on (page 69). • The Harmony function does not operate.
Specifications : available Model Name PSR-A1000 Sound Source AWM Dynamic Stereo Sampling Display 320 ✕ 240 dots backlit graphic LCD Keyboard 61 keys (C1 - C6 with Initial Touch) Voice Polyphony (max) 32 Number of Voices 276 regular voices + 480 XG voices + 20 Drum Kits Number of Oriental Voices 43 Number of Oriental Drum Kits 6 Number of Sweet Voices 3 Number of Cool Voices 1 Sound creator Effects Effect Blocks Effect Types Accompaniment Style Reverb 1 Chorus 1 DSP 1 REVERB 23
Specifications Model Name Scale Scale Memory buttons Scale Template Registration Memory PSR-A1000 Scale Tuning Buttons 6 Equal Temperament, Bayat, Rast, Pure Major, Pure Minor, Pythagorean, Mean-Tone, Werckmeister, Kirnberger 8 Regist Sequence Freeze Others Demo Language Function, Voice, Style 3 languages (English, German, French) Help Direct Access Master Volume Fade In/Out Transpose Keyboard/Song/Master Tuning Touch Response Jacks/Connectors Pedal Functions Amplifiers/ Speakers VOLUME, SUST
Index Numerics 1 - 16 ............................................................................. 87, 96 [1▲▼] - [8▲▼] buttons ........................................... 19, 35–42 A A (ACMP) ........................................................................... 122 [A] - [J] buttons............................................................... 19, 37 Accent Type ....................................................................... 105 Accessories .................................................
Index Edit the Created Accompaniment Style ............................... 104 Editing a Recorded Song....................................................... 93 Editing Channel-related Parameters ...................................... 93 Editing Chord Events ............................................................ 97 Editing Note Events .............................................................. 96 Editing System Events ...........................................................
Index Measure/Beat/Clock ............................................................. 88 Memorizing the Scale Setting – Scale Memory ..................... 74 [MEMORY] button (REGISTRATION MEMORY) ............. 19, 76 [MEMORY] button (SCALE MEMORY)............................ 18, 74 Message Switch .................................................................. 130 Messages ................................................................................ 8 Metronome ........................................
Index S S.STOP WINDOW ............................................................. 122 SAVE .................................................................................... 41 Save ............................................................................... 35, 41 Saving Files .......................................................................... 41 Saving Your Registration Memory Setups.............................. 77 Saving Your Scale Settings ................................................
Index Transmitting MIDI Data ...................................................... 130 TRANSPOSE [E] [ ] buttons.................................... 19, 125 Transpose Assign ................................................................ 125 Tune................................................................................... 114 TUNING ............................................................................ 114 Tuning the Overall Pitch ....................................................
MEMO PSR-A1000 153
OBSERVERA! Apparaten kopplas inte ur växelströmskällan (nätet) sá länge som den ar ansluten till vägguttaget, även om själva apparaten har stängts av. ADVARSEL: Netspæendingen til dette apparat er IKKE afbrudt, sálæenge netledningen siddr i en stikkontakt, som er t endt — ogsá selvom der or slukket pá apparatets afbryder. VAROITUS: Laitteen toisiopiiriin kytketty käyttökytkin ei irroita koko laitetta verkosta.
For details of products, please contact your nearest Yamaha or the authorized distributor listed below. Pour plus de détails sur les produits, veuillez-vous adresser à Yamaha ou au distributeur le plus proche de vous figurant dans la liste suivante. CENTRAL & SOUTH AMERICA MEXICO Yamaha de Mexico S.A. De C.V., Departamento de ventas Javier Rojo Gomez No.1149, Col. Gpe Del Moral, Deleg. Iztapalapa, 09300 Mexico, D.F. Tel: 686-00-33 BRAZIL Yamaha Musical do Brasil LTDA. Av.
Yamaha PK CLUB (Portable Keyboard Home Page, English only) http://www.yamahaPKclub.com/ Yamaha Manual Library http://www2.yamaha.co.jp/manual/english/ M.D.G., Pro Audio & Digital Musical Instrument Division, Yamaha Corporation © 2002 Yamaha Corporation Printed in Indonesia ??????? ???AP???.