
Operation Manual

25
| | | | | | | | | | | | | | | | | | | | | | | | | | | | | | | | | | | | | | | | | | | | | | | | | | | | | | | | | | | | | | | | | | | | | | | | | | | | | | | | | | | | | | | | | | | | | | | | | | | | | | | | | | | | | | | | | | | | | | | | | | | | | | | | | | | | | | | | | | | | |
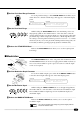
■ Setting the Auto Accompaniment Split Point
To set the Auto Accompaniment split point, first turn Auto Accompani-
ment ON — press the [AUTO ACCOMP] button so that its indicator lights
— then proceed with steps 2 and 3 as described in “Split Point Change” on
page 20. The default Auto Accompaniment split point (55) can be instantly
recalled by pressing both the [+] and [–] buttons at the same time.
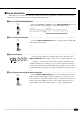
STYLE
SELECT
AUTO
ACCOMP
SPLIT
POINT
NOTES
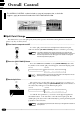
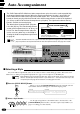
• If the Auto Accompaniment split point is set at a lower key than
the orchestration split point, the L1 and/or L2 voice will sound
between the Auto Accompaniment and orchestration split
points.
• If the Auto Accompaniment split point is set at a higher key
than the orchestration split point, the L1 and/or L2 voice will
sound throughout the entire Auto Accompaniment section.
• If the Auto Accompaniment “Full” fingering mode is selected,
the L1 and/or L2 voice will sound to the left of the orchestration
split point while the R1 and/or R2 voice will sound to the right of
the orchestration split point.
▼▼
Auto
Accompaniment
Left voice Right voice
Orchestration split point
Auto Accompaniment split point
▼
Left voice Right voice
Auto Accompaniment
Orchestration split point
▼▼
Right voice
Auto Accompaniment
Left voice
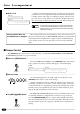
■ Auto Accompaniment Fingering
The PSR-1700 and PSR-2700 have 5 Auto Accompaniment fingering modes, selected via the [FINGERING]
button.
Orchestration split point
Auto Accompaniment split point
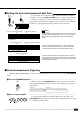
ZPress the [FINGERING] Button .............................................................................................................
When you press the [FINGERING] button the currently selected Auto
Accompaniment fingering number and type name will appear on the LCD
display panel.
MODE
................
1 CHORD 1
2 CHORD 2
3 SINGLE
4 MULTI
5 FULL
FINGE-
RING
PSR-2700PSR-1700
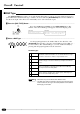
XSelect a Fingering Mode ........................................................................................................................
021
–+
RESET
Use the [+] and [–] buttons, the number buttons, the data dial, or the
[FINGERING] button itself to select the required fingering mode (see page
9 for editing procedure details).
Fingrng=1–:Chord1
08:Showtune 001:GrandPno
C Fingrng=1–:Chord1