Setting Up Reference Quick Guide DIGITAL KEYBOARD Appendix Owner’s Manual How to use this manual Before using the PSR-E323/YPT-320, be sure to read the “PRECAUTIONS” section on pages 4–5. Follow the instructions described in “Setting Up,” then try out the simple operations in “Quick Guide.” “Reference” provides detailed descriptions and procedures for getting the most out of the instrument. After you’ve read the manual, keep it safe and handy for future reference.
SPECIAL MESSAGE SECTION This product utilizes batteries or an external power supply (adapter). DO NOT connect this product to any power supply or adapter other than one described in the manual, on the name plate, or specifically recommended by Yamaha. This product may also use “household” type batteries. Some of these may be rechargeable. Make sure that the battery being charged is a rechargeable type and that the charger is intended for the battery being charged.
FCC INFORMATION (U.S.A.) 1. IMPORTANT NOTICE: DO NOT MODIFY THIS UNIT! This product, when installed as indicated in the instructions contained in this manual, meets FCC requirements. Modifications not expressly approved by Yamaha may void your authority, granted by the FCC, to use the product. 2. IMPORTANT: When connecting this product to accessories and/or another product use only high quality shielded cables. Cable/s supplied with this product MUST be used. Follow all installation instructions.
PRECAUTIONS PLEASE READ CAREFULLY BEFORE PROCEEDING * Please keep this manual in a safe place for future reference. WARNING Always follow the basic precautions listed below to avoid the possibility of serious injury or even death from electrical shock, short-circuiting, damages, fire or other hazards. These precautions include, but are not limited to, the following: Power supply/AC power adaptor Water warning • Only use the voltage specified as correct for the instrument.
Handling caution • Do not insert a finger or hand in any gaps on the instrument. • Never insert or drop paper, metallic, or other objects into the gaps on the panel or keyboard. If this happens, turn off the power immediately and unplug the power cord from the AC outlet. Then have the instrument inspected by qualified Yamaha service personnel. • Do not place vinyl, plastic or rubber objects on the instrument, since this might discolor the panel or keyboard.
What You Can Do With the PSR-E323/YPT-320 Playing Changing Voices > pages 12, 13 The instrument Voice that sounds when you play the keyboard can be changed to violin, flute, harp, or any of an extensive range of voices. You can also restore the piano settings with a simple press of a button. Adding Reverb to the sound >page 43 The reverb effects add a warm ambience to the sound, simulating the complex reflections of actual performance spaces, such as a concert hall or small club.
Contents Power Requirements ................................................. 8 Audio Connections — Headphones and External Equipment.................... 9 Connecting a footswitch............................................. 9 Turn on the power...................................................... 9 Using the music rest .................................................. 9 Removing the protective film...................................... 9 Panel Controls and Terminals 10 Front Panel ....................
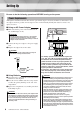
Setting Up Setting Up Be sure to do the following operations BEFORE turning on the power. Setting Up Power Requirements Although the instrument will run either from an optional AC adaptor or batteries, Yamaha recommends use of an AC adaptor whenever possible. An AC adaptor is more environmentally friendly than batteries and does not deplete resources. ■ Using an AC Power Adaptor q Make sure that the power of the instrument is off (the backlit display is off).
Setting Up Make all necessary connections BEFORE turning the power on. Setting Up Turn on the power Audio Connections — Headphones and External Equipment Turn down the volume by turning the [MASTER VOLUME] control to the left and press the [STANDBY/ON] switch to turn on the power. While playing the keyboard, adjust the volume level by using the [MASTER VOLUME] control. Pressing the [STANDBY/ON] switch again turns the power off.
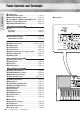
Panel Controls and Terminals ■ Front Panel Setting Up q [STANDBY/ON] switch ..........................................page 9 w [MASTER VOLUME] control ............................... pages 9 e [1 LISTENING 2 TIMING 3 WAITING] button .... pages 32 r [KEYS TO SUCCESS] button............................ pages 28 t [PHRASE REPEAT] button ............................... pages 35 ■ Front Panel When the lesson mode y PART [L] button .............................................................
Panel Controls and Terminals Display (page 27) u Song List (page 72) Style List (page 70) !2 i 001 GrandPno o !4 !3 !0 001 y !9 Music Database List (page 71) Setting Up Voice List (page 64) !1 @1 @0 @2 @3 @4 @5 @6 @7 ■ Rear Panel @9 001 #0 #1 #2 GrandPno 001 PSR-E323/YPT-320 Owner’s Manual 11
Changing the Voices Quick Guide This instrument features a variety of realistic, built-in voices. The grand piano Voice is automatically selected whenever the power is turned on, but you can easily change this guitar, drum, or any of an extensive range of voices. Grand Piano Voice 12 Quick Guide Try playing a variety of instrument Voices 1 Press the [VOICE] button. The Voice number and name are displayed.
Changing the Voices Select a Voice. Select the desired Voice by using the number buttons [0]–[9], [+], [-]. Refer to the Voice List on page 64. 084 3 The Voice shown here becomes the Main Voice for the instrument. Flute Quick Guide 2 Play the keyboard. Try selecting and playing different Voices. Playing the Grand Piano Voice When you simply want to play a piano Voice, all you have to do is press one convenient button. Press the [PORTABLE GRAND] button.
Changing the Voices Percussion and drum icons Metronome Quick Guide Using the Metronome The instrument features a built-in metronome (a device that keeps an accurate tempo) that is convenient for practicing. Press the [METRONOME] button to start the metronome. To stop the metronome, press the [METRONOME] button again.
Changing the Voices Playing the Drum Kit Voice When Voice number 109 (Drum Kit) is selected in step 2 on page 13, you can play different percussion sounds directly from the keyboard. Quick Guide To check which percussion sounds are assigned to each key when you select Voice number 109, look at the icons printed above the keys. You can select and play the desired Drum Kit from 12 preset Drum Kits (Voice number 109–121).
Playing Songs This instrument has 102 built-in Songs. For this instrument, the term “Song” refers to the data that makes up a piece of music. Listening to a Song. 3 1 2 Quick Guide Select and Listen to a Specific Song 1 Press the [SONG] button. The Song number and name are displayed. Song number “004” is automatically selected whenever the power is turned ON. Song number 004 Song name Elise 1 -01 The songs are organized by category. For details, see page 72.
Playing Songs 3 Select a Song. Select the desired song by using the number buttons [0]–[9], [+], [-]. Refer to the Song List on page 72. NOTE • You can play Songs recorded from the instrument or transferred from a computer. The procedure for playing these Songs is the same as that of the built-in Songs. Press the [START/STOP] button. The Song will begin playing. You can stop playback at any time by pressing the [START/ STOP] button.
Play with a Style Styles are rhythm/accompaniment patterns and are played by the auto accompaniment feature. You can select from a wide variety of rhythmic types—rock, blues, Euro trance, and many, many more. Here we’ll learn how to select and play Styles using chords. While you play, you can automatically add specially created intros and endings, as well as variations in the rhythm/chord patterns, for more dynamic, professional-sounding performances.
Play with a Style Play along with the styles Press the [STYLE] button. NOTE The Style number and name are displayed. Style number 001 Style name 8BtModrn 001 2 Select a Style. NOTE Select the desired Style by using the number buttons [0]–[9], [+], [-]. Refer to the Style List on page 70. 018 3 • You can also select commercially available Style Files. To do this load the Style Files from the computer to the instrument, and then register the style data starting with to style number 107.
Play with a Style 4 Turn auto accompaniment on. Press the [ACMP ON/OFF] button. Press the [ACMP ON/OFF] button again to turn the auto accompaniment off. 018 NOTE • If you press the [START/ STOP] button while the auto accompaniment is off, only the rhythm (percussion) parts will start. LoveSong 001 Appears when auto accompaniment is on ● When auto accompaniment is on ... Quick Guide The keys to the left of the Split Point (54; F#2) will play only chords.
Play with a Style Practice — Aura Lee — Recommended Style: 018 Love Song Recommended Voice: 047 String Ensemble A D C E D7 Quick Guide G Composer: G.
Play with a Style Changing the tempo of the Style Styles can be played at any tempo you desire—fast or slow. 1 2 Quick Guide 1 Press the [TEMPO/TAP] button to call up the Tempo setting in the display after selecting a Style. Current Tempo value 070 2 Tempo Set the Tempo by using the number buttons [0]–[9], [+], [-]. NOTE • Press the [+] and [-] buttons simultaneously to instantly reset the value to the default tempo of a Style.
Play with a Style Pattern Variation (Sections) The instrument features a wide variety of Style “sections” (patterns) that allow you to vary the arrangement of the accompaniment to match the Song you are playing. Intro This is the beginning of the Song. Main Ending This is the main part of the Song. This is the end of the Song. Quick Guide Fill in This is the transition between main patterns. Adding an Intro Switching Main Patterns Pressing the [INTRO/ENDING/rit.
Play with a Style Playing chords along with score of the Song Below is an example of a melody score with chord indications. Chord Quick Guide Play the melody on the staff with your right hand, and chords with your left hand. Find the appropriate chords on the next page and play them as illustrated. Melody Chords ● Chord names From the chord name, you can tell at a glance what type of chord it is and which notes make up the chord.
Play with a Style Chords For users who are new to chords, this chart features common chords. Since there are many useful chords and many different ways to use them musically, refer to commercially available chord books for further details. ★ indicates the root note.
Basic Operation and Displays Reference Basic Operation Press a button to select a basic function: Voice, Song or Style. 1 Select a basic 3 Start a function. function. Display (page 27) 001 2 Select an item or value. GrandPno 001 Press the [SONG] button to access the SONG functions (printed above the buttons), and press the [STYLE] button to access the STYLE functions (printed below).
Basic Operation and Displays Display The Main display shows all of the current basic settings for Song, Style and Voice. It also includes a range of indicators that show the on/off status for various functions. KEYS TO SUCCESS Appears when the Keys to Success function is on (page 28). SONG/VOICE/STYLE Indicate the operating condition of the instrument. PHRASE REPEAT Appears when the Phrase Repeat function is on (page 35). REVERB Appears when Reverb is on (page 43).
Song Lesson You can practice the preset Songs using these lesson functions: “Keys to Success,” “Listening, Timing, Waiting” and “Phrase Repeat.” Keys to Success helps you master a Song, whereas Listening, Timing, Waiting helps you first master the timing then playing the correct notes. Phrase Repeat lets you select and repeatedly practice a specific phrase in the Song. If you’re using a keyboard instrument for the first time, we suggest you start with Keys to Success.
Song Lesson 3 Start the Lesson. Press the [START/STOP] button to start Lesson. After the lead-in, Step 01 of the song starts automatically, and the appropriate notes appear in the display. Lr Step01 • In some Steps, the lead-in may run a little slower than normal because a ritardando or fermata section is placed before the Step. NOTE 001 You can start playing along on the keyboard as soon as the lead-in finishes. The score marker and keyboard marker in the display will indicate the notes to play.
Song Lesson Entering and Clearing the Passing Status ● Entering Passing status will automatically be entered and shown in the display when the Step or Song is selected. You can recognize at a glance whether or not you’ve passed the selected Step or Song.
Song Lesson Listening Timing Waiting You can select any Song you like and use it for a left-hand, right-hand, or both-hands lesson. Song Lesson lets you learn how to play Songs in three easy steps. Songs that can be used with the Lesson feature include Songs transferred from a computer to flash memory (SMF Format 0 only; see page 60). The procedure for transferring songs are described on page 61. The lesson modes: 1 Listening ................. Listen and learn the melody or rhythm of a selected Song.
Song Lesson 2 Select the part you want to practice. Press the [R] button for a right-hand lesson, [L] button for a left-hand lesson, or press both the [R] and [L] buttons simultaneously for a bothhands lesson. The selected part is displayed. Left-hand lesson Right-hand lesson Left Right Both-hands lesson BothHand A “No LPart” message is shown in the display if you select the left part in one of the Songs intended for right-hand lesson, which do not have left part data.
Song Lesson Start Lesson. Song playback will begin automatically when you select Lesson mode, and the appropriate notes appear in the display. NOTE • You cannot use Dual or Split Voices during lessons. • The Split Point is fixed and it cannot be changed. For the left-hand lesson, it is fixed at 59 or B2; for the left-hand chord lesson, it is fixed at 54 or F#2. 1 Listening There’s no need to play the keyboard in this mode.
Song Lesson You can select Lesson modes by pressing the [1 LISTENING 2 TIMING 3 WAITING] button respectively. 5 Stop the Lesson mode. You can stop the Lesson mode at any time by pressing the [START/ STOP] button. Grade When the lesson Song has played all the way through in Lesson mode 2 Timing or 3 Waiting, your performance will be evaluated in four levels: OK, Good, Very Good, or Excellent.
Song Lesson Phrase Repeat This function allows you to repeatedly practice difficult phrases, by selecting a phrase and repeatedly play it back. You can also mute one of the parts, and practice just the other part repeatedly. The specified phrase can also be practiced along with the Lesson modes “1 Listening,” “2 Timing” or “3 Waiting” described on page 31.
Play Using the Music Database You want to play music in your favorite style, but you’re not sure how to select the best voice and style for the type of music you want to play ... simply select the appropriate style from the Music Database. The panel settings will automatically be adjusted for the ideal combination of sounds and style! 1 Press the [MUSIC DATABASE] button. 001 AlvFever A Music Database name will appear in the display. 2 Select a Music Database.
Record your own performance You can record up to five of your own performances as User Songs (User 1–5: Song numbers 103–107). Think of each User Song as a kind of basket or drawer for storing your recording. Remember that you can also record a Style (containing chord changes) along with your own performance. 1 Press the [REC] button. NOTE rEC • A total of approximately 10,000 notes or 5,500 chord changes can be recorded to the five User Songs.
Record your own performance 3 Stop recording. Pressing the [START/STOP] button stops recording and writes the data to the User Song. (A “Writing!” message is shown.) To playback the newly recorded performance, press the [START/ STOP] button. ● In order to record with the Style, turn the Auto Accompaniment to on (see Step 4 on page 20), and then record according to the instructions. (The “ACMP ON” lights.
Record your own performance Specifying track recording 1 2 Turn ACMP (auto accompaniment) on or off, depending on what you want to record. If you want to record Style playback, turn ACMP on. If you want to record only your own keyboard performance, turn ACMP off. Specify the track you want to record. Specify the track 2 when you want to record the Style. When you want to record your own keyboard performance, you can specify either track.
Record your own performance Deleting User Songs Deleting an entire User Song. NOTE • You cannot delete a specific track from a User Song. 1 Press the [SONG] button and select the User Song you want to delete by using the number buttons [0]–[9], [+], [-]. 103 2 User 1 Press and hold the [REC] button for longer than a second. The Song Delete display appears. YES ClrUser1 Hold for longer than a second. You can cancel the delete operation by pressing the [-/NO] button.
Initialization Initialization This function erases all backup data in the instrument’s flash memory and restores the initial default settings. The following initialization procedures are provided. Turn the power on by pressing the [STANDBY/ON] switch while holding the highest white key on the keyboard. The backed up data will be erased and the default values restored. CAUTION • When you execute the Initialization, backup parameters will be cleared.
Voice Settings 3 Adding Harmony This feature adds harmony notes as well as tremolo or echo effects to the Main Voice. 1 Press the [HARMONY] button to turn harmony on. When you don’t want to add harmony notes, press the [HARMONY] button again to turn Harmony off. Select a desired Harmony Type by using the number buttons [0]–[9], [+], [-]. Refer to the Harmony Type list on page 73. Try playing the keyboard with the harmony function.
Voice Settings Adding Reverb Adding Chorus Reverb adds the ambience of a room or concert hall to the sound that you play on the keyboard. To add Reverb Press the [REVERB] button to turn Reverb on. Reverb is normally on. You can check how the selected Reverb Type sounds by playing the keyboard. To turn Reverb off, press the [REVERB] button again. This effect makes the Voice sound richer, warmer and more spacious.
Voice Settings Adding Panel Sustain This function adds a fixed sustain to the keyboard Voices. 1 Touch Response Sensitivity Touch Response Press the [FUNCTION] button a number of times until the “Sustain” item appears. oFF Sustain ndPno Current setting 2 Press the [+] button to turn the Panel Sustain on. Panel Sustain will be added to the notes you play on the keyboard when the Panel Sustain is on. To turn it off, press the [-] button. on Sustain On Appears when Touch Response is on.
Voice Settings Selecting a Dual Voice Playing Two Voices Simultaneously—Dual You can select a second Voice which will play in addition to the Main Voice selected on the previous page. This second Voice is known as the Dual Voice. The best-suited Dual Voice is automatically selected whenever you turn Dual on, but you can select any of the available Dual Voices. 1 Press and hold the [DUAL] button for longer than a second. “D.
Voice Settings Playing Different Voices with the Left and Right Hands—Split In the Split mode you can play different Voices to the left and right of the keyboard “Split Point.” The main and Dual Voices can be played to the right of the Split Point, while the Voice played to the left of the Split Point is known as the “Split Voice” Select a Split Voice You can select a different Split Voice by following the procedure outlined below. 1 Press and hold the [SPLIT] button for longer than a second. “S.
Voice Settings Setting the Split Point Adjusting the Voice volume The Split Point setting can be changed as desired. The Voice volume can be individually adjusted for the Main, Dual, and Split Voices. Split Point—default setting: 54 (F#2) 36 48 60 72 84 1 96 Select “M.Volume” for Main Voice volume, “D.Volume” for Dual Voice volume, or “S.Volume” for Split Voice volume. The initial default Split Point is key number 54 (the F#2 key), but you can change it to another key.
Voice Settings Setting the Metronome Beats per Measure, and the Length of Each Beat In this example we’ll set up a 3/4 time signature. 1 Setting the Metronome Volume 1 Press and hold the [METRONOME] button for longer than a second to select the number of beats per measure function “TimeSigN”. Press the [FUNCTION] button a number of times until “MetroVol” appears. 100 MetroVol Metronome Volume Hold for longer than a second. Number of beats per measure.
Voice Settings Octave Transpose The pitch of a note can be shifted upward or downward in steps of an octave for the Main, Dual, and Split Voices. 1 Press the [FUNCTION] button a number of times until the required Voice octave item appears. Select “M. Octave” for Main Voice octave, “D. Octave” for Dual Voice octave, “S. Octave” for Split Voice octave.
Voice Settings Tuning One Touch Setting You can fine tune the pitch of the entire instrument. The overall tuning of the instrument can be shifted up or down by a maximum of 100 cents in 1-cent increments (100 cents = 1 semitone). 1 Press the [FUNCTION] button a number of times until “Tuning” appears. 000 Tuning Sometimes selecting the ideal Voice to play with a Song or Style can be confusing.
Song settings Mute A-B Repeat The Song is made up by several tracks. You can mute Track 1 or Track 2 during Song playback. You can turn the left- and right-hand parts on or off as desired, allowing you to listen to the corresponding part (the part that is turned on), or practice the corresponding part (the part that is turned off) on the keyboard. This function lets you specify a section of a Song—“A” is the start point and “B” is the end point—for repeat playback.
Song settings Song Volume Changing the Melody Voice This procedure allows you to adjust the balance between Song playback and the notes you play on the keyboard by setting the volume of the playback sound. 1 2 You can change a Song’s melody Voice to any other Voice you prefer. NOTE • You cannot change the melody Voice of a User Song. Press the [SONG] button. Press the [FUNCTION] button a number of times until “SongVol” appears. 1 Select the Song and play it.
Style (Auto Accompaniment) Functions Starting Style playback The following two methods can be used to start Style playback. In either case you will need to press the [ACMP ON/OFF] button to turn auto accompaniment on before actually starting Style playback. ■ Synchro Start (Chord Start) Press the [SYNC START] button and the beat arrows will begin flashing, indicating that the Sync Start “standby” mode has been engaged.
Style (Auto Accompaniment) Functions Looking up Chords Using the Chord Dictionary 3 The Dictionary function is essentially a built-in “chord dictionary” that shows you the individual notes of chords. It is ideal when you know the name of a certain chord and want to quickly learn how to play it. 1 Press the “M7” (major seventh) key in the section of the keyboard labeled “CHORD TYPE > .” (The note doesn’t sound.
Style (Auto Accompaniment) Functions Registering Style Files This instrument features 106 internal styles, but other styles, such as those which can be obtained from the internet (only styles with the “.sty” suffix), can be registered into style number 107 and used in the same way as the internal styles. In order to use the style file register function, the file must already have been transferred from the computer to the instrument.
Function Settings The [FUNCTION] button gives you access to a variety of operations related to adjusting or enhancing the sound and making settings for connection to external devices. Select the item and change the value There are 34 different items that can be set. 1 Press the [FUNCTION] button a number of times until desired item appears. Each time the [FUNCTION] button is pressed 34 function items are displayed in sequence.
Function Settings Dual Voice Volume Dual Voice Octave Display Range/settings Description D.Voice 001–482 Selects the Dual Voice. D.Volume 000–127 Determines the volume of the Dual Voice. D.Octave -2–0–2 Determines the octave range for the Dual Voice. Dual Voice Chorus Send Level D.Chorus 000–127 Determines how much of the Dual Voice’s signal is sent to the Chorus effect. Split Voice S.Voice 001–482 Selects the Split Voice. Determines the volume of the Split Voice.
About MIDI The instrument features a MIDI terminals that can be connected to other MIDI instruments and devices for expanded musical functionality. What is MIDI? MIDI (Musical Instrument Digital Interface) is a world-standard interface for communication between electronic musical instruments and music devices.
About MIDI ■ MIDI settings These settings should be made when transmitting/receiving performance data to a connected MIDI device or computer. PC Mode The PC settings instantly reconfigure all important MIDI settings (as shown below). The selections are PC1, PC2 and OFF.
About MIDI Remote Control of MIDI Devices You can also use this instrument as a remote control device for the Digital Music Notebook application on your computer (via the MIDI connection) —controlling playback, stop and transport functions from the panel. ● Remote control keys PSR-E323/YPT-320: To use the remote control functions, simultaneously hold down the lowest two keys on the keyboard (C1 and C#1) and press the appropriate key (shown below).
About MIDI Connecting a personal computer After installing the Musicsoft Downloader application on your computer, connect the PSR-E323/ YPT-320 as described below. A Yamaha UX16 or similar USB-MIDI interface (sold separately) will be necessary for MIDI connection between the PSR-E323/YPT-320 and a USB-equipped computer. Make sure to purchase a Yamaha UX16 or a quality USB-MIDI interface at a musical instrument store, computer store or electrical appliance store.
About MIDI Transferring a backup file from the PSRE323/YPT-320 to a computer You can transfer backup data (page 41) other than “Passing status of Song and Step” to a computer as a “backup file” by using Musicsoft Downloader. Move the file from “System Drive” under “Electronic Musical Instruments” to the computer via the Musicsoft Downloader.
Troubleshooting Appendix Problem Possible Cause and Solution When the instrument is turned on or off, a popping sound is temporarily produced. This is normal and indicates that the instrument is receiving electrical power. When using a mobile phone, noise is produced. Using a mobile phone in close proximity to the instrument may produce interference. To prevent this, turn off the mobile phone or use it further away from the instrument.
Voice List ■ Maximum Polyphony • • • • • • • • • • • • • • • • • • • • • NOTE The instrument has 32-note maximum polyphony. This means that it can play a maximum of up to 32 notes at once, regardless of what functions are used. Auto accompaniment uses a number of the available notes, so when auto accompaniment is used the total number of available notes for playing on the keyboard is correspondingly reduced. The same applies to the Split Voice and Song functions.
Voice List MSB (0–127) LSB (0–127) 092 093 094 095 096 097 098 099 100 0 0 0 0 0 0 0 0 0 119 112 112 112 112 112 112 113 113 101 102 103 104 105 106 107 108 0 0 0 0 0 0 0 0 112 112 112 112 112 112 112 112 109 110 111 112 113 114 115 116 117 118 119 120 121 127 127 127 127 127 127 127 127 127 127 126 126 126 0 0 0 0 0 0 0 0 0 0 0 0 0 MIDI Program Voice Name Change# (1–128) 82 Fargo 99 Star Dust 86 Voice Lead 101 Brightness 92 Xenon Pad 95 Equinox 89 Fantasia 90 Dark Moon 101 Bell Pad PERCUSSION 1
Voice List Bank Select Voice No.
Voice List MSB (0–127) LSB (0–127) 352 353 354 355 356 357 358 359 0 0 0 0 0 0 0 0 0 0 0 66 0 0 0 0 360 361 362 363 364 365 366 367 368 369 370 371 372 373 374 375 376 377 378 379 380 381 382 383 384 385 386 387 388 389 390 391 392 393 394 0 0 0 0 0 0 0 0 0 0 0 0 0 0 0 0 0 0 0 0 0 0 0 0 0 0 0 0 0 0 0 0 0 0 0 0 65 66 0 27 0 12 14 18 35 40 41 42 65 70 71 72 0 18 19 40 64 65 66 0 0 64 65 67 68 70 71 96 0 0 395 396 397 398 399 400 401 402 403 404 405 406 407 408 409 410 411 0 0 0 0 0 0 0 0 0 0 0 0 0 0
Drum Kit List • “ ” indicates that the drum sound is the same as “Standard Kit 1”. • Each percussion voice uses one note. • The MIDI Note # and Note are actually one octave lower than keyboard Note # and Note. For example, in “109: Standard Kit 1”, the “Seq Click H” (Note# 36/Note C1) corresponds to (Note# 24/Note C0). • Key Off: Keys marked “O” stop sounding the instant they are released. • Voices with the same Alternate Note Number (*1 … 4) cannot be played simultaneously.
Drum Kit List C1 114 127/0/26 115 127/0/28 116 127/0/33 117 127/0/41 118 127/0/49 119 126/0/1 120 126/0/2 121 126/0/113 Analog Kit Dance Kit Jazz Kit Brush Kit Symphony Kit SFX Kit 1 SFX Kit 2 Sound Effect Kit C#1 D1 E1 F1 D#1 F#1 G1 Reverse Cymbal Reverse Cymbal Hi Q 2 SD Rock H Hi Q 2 AnSD Snappy Bass Drum H BD Analog L BD Analog H Analog Side Stick Analog Snare 1 AnBD Dance-1 AnSD OpenRim AnBD Dance-2 AnBD Dance-3 Analog Side Stick AnSD Q Analog Snare 2 Analog Tom 1 Analog HH
Style List Style No. Style Name Style No. Style No.
Music Database List MDB No. MDB Name MDB No. POP MDB Name MDB Name 77 MuchoTrp 1 AlvFever 39 AmazingG 78 Sunshine 2 DayPdise 40 BoogiePf 79 Tico Org 3 GoMyWay 41 Clock Rk 80 TrbWave 4 HowDeep! 42 CU later 5 HurryLuv 43 HappyDay 81 BoxerFlt 6 Imagine 44 RisingSn 82 CntryRds 7 JustCall 45 ShookUp 83 Jambala 8 SultanSw 46 TeddyBer 84 TopWorld 9 WhitePle SWING & JAZZ 85 YlwRose 10 YesterPf ROCK R&B MDB No.
Song List Top Picks These demonstration songs showcase the various sounds of the instrument. Learn to Play Each of these songs has two variations: an easy one which even beginners can practice with ease, and another more challenging version. Favorite We’ve collected various folk songs from around the world which have been handed down from through the generations, as well as famous classical pieces. Try playing the melody of these songs with your right hand.
Effect Type List ● Harmony Types No.
Specifications Keyboards • 61 standard-size keys (C1–C6), with Touch Response Display • LCD display (backlit) Setup • STANDBY/ON • MASTER VOLUME: MIN–MAX Panel Controls • [L]/[REC TRACK 2], [R]/[REC TRACK 1], [1 LISTENING 2 TIMING 3 WAITING], [KEYS TO SUCCESS], [PHRASE REPEAT], [A-B REPEAT]/[ACMP ON/OFF], [REW]/ [INTRO/ENDING/rit.
Index A AB Repeat .................................................................. 51 AC Power Adaptor ....................................................... 8 ACMP ON/OFF ......................................................... 20 Auto Accompaniment .......................................... 18, 20 Auto accompaniment range ................................. 18, 20 B Backup ................................................................. 41, 62 Backup File .............................................
Index P T Part ............................................................................. 32 Passing Status ....................................................... 27, 30 Pause .......................................................................... 17 PC setting ................................................................... 59 PHONES/OUTPUT ..................................................... 9 Phrase ......................................................................... 35 Phrase Repeat .
PSR-E323/YPT-320 Owner’s Manual 77
Limited Warranty 90 DAYS LABOR 1 YEAR PARTS Yamaha Corporation of America, hereafter referred to as Yamaha, warrants to the original consumer of a product included in the categories listed below, that the product will be free of defects in materials and/or workmanship for the periods indicated.
For details of products, please contact your nearest Yamaha representative or the authorized distributor listed below. Pour plus de détails sur les produits, veuillez-vous adresser à Yamaha ou au distributeur le plus proche de vous figurant dans la liste suivante. NORTH AMERICA CANADA Yamaha Canada Music Ltd. 135 Milner Avenue, Scarborough, Ontario, M1S 3R1, Canada Tel: 416-298-1311 U.S.A. Yamaha Corporation of America 6600 Orangethorpe Ave., Buena Park, Calif. 90620, U.S.A.
Yamaha Home Keyboards Home Page http://music.yamaha.com/homekeyboard/ Yamaha Manual Library http://www.yamaha.co.jp/manual/ U.R.G., Digital Musical Instruments Division © 2009 Yamaha Corporation WQ39170 XXXPOTYX.