Owner’s Manual EN
SPECIAL MESSAGE SECTION This product utilizes batteries or an external power supply (adapter). DO NOT connect this product to any power supply or adapter other than one described in the manual, on the name plate, or specifically recommended by Yamaha. This product may also use “household” type batteries. Some of these may be rechargeable. Make sure that the battery being charged is a rechargeable type and that the charger is intended for the battery being charged.
FCC INFORMATION (U.S.A.) 1. IMPORTANT NOTICE: DO NOT MODIFY THIS UNIT! This product, when installed as indicated in the instructions contained in this manual, meets FCC requirements. Modifications not expressly approved by Yamaha may void your authority, granted by the FCC, to use the product. 2. IMPORTANT: When connecting this product to accessories and/or another product use only high quality shielded cables. Cable/s supplied with this product MUST be used. Follow all installation instructions.
PRECAUTIONS PLEASE READ CAREFULLY BEFORE PROCEEDING * Please keep this manual in a safe place for future reference. WARNING Always follow the basic precautions listed below to avoid the possibility of serious injury or even death from electrical shock, short-circuiting, damages, fire or other hazards. These precautions include, but are not limited to, the following: Power supply/AC power adaptor Water warning • Only use the voltage specified as correct for the instrument.
• Before moving the instrument, remove all connected adaptor and other cables. • Use only the stand specified for the instrument. When attaching the stand or rack, use the provided screws only. Failure to do so could cause damage to the internal components or result in the instrument falling over. Connections • Before connecting the instrument to other electronic components, turn off the power for all components.
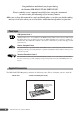
Congratulations and thank you for purchasing the Yamaha PSR-E203/YPT-200 PORTATONE! Please read this owner’s manual carefully before using the instrument in order to take full advantage of its various features. Make sure to keep this manual in a safe and handy place even after you finish reading, and refer to it often when you need to better understand an operation or function.
Contents Panel logos ................................................................ 6 Supplied Accessories................................................. 6 Setting Up 8 Power Requirements ................................................. 8 Connecting headphones (PHONES/OUTPUT Jack) . 9 Connecting a footswitch (SUSTAIN Jack) ................. 9 Using the MIDI Terminals .......................................... 9 Turn on the power......................................................
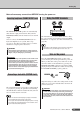
Setting Up Be sure to do the following operations BEFORE turning on the power. Power Requirements Although the instrument will run either from an optional AC adaptor or batteries, Yamaha recommends use of an AC adaptor whenever possible. An AC adaptor is more environmentally friendly than batteries and does not deplete resources. ■ Using an AC Power Adaptor q Make sure that the power of the instrument is off (display is blank, except for notation staff).
Setting Up Make all necessary connections BEFORE turning the power on. Using the MIDI Terminals Connecting headphones (PHONES/OUTPUT Jack) The PSR-E203/YPT-200 speakers are automatically shut off when a plug is inserted into this jack. The PHONES/OUTPUT jack also functions as an external output. You can connect the PHONES/OUTPUT jack to a keyboard amplifier, stereo system, mixer, tape recorder, or other line-level audio device to send the instrument’s output signal to that device.
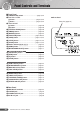
Panel Controls and Terminals ■ Front Panel q [STANDBY/ON] switch ....................................page 9, 24 w MASTER VOLUME [+] button ....................................................... pages 9, 24 [-] button ........................................................ pages 9, 24 e LESSON PART [L] button .............................................................page 28 [R] button.............................................................page 28 r [LISTEN & LEARN] button..........................
Panel Controls and Terminals Style List (page 56) Voice List (page 53) u r 001 GrandPno t 001 y !8 Display (page 26) !2 i o !1 !0 !3 @0 !9 001 @1 @2 GrandPno 001 ■ Rear Panel @3 @4 @5 @6 PSR-E203/YPT-200 Owner’s Manual 11
Step 1 — Quick Guide — Changing the Voices Turn the power on and adjust the volume Turning the power on Press the [STANDBY/ON] switch to turn on the power. Press the [STANDBY/ON] switch again to turn the power off. Adjusting the volume When turning the power on, bars appear at the left side in the display to indicate the value of the master volume. 001 GrandPno 001 The volume increases as indicated by the bars in the display.
Try playing a variety of instrument Voices Press the [VOICE] button. The Voice number and name are displayed. Voice number 001 Voice name GrandPno 001 2 Appears when the Voice mode. Select a Voice. Select the desired Voice by using the number buttons [0]-[9], [+], [-]. Refer to the Voice List on page 53. 065 3 Step 1 Changing the Voices 1 Quick Guide In addition to the piano Voice, a wide variety of other instrument Voices can be selected and played, including guitar, trumpet and flute.
Playing the Grand Piano Voice When you simply want to play a piano Voice, all you have to do is press one convenient button. Press the [PORTABLE GRAND] button. The Voice “Grand Piano1 001” will automatically be selected as the Main Voice. Drum kits Drum kits are collections of drum and percussion instruments. When drum kits (Voice number 130-134) are selected, you can play different percussion sounds directly from the keyboard. 1 Press the [VOICE] button. 2 Select the desired Drum kit.
Quick Guide Try out each key. You’ll hear bongo drums, congas, maracas, and more—a comprehensive variety of drum and percussion sounds. Details on the instruments and key assignments of each drum kit can be found in the Drum Kit List on page 55.
Step 2 — Quick Guide — Fun Sounds This instrument also includes a wide range of unique sound effects. Try out each key and enjoy the sounds! As you try out the various keys you’ll hear the sound of a dog barking, running water, a creaking door and many other unique effects. Press the [SOUND EFFECT KIT] button. Try out each key and enjoy the sounds. Don’t forget the black keys! You’ll be able to play various sound effects from the keyboard: barking, braying, yelling, and much more.
Step — Quick Guide — 3 Play With The Metronome Quick Guide Start the metronome The instrument includes a metronome with adjustable tempo and time signature. Play and set the tempo that is most comfortable for you. Starting the metronome Step 3 Play With The Metronome Turn the metronome on and start it by pressing the [METRONOME ON/ OFF] button. To stop the metronome, press the [METRONOME ON/OFF] button again. 001 GrandPno 1 1 Displays the current beat.
Setting the Metronome Time Signature A chime will sound on the first beat of each measure, while a metronome click will sound on all others. You can also set the time signature to “00,” in which case the chime will not sound and the click sound will be heard on all beats. 1 Press and hold the [METRONOME ON/OFF] button for longer than a second The time signature appears in the display. Time signature 04 TimeSig Hold for longer than a second.
Step — Quick Guide — 4 Playing Songs Quick Guide Select and Listen to a Specific Song This instrument has 102 built-in Songs. Listening to a Song Press the [SONG] button. The Song number and name are displayed. Song number 001 Step 4 Playing Songs 1 Song name Castaway Appears when the Song mode is active. 001 2 Select the desired Song by using the number buttons [0]-[9], [+], [-]. 3 Press the [START/STOP] button. Refer to the Song List on next page. The Song will begin playing.
● Other Operations [REW] button ........... Fast-reverses the Song if pressed during playback (no sound is heard during fast reverse). Decreases the measure number if pressed while playback is stopped. [FF] button................ Fast-forwards the Song if pressed during playback. Increases the measure number if pressed while playback is stopped. [PAUSE] button ........ Temporarily stops playback. Press this button a second time to resume playback from the point at which it was stopped.
Step — Quick Guide — 5 Play with a Style Quick Guide Selecting a rhythm of a Style The Style feature provides backing and rhythm parts in a wide variety of musical categories, including rock, blues, techno and much more. Here’s how to play a rhythm of a Style. The rhythm sound consists of percussion instruments. Press the [STYLE] button. The Style number and name are displayed. Style number 001 Style name 8BtModrn Appears when the Style mode is active. 001 2 Select a Style.
Playing with a Style On the previous page, you’ve learned how to select your favorite rhythm of a Style. Here, you’ll learn how to expand on that rhythm with bass and chord backing, and use all of it as your accompaniment as you play. 1 2 Press the [STYLE] button and then select a Style. Turn auto accompaniment on. Press the [ACMP ON/OFF] button. Press the [ACMP ON/OFF] button again to turn the auto accompaniment off.
4 The Style will begin playing as soon as you play a chord in the accompaniment range of the keyboard. Quick Guide Not sure how to play chords? No problem! This instrument is capable of playing chords even if you only play one key. Try playing one, two or three keys (any notes will do) in the auto accompaniment range of the keyboard. Different keys will produce different results. Refer to page 44 for detailed instructions for playing chords.
Basic Operation and Displays Basic Operation Turning the power on Adjusting the volume Press the [STANDBY/ON] switch to turn on the power. Press the [STANDBY/ON] switch again to turn the power OFF. Pressing the MASTER VOLUME [+] and [-] buttons. Press the [+] button to increase the volume. Press the [-] button to lower the volume.
Basic Operation and Displays Press a button to select a basic function Press the [SONG] button to select a Song. Press the [STYLE] button to select a Style. When you select a basic function, the name and number of the currently selected Song, Style and Voice is shown. From this display, you can select the desired Song, Style or Voice. Press the [VOICE] button to select a Voice.
Basic Operation and Displays Display The Main display shows all of the current basic settings for Song, Style and Voice. It also includes a range of indicators that show the on/off status for various functions. Song track display Notation Information related to the Song tracks is shown here. (See page 32.) Displays the melody and chord notes of a Song when the Song lesson function is in use, or the notes of chords you specify when the Dictionary function is in use.
Song Lesson Yamaha Education Suite 5 You can select any Song you like and use it for a left-hand, right-hand, or both-hands lesson. Song Lesson lets you learn how to play Songs in three easy steps. ■ Lesson Flow Select a Song for your lesson. Select the part you want to practice. Select the practice method. Start the Lesson! ■ The practice methods: Lesson 1 (Listen & Learn) ........ Listen and learn the melody or rhythm of a selected Song. Lesson 2 (Timing) ......................
Song Lesson 2 Select the part you want to practice. Press the [R] button for a right-hand lesson, [L] button for a left-hand lesson, or press both the [R] and [L] buttons simultaneously for a bothhands lesson. The selected part is displayed. Left-hand lesson Right-hand lesson Left Right Both-hands lesson BothHand A “No LPart” message is shown in the display if you select the left part in Song 003, which does not have left part data. Song 003 cannot be used for left-hand or both-hands lessons.
Song Lesson Lesson 2 (Timing) In this lesson, try playing the notes with the correct timing. Simply concentrate on playing each note in time with the rhythmic accompaniment. The correct notes sound even if you play wrong notes as long as you play in time with the rhythm. 1 Select a Song for your lesson. • The Split Point is fixed and it cannot be changed. For the left-hand lesson, it is fixed at 59 or B2; for the left-hand chord lesson, it is fixed at 54 or F#2.
Song Lesson Lesson 3 (Waiting) In this mode, try playing the correct notes. The notes you should play appear in the score and the keyboard on the display. The Song pauses until you play the right note. 1 Select a Song for your lesson. NOTE 2 Select the part you want to practice. 3 Start Lesson 3. Press the [WAITING] button to start Lesson 3. r3 WAITING Play the notes shown in the display. Try playing the correct notes. 4 30 Stop the Lesson mode.
Song settings Changing the Melody Voice You can change a Song’s melody Voice to any other Voice you prefer. 1 Select the Song and play it. Refer to the section “Playing Songs” on page 19. 2 Select the voice. Select a desired Voice by using the number buttons [0]-[9], [+], [-]. 004 HnkyTonk 001 The selected Voice sounds when you play the keyboard. If a Song has played through and stopped during this procedure, press the [START/STOP] button to start playback again.
Song settings 2 Press the [FUNCTION] button a number of times until “SongVol” appears. Current Song Volume 100 3 Song Volume SongVol Set the Song Volume by pressing the number buttons [0][9], [+], [-]. NOTE • Press the [+] and [-] buttons simultaneously to instantly reset the value to its default setting (100). Mute The Song is made up by several tracks. You can mute Track 1 or Track 2 during Song playback. • Track 1 can be muted by pressing the [R] button during Song playback.
Song settings Practice Makes Perfect You can repeatedly practice a section you find difficult. This function lets you specify a section of a Song you want to practice—“A” is the start point and “B” is the end point—for repeat playback. A B Repeat playback of this section 1 Play the Song and press the [A-B REPEAT] button at the beginning of the section you want to repeat (the “A” point). “A-REPEAT” will be displayed.
Play With a Variety of Effects Adding Reverb Reverb adds the ambience of a room or concert hall to the sound that you play on the keyboard. To add Reverb Press the [REVERB ON/OFF] button to turn Reverb on. Reverb is normally on. You can check how the selected Reverb Type sounds by playing the keyboard. To turn Reverb off, press the [REVERB ON/OFF] button again. Appears when Reverb is on.