Appendix Reference Quick Guide Setting Up DIGITAL KEYBOARD Owner’s Manual EN
SPECIAL MESSAGE SECTION This product utilizes batteries or an external power supply (adapter). DO NOT connect this product to any power supply or adapter other than one described in the manual, on the name plate, or specifically recommended by Yamaha. WARNING: Do not place this product in a position where anyone could walk on, trip over, or roll anything over power or connecting cords of any kind.
OBSERVERA! Apparaten kopplas inte ur växelströmskällan (nätet) så länge som den ar ansluten till vägguttaget, även om själva apparaten har stängts av. ADVARSEL: Netspændingen til dette apparat er IKKE afbrudt, sålænge netledningen sidder i en stikkontakt, som er tændt — også selvom der er slukket på apparatets afbryder. Entsorgung leerer Batterien (nur innerhalb Deutschlands) Leisten Sie einen Beitrag zum Umweltschutz. Verbrauchte Batterien oder Akkumulatoren dürfen nicht in den Hausmüll.
PRECAUTIONS PLEASE READ CAREFULLY BEFORE PROCEEDING Please keep this manual in a safe and handy place for future reference. WARNING Always follow the basic precautions listed below to avoid the possibility of serious injury or even death from electrical shock, short-circuiting, damages, fire or other hazards. These precautions include, but are not limited to, the following: Power supply/AC power adaptor Battery • Do not place the power cord near heat sources such as heaters or radiators.
• When setting up the product, make sure that the AC outlet you are using is easily accessible. If some trouble or malfunction occurs, immediately turn off the power switch and disconnect the plug from the outlet. Even when the power switch is turned off, electricity is still flowing to the product at the minimum level. When you are not using the product for a long time, make sure to unplug the power cord from the wall AC outlet. • Do not insert a finger or hand in any gaps on the instrument.
Table of Contents Setting Up Special Features ..............................................................6 Compatible Format and Functions ...................................8 Included Accessories .......................................................8 About the Manuals ...........................................................9 Setting Up Panel Controls and Terminals 10 Setting Up 12 Power Requirements......................................................
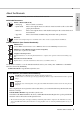
35 Selecting a Reverb Type ................................................35 Selecting a Chorus Type ................................................35 Pitch Controls—Transpose ............................................36 Pitch Controls—Fine Tuning ..........................................36 Pitch Controls—the PITCH BEND wheel .......................36 Calling Up Optimum Panel Settings —One Touch Setting (OTS).......................................36 Changing the Touch Response of the Keyboard ........
Compatible Format and Functions Setting Up GM System Level 1 “GM System Level 1” is an addition to the MIDI standard which ensures that any GM-compatible music data can be accurately played by any GM-compatible tone generator, regardless of manufacturer. The GM mark is affixed to all software and hardware products that support GM System Level. XGlite As its name implies, “XGlite” is a simplified version of Yamaha’s high-quality XG tone generation format.
About the Manuals Setting Up This instrument has the following documents and instructional materials. Included Documents Owner’s Manual (this book) • Setting Up Please read this section first. • Quick Guide This section explains how to use the basic functions. Refer to this section while playing the instrument. • Reference This section explains how to make detailed settings for the various functions of the instrument. • Appendix This section includes troubleshooting information and specifications.
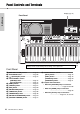
Panel Controls and Terminals Setting Up Display (page 16) Front Panel Setting Up GrandPno 001 t y u i o !0 !2 !1 001 !3 q e !4 !5 r @5 w 036 (C1) 048 (C2) 060 (C3) As illustrated above, each note of the keyboard has a specific note number and name (e.g., 036/C1), which is used in making various settings, such as Split Point. Front Panel q w e r t y u i o !0 !1 !2 10 [MASTER VOLUME] control ................Page 15 PITCH BEND wheel..............................
Panel Controls and Terminals Style List (Data List) Voice List (Data List) Setting Up Dial (page 15) Pattern List (Data List) Song List (Data List) !6 !7 !8 !9 @0 @2 @1 @4 “Press & Hold” symbol By holding down one of the buttons having this symbol, you can call up an alternate function, other than the one called up when simply pressing. @3 Rear Panel 084 (C5) 096 (C6) @6 @8 @9 #0 • When the [PATTERN] lamp is turned on: ..............................................
Setting Up Notice for the AC adaptor Power Requirements Setting Up Although the instrument will run either from an optional AC adaptor or batteries, Yamaha recommends use of an AC adaptor whenever possible. An AC adaptor is more environmentally friendly than batteries and does not deplete resources. Using an AC Power Adaptor 1 Make sure that the power of the instrument is off (display is blank, except for notation staff).
Setting Up This instrument requires six “AA” size, Alkaline (LR6)/Manganese (R6) batteries, or rechargeable nickel-metal hydride batteries (rechargeable Ni-MH batteries). The Alkaline batteries or rechargeable NiMH batteries are recommended for this instrument, since other types may result in poorer battery performance. WARNING • When using Ni-MH batteries, follow the instructions that came with the batteries. Use only the specified charger device when charging.
Setting Up Setting Up Connecting Headphones or External Audio Equipment Any pair of stereo headphones with a 1/4” stereo phone plug can be plugged in here for convenient monitoring. The speakers are automatically shut off when a plug is inserted into this jack. The [PHONES/OUTPUT] jack also functions as an external output.
Basic Operations Turn down the MASTER VOLUME control to “MIN” then press the [ ] (Standby/On) switch to turn on the power. While playing the keyboard, adjust the MASTER VOLUME control. To turn off the power, press the [ ] (Standby/On) switch again for a second.
Display Items The display shows all the current settings of the Song, Style Pattern, Voice and other related functions. Setting Up Power source status Indicates the source from which this instrument obtains power, AC power adaptor or batteries. (Page 13) USB connection status Appears when USB flash memory is connected to this instrument. (Page 56) Notation Normally this indicates the notes you play. When the Song Lesson function is used, this indicates the current notes and chord of playback.
Try Playing a Variety of Instrument Voices Quick Guide In addition to piano, organ, and other “standard” keyboard instruments, this instrument has a large range of voices that includes guitar, bass, strings, sax, trumpet, drums and percussion, and even sound effects—giving you a wide variety of musical sounds. Selecting a Main Voice 1 Press the [VOICE] button. The Voice number and name will be shown. For details, refer to the front panel or the Voice List of the separate Data List.
Try Playing a Variety of Instrument Voices Layering a Dual Voice In addition to the Main Voice, you can layer a different Voice over the entire keyboard as a “Dual Voice.” 1 Press the [DUAL] button to turn Dual on. Flute 134 Playing a Split Voice in the Left Hand area By dividing the keyboard into the two separate areas, you can play a different Voice between the Left hand and Right hand areas. 1 Press the [SPLIT] button to turn on Split.
Try Playing a Variety of Instrument Voices 2 The instrument features a built-in metronome (a device that keeps an accurate tempo), convenient for practicing. 1 NOTE Press the [METRONOME] button to start the metronome. • This parameter cannot be set during playback of a Style, Song or Pattern. 3 2 Rotate the dial to select the number of beats per measure. A chime will sound on the first beat of each measure while the other beats will click.
Try Playing a Variety of Instrument Voices Adding Harmony 3 Rotate the dial to select the desired Harmony Type. For details, refer to the Effect Type List of the separate Data List. The effect and operation differs depending on the Harmony Type. Refer to “How to sound each Harmony Type” below. 4 Press the [HARMONY] button again to turn Harmony off. You can add harmony notes to the Main Voice. 1 Press the [HARMONY] button to turn Harmony on. Appears when the Harmony is turned on.
Creating Arpeggios The Arpeggio function lets you create arpeggios (broken chords) by simply pressing the notes of the chord. For example, you could play the notes of a triad—the root, third, and fifth—to trigger interesting phrases. This feature can be used for music production as well as performance. 1 Press the [ARPEGGIO] button to turn on the Arpeggio function.
Creating Original Sounds via the Knobs The two knobs located in the lower left area of the panel can be used to add variations to the sound being played, transforming the sound in a variety of musical ways. Select the desired pre-programmed effect combination printed above the Knobs, then rotate the Knobs to enjoy the sound. Selecting a Knob Effect Combination Repeatedly press the [ASSIGN] button to sequentially select the five effect combinations provided: (1) (2) (3) (4) (5) (6) (1) … etc.
Playing Styles This instrument includes the Auto Accompaniment feature that plays appropriate “Styles” (rhythm + bass + chord accompaniment). You can select from a huge variety of Styles covering a wide range of musical genres. 1 Press the [STYLE] button, then use the dial to select the desired Style. The Style List is provided on the front panel, or in the Data List (page 9). For information about chords, refer to “Chord List” (page 48) or use the Chord Dictionary function (page 49).
Playing with Patterns Like a DJ! The Pattern playback function lets you repeatedly play various rhythm patterns, and is particularly effective in Hip-Hop, House music, etc. Try out the cool DJ-like performance features—changing keys in the left-hand area of the keyboard and rotating the Knobs for dynamic sound variations. 1 Using Retrigger function (page 46) Pressing the button of the currently playing Section restarts playback from the beginning.
Playing Songs You can simply enjoy listening to the internal Songs, or use them with just about any of the functions, such as Lesson. Song Category The Songs are organized by category as listed below. • • • • • • • • Gives you an idea of the advanced capabilities of this instrument. Demonstrates many useful Voices of this instrument. These piano solo pieces are ideally suited for the Song Lesson. These piano ensemble pieces are also well suited for the Song Lesson.
Playing Songs Song Fast Forward, Fast Reverse, and Pause Like the transport controls on an audio player, this instrument lets you fast forward [ ] (Fast Forward), rewind [ ] (Fast Reverse) and pause [ ] (PAUSE) playback of the Song. Fast Forward During playback, press this button to rapidly skip ahead to a later point in the Song. 3 When playback reaches to the point you want to specify as the end point, press the [ ] (A-B REPEAT) button again to set the B point.
Using the Song Lesson Feature You can use the selected Song for a left-hand, right-hand, or both-hands lesson. Try practicing with these three Song Lesson types while referring to the music scores in the Song Book (page 9). Three Types of Song Lesson Practicing with Song Lesson 1 Lesson 1—Listen Select the desired Song for your lesson (page 25). NOTE In this Lesson, you need not play the keyboard. The model melody/chords of the part you selected will sound. Listen to it carefully and remember it well.
Using the Song Lesson Feature TIMING Lp2 The notation and key positions you should play are shown. 007 Both-hands lesson 2 (TIMING) is indicated as shown. Righthand lesson 2 is indicated as “R2” and Left-hand lesson 2 is indicated as “L 2.” Making Practice Perfect—Repeat & Learn If you want to practice a specific section in which you made a mistake or you have difficulty with use the Repeat & Learn function. Press the [ ] (REPEAT & LEARN) button during a Lesson playback.
Playing an External Audio Device with the Built-in Speakers You can output the sound of an external audio device, such as a portable music player, with the built-in speakers of this instrument by connecting it via a cable. This lets you play the keyboard along with playback of your music player. 1 Turn off the power for both the external audio device and this instrument. 6 Play the keyboard along with the sound of the audio device. 2 Connect the audio device to the instrument’s [AUX IN] jack.
Recording Your Performance You can record up to 10 of your performances as User Songs. The recorded User Songs can be played back on the instrument. NOTE • About audio files The Recording function of this instrument will record your keyboard performance as MIDI data. Note that audio recording is not available. NOTE Track Structure of a Song Quick Guide Melody Tracks [1]–[5] The melody performance of the keyboard will be recorded.
Recording Your Performance If you want to record only the Pattern playback: Press the [Pattern] button, then select the desired Pattern. While holding down the [REC] button, press the [6/A] button. ACMP is automatically turned on. Recording to a Specified Track The operation here is useful especially when you want to record the additional performances to an already recorded Song. Press the [SONG] button, then select the desired User Song (031–040) as the recording target.
Recording Your Performance Clearing a User Song You can clear all tracks of a User Song. 1 2 Press the [SONG] button, then select the User Song (031–040) to be cleared. Hold down the track [6/A] and [1] buttons simultaneously for longer than a second. A confirmation message will appear on the display. Clearing a Specified Track from a User Song This lets you clear individual tracks from a User Song. 1 Press the [SONG] button, then select the desired User Song (031–040).
Memorizing Your Favorite Panel Settings This instrument has a Registration Memory feature that lets you memorize your favorite settings for easy recall whenever they’re needed. Up to 32 complete setups can be saved (eight banks of four setups each). 8 Banks Memory 1 Memory 2 Memory 3 Memory 4 Up to 32 presets (eight banks of four each) can be memorized. 1 Make the desired settings such as those for Voice, Style, and Pattern.
Using with a Computer or iPad/iPhone Connecting to a computer This instrument supports MIDI (Musical Instrument Digital Interface) and can transmit/receive keyboard performance information (MIDI messages) or Song/ Style data (MIDI files) to/from the computer connected via a USB cable. For details on using a computer with this instrument, refer to the “Computerrelated Operations” (page 9) on the website. USB terminal Data that can be transferred from a computer to this instrument (and vice versa).
Handy Performance Features Reference Selecting a Reverb Type Selecting a Chorus Type The Reverb effect lets you play with a rich concert hall type ambience. Although selecting a Style or Song will call up the optimum Reverb type for the entire sound, you can select a different Reverb type manually. The Chorus effect creates a thick sound that is similar to many of the same Voices being played in unison.
Handy Performance Features Pitch Controls—Transpose The overall pitch of the instrument (except for the Drum Kit Voices) can be shifted up or down by a maximum of 1 octave in semitone increments. 1 Press the [TRANSPOSE] button to call up “Transpos” (Function 005). Pitch Controls—the PITCH BEND wheel The PITCH BEND wheel can be used to add smooth pitch variations to notes you play on the keyboard. Roll the wheel upward to raise the pitch, or downward to lower the pitch.
Handy Performance Features Changing the Touch Response of the Keyboard Selecting an EQ Setting for the Best Sound The keyboard of this instrument is equipped with a Touch Response feature that lets you dynamically and expressively control the level of the Voices according to your playing strength.
Scale Tuning By default, this keyboard scale is set to Equal Temperament — the same tuning as with any acoustic piano. However, the setting can be changed to any other scale according to the music genre or music style you want to play. Selecting Scale You can select a desired scale among the various preset scales. 1 2 Press the [FUNCTION] button.
Scale Tuning Tuning Each Note to Create an Original Scale You can tune the individual notes in cents (a “cent” is one one-hundredth of a semitone.) to create your original scale. 1 Select the Base Note following the “Setting the Base Note for Each Scale” instructions (page 38). 2 Use the CATEGORY [+] or [-] button to call up the individual notes to be tuned, such as “Tune C” (Function 047) as shown. Tune C 00 047 3 Rotate the dial to tune the note selected in step 2.
Voice Settings Selecting a Dual Voice Voice Editing 1 For each of the Main, Dual and Split Voices, you can edit the parameters such as volume, octave and depth of the Reverb and Chorus, allowing you to create new, custom sounds that best suit your musical needs. Hold down the [DUAL] button for longer than a second to call up “D.Voice.” “D.VOICE” is shown for a few seconds, then the current Dual Voice appears. D.Voice 1 Press the [FUNCTION] button.
Parameters Assigned to the Knobs This section describes each of the parameters which can be assigned to the Knobs (page 22). c FILTER Filter effects shape the sound by allowing only a specified range of frequencies to pass and/or by producing a resonance peak at the filter’s “cutoff” frequency. Filter effects can be used to create a range of synthesizerlike sounds. NOTE EG (Envelope Generator) Envelope Generator effects determine how the level of the sound varies over time.
Parameters Assigned to the Knobs knob will increase/decrease the volume of the Song/ Style/Pattern playback sound, maintaining the keyboard performance volume. n SPECIAL EFFECT Knob B: RETRIGGER RATE While holding down the button of the currently playing Section, rotating this knob will change the Retrigger Rate (the length of the part to be repeated). Turning right will shorten the length, and vice versa.
Arpeggio Settings Synchronizing an Arpeggio to Song/Style/Pattern Playback—Arpeggio Quantize When you play the keyboard to trigger an Arpeggio (page 21) along with Song/Style/Pattern playback, you’ll need to play the notes with correct timing to keep the Arpeggio in synchronization with the other playback tracks. However, your actual timing may be slightly ahead of or behind the beat (or both).
Styles (Auto Accompaniment) and Patterns Style Variations—Sections Each Style consists of “Sections” that allow you to vary the arrangement of the accompaniment to match the song you are playing. INTRO MAIN A/B ENDING AUTO FILL INTRO This is used for the beginning of the Song. When the Intro finishes, Style playback shifts to the Main section. The length of the Intro (in measures) differs depending on the selected Style. MAIN This is used for playing the main part of the Song.
Styles (Auto Accompaniment) and Patterns 5 Press the [INTRO/ENDING/rit.] button. INTRO≥A Now, you’re ready to start Style playback from the Intro section. 6 Play a chord with your left hand to start playback of the Intro. For this example, play a C major chord (as shown below). For information on how to enter chords, see “Chords” on page 48.
Styles (Auto Accompaniment) and Patterns Pattern Variations—Sections Like the Styles, each Pattern features several Sections, allowing you to add dynamic variations to the performance. Five Sections (A–E) are provided. NOTE • When recording the Pattern playback with the Retrigger, note that the beat indicator in the display, metronome and Arpeggio playback is not synchronized with playback of the recorded Song.
Styles (Auto Accompaniment) and Patterns Adjusting the Volume of the Style or Pattern 3 Rotate the dial to set the Split Point between 036 (C1) and 096 (C6). Split Point ... default value: 054 (F#2) You can adjust the volume balance between Style or Pattern playback and keyboard performance. Press the [FUNCTION] button. 036 (C1) 048 (C2) Split voice 2 3 Use the CATEGORY [+] and [-] buttons to call up “StyleVol” (Function 001) or “PatrnVol” (Function 003).
Styles (Auto Accompaniment) and Patterns Chord Types for Style Playback For users who are new to chords, this chart features common chords. Since there are many useful chords and many different ways to use them musically, refer to commercially available chord books for further details. indicates the root note.
Styles (Auto Accompaniment) and Patterns 2-2. Looking Up Chords Using the Chord Dictionary The Dictionary function is useful when you know the name of a certain chord and want to quickly learn how to play it. 1 Press the key labeled “M7” in the section between “CHORD TYPE ” and “ROOT.” The notes you should play for the specified chord (root note and chord type) are conveniently shown in the display, both as notation and in the keyboard diagram.
Song Settings BGM (Background Music) Playback With the default setting, pressing the [DEMO/BGM] button will play back only a few of the internal Songs repeatedly. This setting can be changed so that, for example, all internal Songs are played, or all Songs transferred to the instrument from a computer are played back, letting you use the instrument as a background music source. Five playback group settings are provided. Simply select the one that suits your needs.
Song Settings Tempo Setting of the Song This operation is same as that of the Style and Pattern. Refer to page 46. Tap Start Melody Voice Setting of the Preset Song You can change the Melody Voice of the current Preset Song temporarily to any other desired Voice. 1 Press the [SONG] button, select the desired Preset Song, then start playback. 2 Press the [VOICE] button, then rotate the dial to select the desired Voice. This operation is same as that of the Style and Pattern. Refer to page 46.
The Functions The “Functions” provide access to a range of detailed instrument parameters such as Tuning, Split Point, Voices and Effects. Take a look at the Function List (pages 52–55). When you find the desired Function you want to change, follow the instructions below. Basic Procedure in the Function Display 1 Find the desired item in the Function List on pages 52–55. 2 Press the [FUNCTION] button.
The Functions Function Number Function Display Range/Settings Default Value Description Main Voice (page 17) 010 Volume M.Volume 000–127 * Determines the volume of the Main Voice. 011 Octave M.Octave -2 – +2 * Determines the octave range for the Main Voice. 012 Pan M.Pan 000 (left)– 064 (center)– 127 (right) * Determines the stereo pan position of the Main Voice. The value “0” results in the sound being panned full left; the value “127” results in the sound being panned full right.
The Functions Function Number Function Display Range/Settings Default Value Description Arpeggio (page 21) 041 Arpeggio Type ARP Type 001–150 * Determines the Arpeggio type. 042 Arpeggio Velocity ARP Velo 1(Original), 2(Thru) Depending on the Arpeggio type When “Thru” is selected, the velocities of Arpeggio playback are determined by your playing strength.
The Functions Function Number Function Display Range/Settings Default Value Description Demo (page 25) 073 Demo Group DemoGrp 1 (Demo) / 2 (Preset) / 3 (User) / 4 (Download) / 5 (USB) 1 (Demo) Refer to page 50. 074 Demo Play Mode PlayMode 1 (Normal) 2 (Random) 1 (Normal) Refer to page 50. 075 Demo Cancel D-Cancel ON/OFF OFF Determines whether Demo cancel is enabled or not. When this is set to ON, the Demo Song will not play, even if the [DEMO/BGM] button is pressed.
USB Flash Memory Operations By connecting the USB flash memory device to the USB [TO DEVICE] terminal, you can save the data created on this instrument, such as User Song and parameter settings. The saved data can be recalled to this instrument again for the future use. IMPORTANT • It is recommended to use the Power Adaptor when executing USB flash memory operations, since battery power may not be reliable enough to last through these crucial operations.
USB Flash Memory Operations Connecting a USB Flash Memory 1 2 Connect a USB flash memory to the USB [TO DEVICE] terminal, being careful to insert it with the proper orientation. Wait until “USB” appears on the left corner of the display. The “USB” indication confirms that the connected USB flash memory has been mounted or recognized. 4 Use the CATEGORY [+] and [-] buttons to call up the desired File Control function, then execute it. For details, refer to the table below.
USB Flash Memory Operations Formatting a USB Flash Memory The Format operation lets you prepare commercially available USB flash memory for use with this instrument is called “Format.” 1 2 Recognizable file location in the USB flash memory for Song playback (page 25) USB flash memory (Root) Song File Hold the [FUNCTION] button for longer than a second to call up the File Control display. Song File Use the CATEGORY [+] and [-] buttons to call up “Format?.” Can be selected/ played.
USB Flash Memory Operations Saving User Data to a USB Flash Memory 5 The following data created on this instrument comprise the “User Data.” • All 10 User Songs • Styles which have been transferred from a computer then loaded to Style numbers 201–205. NOTICE • The Save operation cannot be cancelled during execution. Never turn off the power or disconnect the USB flash memory during the operation. Doing so may result in data loss.
USB Flash Memory Operations Saving a User Song as SMF to a USB Flash Memory 5 A User Song can be converted to SMF (Standard MIDI File) format 0 and saved to a USB flash memory. SMF (Standard MIDI File) format With this format, various events via the keyboard performance such as note on/off and Voice selection will be recorded as MIDI data. The SMF Format 0 and Format 1 are available.
USB Flash Memory Operations 2 Hold the [FUNCTION] button for longer than a second to call up the File Control display. Use the CATEGORY [+] and [-] buttons to call up “Load USR.” Load USR 3 Press the [0/EXECUTE] button. “USER***” (***: number) appears on the display as the User file name in the USB flash memory. As desired, rotate the dial to select a different User file.
USB Flash Memory Operations 5 Press the [0/EXECUTE] button again. A confirmation message will appear. To cancel the operation, press the [-/NO] button. 4 Press the [0/EXECUTE] button again. A confirmation message will appear. To cancel the operation, press the [-/NO] button. 6 Press the [0/EXECUTE] button again, or the [+/YES] button to execute the Load operation. After a while, a message indicating completion of the operation appears.
USB Flash Memory Operations 5 Press the [0/EXECUTE] button again. A confirmation message will appear. To cancel the operation, press the [-/NO] button. Press the [0/EXECUTE] button again, or the [+/YES] button to execute the Delete operation. After a while, a message indicating completion of the operation appears. Message List Message Can’tUse • Indicates that the file control function is currently unavailable since the media is being accessed.
Troubleshooting Appendix Problem Possible Cause and Solution When the instrument is turned on or off, a popping sound is temporarily produced. This is normal and indicates that the instrument is receiving electrical power. When using a mobile phone, noise is produced Using a mobile phone in close proximity to the instrument may produce interference.
Specifications Keyboard Other Controllers Display Voices Effects Accompaniment Styles Dimensions (W x D x H) Weight Number of Keys Touch Response Pitch Bend Control Knobs Display Language Tone Generation Tone Generating Technology Number of Polyphony (Max.
Index A D H A-B Repeat ................................... 26 AC Power Adaptor .................. 8, 12 Accessories .................................... 8 ACMP ..................................... 23, 44 Arpeggio ..................... 21, 24, 43, 54 Arpeggio Quantize ................ 43, 54 Arpeggio Type ....................... 21, 54 Arpeggio Velocity ........................ 54 ATTACK ...................................... 41 Attack Time ................................. 53 Audio file ................
Index N S U no data .......................................... 63 no file ............................................ 63 Notation ........................................ 16 Save SMF ...............................57, 60 Save USR ................................57, 59 Scale ........................................38, 54 Scale Tuning ...........................38, 54 Section ..............................24, 44, 46 SMF (Standard MIDI File) ...60, 62 Song ........................................
MEMO
LIMITED 1-YEAR WARRANTY ON PORTABLE KEYBOARDS (NP, NPV, PSRE, EZ, DGX230, DGX530, YPG AND YPT SERIES) Thank you for selecting a Yamaha product. Yamaha products are designed and manufactured to provide a high level of defect-free performance. Yamaha Corporation of America (“Yamaha”) is proud of the experience and craftsmanship that goes into each and every Yamaha product.
For details of products, please contact your nearest Yamaha representative or the authorized distributor listed below. NORTH AMERICA CANADA Yamaha Canada Music Ltd. 135 Milner Avenue, Toronto, Ontario, M1S 3R1, Canada Tel: 416-298-1311 U.S.A. Yamaha Corporation of America 6600 Orangethorpe Avenue, Buena Park, CA 90620, U.S.A. Tel: 714-522-9011 CENTRAL & SOUTH AMERICA MEXICO Yamaha de México, S.A. de C.V. Av. Insurgentes Sur 1647 “Prisma Insurgentes”, Col. San Jose Insurgentes, Del.
Yamaha Global Site http://www.yamaha.com/ Yamaha Downloads http://download.yamaha.com/ C.S.G., DMI Development Division ©2014 Yamaha Corporation Published 03/2014 PO##*.