
User Manual
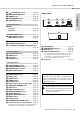

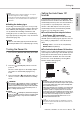
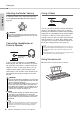

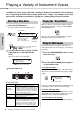
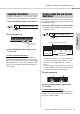
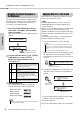
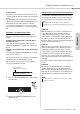
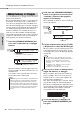
Table Of Contents
- PRECAUTIONS
- NOTICE
- Information
- About the Manuals
- Included Accessories
- Formats and functions
- Contents
- Setting Up
- Reference
- Playing a Variety of Instrument Voices
- Playing the keyboard with two persons (Duo mode)
- Playing Rhythm and Accompaniment (Style)
- Playing Songs
- Using the Song Lesson Feature
- Learning How to Use “Touch” Control (Touch Tutor)
- Hearing and Experiencing the Sound of the Chords (Chord Study)
- Playing Chords along with Chord Progressions of a Song
- Recording Your Performance
- Memorizing Your Favorite Panel Settings
- Selecting an EQ Setting for your Favorite Sound
- Playing an Device with the Built-in Speakers
- Using with a Computer or Smart Device
- Backup and Initialization
- The Functions
- Appendix

Panel Controls and Terminals
PSR-E373, PSR-EW310, YPT-370 Owner’s Manual
11
Setting Up
q [ ] (Standby/On) switch ....................page 13
w [MASTER VOLUME] dial ......................page 14
e [DEMO] button......................................page 31
r [METRONOME] button.........................page 16
t [TEMPO/TAP] button ............................page 30
y PART
[L] button ..............................................page 38
[R] button ..............................................page 38
y [REC TRACK 2] button.........................page 43
[REC TRACK 1] button.........................page 43
u [KEYS TO SUCCESS] button...............page 35
i [PHRASE REPEAT] button...................page 37
o [1 LISTENING 2 TIMING 3 WAITING] button
...............................................................page 38
!0 [A-B REPEAT] button ...........................page 33
!1 [REW] button ........................................page 32
!2 [FF] button ............................................page 32
!3 [PAUSE] button.....................................page 32
!0 [ACMP ON/OFF] button........................page 24
!1 [INTRO/ENDING/rit.] button .................page 25
!2 [MAIN/AUTO FILL] button ....................page 25
!3 [SYNC START] button ..........................page 24
!4 [START/STOP] button...........................page 31
!5 [REC] button .........................................page 43
!6 [VOICE] button......................................page 16
!7 [SONG] button ......................................page 31
!8 [STYLE] button .....................................page 24
!9
Number buttons [0]–[9], [+/YES], [-/NO]
....page 15
@0 [PORTABLE GRAND] button ............... page 16
@1 [DSP] button .........................................page 18
@2 [ARTICULATION] button ......................page 19
@3 [REGIST MEMORY] button ..................page 45
@4 [FUNCTION] button ..............................page 52
@5 [MUSIC DATABASE] button .................page 29
@6 [DUAL] button.......................................page 17
@7 [SPLIT] button ......................................page 17
@8 [HARMONY/ARPEGGIO] button..........page 20
@9 Drum illustrations for the Drum Kit ....page 16
Each of these indicates the drum or percussion instrument
assigned to the corresponding key for “Standard Kit 1.”
#0 [SUSTAIN] jack .....................................page 14
#1 [PHONES/OUTPUT] jack......................page 14
#2 [AUX IN] jack.........................................page 48
#3 [USB TO HOST] terminal* ....................page 50
* For connecting to a computer. For details, refer to “Com-
puter-related Operations” (page 8) on the website. When
connecting, use an AB type USB cable of less than 3
meters. USB 3.0 cables cannot be used.
#4 DC IN jack .............................................page 12
In the Lesson mode
In the Recording mode
In the Song mode
In the Style mode
Panel Setup (Panel Settings)
By using the controls on the panel, you can make various
settings as described here. These settings of the instru-
ment are together referred to as “panel setup” or “panel
settings” in this manual.
The “Press and hold” Symbol
Buttons having this indication can be used to call
up an alternate function when the relevant button
is pressed and held. Hold down this button until
the function is called up.
#1 #2 #3
#4
#0
Rear Panel