
User Manual
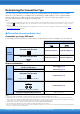
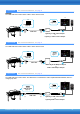
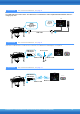
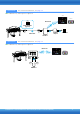
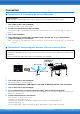

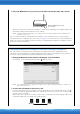
Table Of Contents

Smart Device Connection Manual for iPhone/iPad (iPhone/iPad Connection Manual)
8
Connection
Connection A–D: Connecting by using a USB cable
1
Turn off the power of the instrument.
Quit any open app on your iPhone/iPad.
2 Connect your iPhone/iPad to the instrument.
For the proper order, carefully follow the indicated instruction steps for each connection type on page 5 or
page 6.
3 Turn on the instrument.
4 The connection procedures are completed at step 3. Use the app on your iPhone/iPad to
communicate with your instrument.
NOTE Some apps need the appropriate setting to communicate with the instrument. For details, refer to the relevant app
manuals.
Connection E: Connecting with Wireless LAN via an Access Point
If the wireless LAN function is included on the instrument, skip steps 1 and 2 below.
1 Turn off the power to the instrument.
Quit any open app on your iPhone/iPad.
2 Connect the USB Wireless LAN Adaptor to the [USB TO DEVICE] terminal of the instrument.
3 Turn on the power to the instrument.
4 If your instrument has a wireless LAN mode setting, set it to Infrastructure Mode.
For instructions on setting your instrument’s wireless LAN mode, refer to the Owner’s Manual or the Reference
Manual of your instrument.
5 Connect the instrument to the network.
There are three methods of connection:
• Automatic Setup by WPS (page 9)
• Displaying the Networks in the Wireless LAN and Connecting to the Network (page 10)
• Manual Setup (page 11)
Select the appropriate setup method from the above depending on your network environment.
Required devices
• USB Cable and conversion adaptor (if necessary) as shown in each connection type on page 5 or page 6.
Required devices
• USB Wireless LAN Adaptor specified for your instrument (This is unnecessary if the wireless LAN function is included on the
instrument.)
• Access point with router (This is unnecessary if your modem has router capability.)
iPad
iPhone
Access point
Wireless LAN Wireless LAN
USB Wireless
LAN Adaptor