SPECIAL MESSAGE SECTION (U.S.A.) This product utilizes batteries or an external power supply (adapter). DO NOT connect this product to any power supply or adapter other than one described in the manual, on the name plate, or specifically recommended by Yamaha. This product should be used only with the components supplied or; a cart, rack, or stand that is recommended by Yamaha. If a cart, etc., is used, please observe all safety markings and instructions that accompany the accessory product.
PRECAUTIONS PLEASE READ CAREFULLY BEFORE PROCEEDING * Please keep these precautions in a safe place for future reference. WARNING Always follow the basic precautions listed below to avoid the possibility of serious injury or even death from electrical shock, short-circuiting, damages, fire or other hazards. These precautions include, but are not limited to, the following: • Do not open the instrument or attempt to disassemble the internal parts or modify them in any way.
Congratulations on your purchase of the Yamaha PSR-195/PSR-79 PortaTone! You now own a portable keyboard that combines advanced functions, great sound and exceptional ease-of-use in a highly compact package. Its outstanding features also make it a remarkably expressive and versatile instrument. Read this Owner’s Manual carefully while playing your new PortaTone in order to take full advantage of its various features. Contents PANEL CONTROLS AND TERMINALS ● ● 6 Front Panel ................................
Main Features The PSR-195/PSR-79 is a sophisticated yet easy-to-use keyboard with the following features and functions: Yamaha Education Suite page 26-27, 34-35, 37-39 The PortaTone features the new Yamaha Education Suite — a set of learning tools that utilize the latest technology to make studying and practicing music more fun and fulfilling than ever before! The Yamaha Education Suite includes: Powerful Melody Guide functions in the Song mode — Waiting and Minus One — that let you easily learn the 100
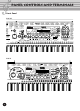
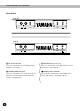
Panel Controls and Terminals Front Panel PSR-195 100 O D PIANO Y-TONK O 1~4 CHORD TA AN 1~4 H ORG 1~2 RGAN ORGAN RDION ONICA /BASS GUITAR GUITAR UITAR GUITAR 25 E GUITAR 26 DIST GUITAR 27 WOOD BASS 28 FINGER BASS 29 MUTE BASS 30 SLAP BASS STRINGS/MALLET 31 STRINGS 32 VIOLIN 33 CELLO 34 HARP 35 SITAR 36 BANJO 37 UKULELE 38 VIBRAPHONE 39 MARIMBA 40 STEEL DRUMS WIND 41 TRUMPET 42 TROMBONE 43 MUTE TRPET 44 FRENCH HORN A 45 BRASS SECT 55 46 ALTO SAX 56 47 TENOR SAX 57~58 59 48 CLARINET 49 FLUTE 60 50 PAN FLU
Panel Controls and Terminals A Power switch (STAND BY/ON) B MASTER VOLUME dial This determines the overall volume of the PortaTone. C OVERALL, DEMO START buttons (s, t, +, -) These are for selecting the various “overall” functions and setting their values. (See page 23.) They are also used to play the Demo songs. (See page 11.) D SONG button This selects the Song mode. (See page 20.) E VOICE button This selects the Voice mode. (See page 15.) F STYLE button This selects the Style mode. (See page 28.
Panel Controls and Terminals Rear Panel PSR-195 T IN MIDI OUT SUSTAIN S PHONES/ AUX OUT R DC IN 10-12V PSR-79 S IN 8 MIDI OUT PHONES/ AUX OUT R DC IN 10-12V R DC IN 10-12V jack T SUSTAIN jack (PSR-195 only) This is for connection to a PA-3B AC power adaptor. (See page 9.) This is for connection to an optional FC4 or FC5 Footswitch. (See page 10.) S PHONES/AUX OUT jack This is for connection to a set of stereo headphones or to an external amplifier/speaker system. (See page 10.
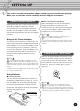
Setting Up This section contains information about setting up your PortaTone for playing. Make sure to read this section carefully before using the instrument. Power Requirements Although the PSR-195/79 will run either from an optional AC adaptor or batteries, Yamaha recommends use of an AC adaptor whenever possible. An AC adaptor is more environmentally friendly than batteries and does not deplete resources.
Setting Up Accessory Jacks ■ Using Headphones For private practicing and playing without disturbing others, connect a set of stereo headphones to the rear panel PHONES/AUX OUT jack. Sound from the built-in speaker system is automatically cut off when you insert a headphone plug into this jack. ■ Connecting a Keyboard Amplifier or Stereo System Though the PortaTone is equipped with a builtin speaker system, you can also play it through an external amplifier/speaker system.
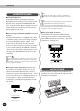
Getting Started — Playing the Demo Songs The PortaTone has a huge variety of Demo songs, specially recorded to showcase the dynamic sounds and rhythms and give you an idea of what you can do with the instrument. First, turn on the power. Press the STAND BY/ON button. Whenever the power is turned on, the Voice mode is automatically called up and set to play Voice 1 (GrandPno). STAND BY ON Set the Volume. Initially, turn the MASTER VOLUME control about a third of the way up.
Panel Display Indications The PortaTone features a large multi-function display that shows all important settings for the instrument. The section below briefly explains the various icons and indications in the display. B Overall function bar indicator G Song/Voice/Style name and number MEASURE D Keyboard These dark bars indicate the currently selected mode: Song, Voice, or Style. A C-shaped bar (at SONG or STYLE) indicates that the mode is active in the background.
Portable Grand This convenient function lets you automatically exit from any other mode or function and instantly call up the Grand Piano voice. “STEREO SAMPLING PIANO” Press the piano-shaped PORTABLE GRAND button. METRONOME PORTABLE GRAND Doing this automatically cancels any other mode or function, and resets the entire instrument for playing the special “Stereo Sampling Piano” Grand Piano voice (voice 001).
Portable Grand Setting the Metronome Time Signature The time signature of the Metronome can be set to various quarter-note based meters. NOTE: The time signature changes automatically when a style or song is selected. Simultaneously hold down the METRONOME button and press the button on the numeric keypad that corresponds to the desired time signature (see chart at right).
Selecting and Playing Voices — The Voice Mode The Voice mode features 100 authentic voices that have been created with Yamaha’s sophisticated AWM (Advanced Wave Memory) tone generation system. Many of these voices also have special preset characteristics or embellishments. The voices are divided into various categories depending on their characteristics or the effects used. “STEREO SAMPLING PIANO” Selecting and Playing a Voice Select the Voice mode. Press the VOICE button.
Selecting and Playing Voices — The Voice Mode There are three ways to select voices: 1) directly entering the voice number with the numeric keypad, 2) using the +/- keys to step up and down through the voices, or 3) pressing the VOICE button to advance through the voice numbers. Using the numeric keypad Enter the digits of the voice number as printed on the panel. For example, to select voice #42, press “4” on the numeric keypad, then “2.
Selecting and Playing Voices — The Voice Mode NOTE: The PortaTone is polyphonic up to a maximum of 16 notes. (Depending on the voice selected — such as split voices and dual voices — fewer notes may be available.) This includes not only the notes played from the keyboard, but also the notes in a style pattern, the notes played by a Pad (page 40), and so on. Thus, if you play too many notes at one time, some may not sound and/or others may be cancelled. Play the selected voice.
Selecting and Playing Voices — The Voice Mode Transpose and Tuning You can also adjust the tuning and change the transposition (key) of the PortaTone with the Transpose and Tuning functions. Transpose Transpose determines the key of both the main voice and the bass/chord accompaniment of the selected style. It also determines the pitch of the songs and the Multi Pads.
Selecting and Playing Voices — The Voice Mode Tuning Tuning determines the fine pitch setting of both the main voice and the bass/chord accompaniment of the selected style. It also determines the pitch of the songs and the Multi Pads. This allows you to accurately match the tuning with that of other instruments. The Tuning settings can be adjusted over a range of ± 50 (approx. ± 0.5 semitones). Select the Tuning function in the Overall menu.
Selecting and Playing Songs — The Song Mode The Song mode features 100 special songs that have been created using the rich and dynamic sounds of the PortaTone. The songs are generally for your listening enjoyment; however, you can also play along with them on the keyboard. A Voice Change function lets you set whether the keyboard voice changes or not with the voice changes in the song itself.
Selecting and Playing Songs — The Song Mode NOTE: You can play along with the song using the currently selected voice, or even select a different voice for playing along. Simply call up the Voice mode while the song is playing back and select the desired voice . Current measure number 001 StarWars MEASURE 002 Current melody note If you want to change to another song, repeat step 2 above. Stop the song. Press the START/STOP (>/■) button.
Selecting and Playing Songs — The Song Mode Change the value. Use the OVERALL +/- buttons to increase or decrease the Tempo value. Holding down either button continuously increases or decreases the value. OVERALL Decreases Tempo value Restoring the Default Tempo Value Each song and style has been given a default or standard tempo. If you’ve changed the tempo, you can restore the original default setting by pressing both OVERALL +/buttons simultaneously (when Tempo is selected in the Overall menu).
Selecting and Playing Songs — The Song Mode Adjusting the Song Volume The playback volume of the song can be adjusted. This volume control affects only the song volume. The volume range is 000 - 127. Select the Song Volume function in the Overall menu. Press one of the OVERALL s/t buttons, repeatedly if necessary, until “SongVol” appears in the display. Current Song Volume value 110 SongVol MEASURE SONG VOL 001 OVERALL Change the value.
Selecting and Playing Songs — The Song Mode Song Controls When the Song mode is active, the panel buttons below the display function as song controls. This has no function in the Song mode. This functions as a rewind button, stepping in reverse through the measure numbers. It can be used during playback, or when playback is paused or stopped. Pressing this button alternately starts and stops song playback. SONG a Pressing this button alternately pauses and resumes song playback.
Selecting and Playing Songs — The Song Mode Set point B (the end point of the section). A-b Repeat Press the button once again, at the ending point of the section to be repeated. The selected phrase repeats indefinitely until stopped. MEASURE 012 Pause or stop playback as needed. Use the Pause (❙ ❙) and START/STOP (>/■) buttons. Stopping playback does not cancel the set A/B points or the A/B Repeat function. Turn off the A/B Repeat function. oFF Repeat Press the button.
Selecting and Playing Songs — The Song Mode Melody Guide The PortaTone has a special Melody Guide function that makes practice and learning of the 100 songs both fun and easy. During song playback, the PortaTone shows the notes of the melody in the music staves and the keyboard diagram in the display — indicating which notes you should play and when you should play them. The Melody Guide function even lets you practice at your own pace by automatically pausing playback until you play the correct notes.
Selecting and Playing Songs — The Song Mode Start playback of the song, and play the melody from the keyboard. Start playback in the normal fashion (page 20) and play the melody along with the song. You can also change the Melody Guide setting while the song is playing back by simply pressing the MELODY GUIDE button. To stop the song, press the START/STOP (>/■) button.
Selecting and Playing Styles — The Style Mode The Style mode provides dynamic rhythm/accompaniment patterns — as well as voice settings appropriate for each pattern — for various popular music styles. A total of 100 different styles are available, in several different categories. Each style is made up of separate “sections” — Intro, Main A and B (with 4 Fill-ins), and Ending — letting you call up different accompaniment patterns as you perform.
Selecting and Playing Styles — The Style Mode Start the selected style. You can do this in one of the following ways: Pressing the START/STOP button The rhythm starts playing immediately without bass and chord accompaniment. The currently selected Main A or B section will play. (You can select either section by pressing the appropriate button — AUTO FILL/MAIN A or B — before pressing the START/ STOP button.) YNCTART START/ STOP INTRO/ ENDING rit.
Selecting and Playing Styles — The Style Mode Stop the style. You can do this in one of three ways: Pressing the START/STOP button The rhythm/accompaniment stops playing immediately. Pressing the SYNC-START button This stops the style and automatically enables Sync-Start, letting you re-start the style by simply playing a chord or key in the ACMP section of the keyboard (or any key when accompaniment is off). Using an Ending section Press the INTRO/ENDING button.
Selecting and Playing Styles — The Style Mode Using the Auto Accompaniment Features Turn on the auto accompaniment. Press the ACMP ON/OFF button to turn on (enable) the auto accompaniment. ACMP SYNCON/OFF START START/ STOP INT END Indicates that auto accompaniment is on. 001 8BtPop TEMPO ACMP ON 116 Select and play a style. Select one of the styles and start playback, as described in steps 1 - 3 on page 28. Change chords using the auto accompaniment feature.
Selecting and Playing Styles — The Style Mode Style Sections (Main A, Main B) and Fill-ins While the style is playing, you can add variation in the rhythm/accompaniment by pressing one of the MAIN A/B (AUTO FILL) buttons. This automatically plays one of four Fill-in sections, and smoothly leads into the next section — even if it is the same section. / G rit. • Fill-in patterns are not available when one of the Piano styles (#81 - #100) are selected.
Selecting and Playing Styles — The Style Mode Using Auto Accompaniment — Multi Fingering The auto accompaniment function automatically generates bass and chord accompaniment for you to play along with, by using Multi Fingering operation. You can change the chords of the accompaniment by playing keys in the ACMP section of the keyboard using either the “Single Finger” or “Fingered” method. With Single Finger you can simply play a one-, two- or three-finger chord indication (see Single Finger Chords below).
Selecting and Playing Styles — The Style Mode What is a Chord? The simple answer: Three or more notes played simultaneously is a chord. (Two notes played together is an “interval” — an interval being the distance between two different notes. This is also referred to as a “harmony.”) Depending on the intervals between the three or more notes, a chord can sound beautiful or muddy and dissonant. The organization of notes in the example at left — a triad chord — produces a pleasant, harmonious sound.
Selecting and Playing Styles — The Style Mode Writing Chord Names Knowing how to read and write chord names is an easy yet invaluable skill. Chords are often written in a kind of shorthand that makes them instantly recognizable (and gives you the freedom to play them with the voicing or inversion that you prefer). Once you understand the basic principles of harmony and chords, it’s very simple to use this shorthand to write out the chords of a song.
Selecting and Playing Styles — The Style Mode One Touch Setting (OTS) The One Touch Setting function automatically selects an appropriate voice for playing with the style you select. In other words, when One Touch Setting is on, the voice automatically changes when you change the style. Select a style. Select one of the styles, as described in steps 1 2 on page 28. Turn on the One Touch Setting function. Press the OTS button so that “OTS On” appears briefly in the display.
Selecting and Playing Styles — The Style Mode Chord Guide The Chord Guide functions of the PortaTone provide powerful, easy-to-use tools for learning chords and chord relationships. Chord Guide features two different types of operation: Smart and Dictionary. Smart The Smart type allows you to set the basic key for the chord accompaniment. Once this is set, you can simply press single keys in the scale and have harmonically appropriate chords played automatically.
Selecting and Playing Styles — The Style Mode Number 01 02 03 04 05 06 07 08 Key (display indication, actual key) #/b=0 (C, or Am) #=1 (G, or Em) #=2 (D, or Bm) #=3 (A, or F#m) #=4 (E, or C#m) #=5 (B, or G#m) #=6 (F#, or D#m) #=7 (C#, or A#m) Number 09 10 11 12 13 14 15 Key (display indication, actual key) b=7 (Cb, or Abm) b=6 (Gb, or Ebm) b=5 (Db, or Bbm) b=4 (Ab, or Fm) b=3 (Eb, or Cm) b=2 (Bb, or Gm) b=1 (F, or Dm) For example, if you want to perform with the following score, set the key to b=1 (F,
Selecting and Playing Styles — The Style Mode Dictionary The Dictionary type is essentially a built-in “chord book” that shows you the individual notes of chords. It is ideal when you know the name of a certain chord and want to quickly learn how to play it. With the Style mode active, select the Dictionary Chord Guide. Dict. TEMPO Press the CHORD GUIDE button so that “Dict.” appears briefly in the display. 116 ACMP ON ROOT G Specify the root of the chord.
Selecting and Playing Styles — The Style Mode Multi Pads These convenient pads let you instantly trigger various musical and rhythmic phrases as you play the PortaTone. There are a total of 40 different sounds or phrases (20 banks, with two pad sounds for each bank). The phrases play back at the same speed as the Tempo setting, and they also change harmonically along with the accompaniment chords (both in the Style and Song modes). Select the Pad function in the Overall menu.
MIDI Selecting and Playing Styles — The Style Mode The PortaTone also features MIDI terminals, allowing you to interface the PortaTone with other MIDI instruments and devices. Receives MIDI data from the connected sending device. Transmits MIDI data (keyboard performance) to the connected device.
Troubleshooting 42 Problem Possible Cause and Solution When the PortaTone is turned on or off, a popping sound is temporarily produced. This is normal and indicates that the PortaTone is receiving electrical power. The sound of the voices or rhythms seems unusual or strange. The battery power is too low. Replace the batteries. (See page 9.) There is no sound even when the keyboard is played or when a Song is being played back.
Index Misc. H S +/- keys ......................................... 16 Harmony voices ............................ 17 sections (style) ............................... 32 headphones .................................. 10 Single Finger chords ...................... 33 A Smart ............................................ 37 A/B Repeat .................................... 24 I song controls ................................ 24 AC adaptor ...................................... 9 interval .............
VOICE LIST The following voices can be selected when the Voice mode is active, or when the Voice Change function is on. They can also be selected by a connected MIDI device; the corresponding bank select messages are: MSB = 00H, LSB = 70H. When selecting voices via MIDI: * The Harmony voices (#61 - #70) and Echo voices (#81 - #90) are sounded without the respective harmony and echo effects. Panel Prg. # Ch.
VOICE LIST The following voices cannot be directly selected from the panel controls; they are special voices programmed into the songs of the PortaTone and are selected automatically in song playback. However, they can be selected by a connected MIDI device; the corresponding bank select messages are: MSB = 00H, LSB = 00H. Prg. Ch.
MULTI PAD LIST No. 1 2 3 4 5 6 7 8 9 10 11 12 13 14 15 16 17 18 19 20 46 Name Pianist1 Pianist2 Guitar Play Brass BrassHit Funky Techno1 Techno2 Arpeggio Twinkle1 Twinkle2 Crystal Bird Africa DrumKit Tom_Flam Drum_Seq LatPerc BongoSeq Timbales LCD Pianist1 Pianist2 Gtr.
SPECIFICATIONS Keyboard PSR-195: 61 standard-size keys (C1 - C6) PSR-79: 49 standard-size keys (C1 - C5) Power supply Adaptor: Yamaha PA-3B AC power adaptor Batteries: Six “D” size, SUM-1, R-20 or equivalent batteries Voices 100 panel voices (max.
midi implementation chart [Portable Keyboard] Model: PSR-195/PSR-79 Function Basic Default Channel Changed Recognized 1~7, 10 X Default Messages Altered 3 X ************** 3 X X : True voice 0~127 ************** 0~127 0~127 Velocity Note ON Note OFF O 9nH, v=1~127 X 9nH, v=0 O 9nH, v=1~127 X 9nH, v=0 or 8nH After Touch key’s Ch’s X X X X X X Note Number Pitch Bender Control Change 0, 32 1 6, 38 7 10 11 64 66 84 91 96 97 100, 101 120 121 Remarks O X X O O X O X O X X X X X X *1 O X
midi implementation chart NOTE: *1 MSB can be used to change the voice for the Melody or Rhythm. MSB=00H :Melody Voice MSB=7FH : Rhythm Voice LSB: Refer to Voice list. *2 For program change values, refer to the voice list. *3 < GM System on > F0H,7EH,7FH, 09H, 01H, F7H All data is restored to the default values. *4 MIDI does not function (transmit/receive) in the Song mode. FCC INFORMATION (U.S.A.) 1.
Limited Warranty 90 DAYS LABOR 1 YEAR PARTS Yamaha Corporation of America, hereafter referred to as Yamaha, warrants to the original consumer of a product included in the categories listed below, that the product will be free of defects in materials and/or workmanship for the periods indicated.
For details of products, please contact your nearest Yamaha or the authorized distributor listed below. Pour plus de détails sur les produits, veuillez-vous adresser à Yamaha ou au distributeur le plus proche de vous figurant dans la liste suivante. NORTH AMERICA CANADA Yamaha Canada Music Ltd. 135 Milner Avenue, Scarborough, Ontario, M1S 3R1, Canada Tel: 416-298-1311 U.S.A. Yamaha Corporation of America 6600 Orangethorpe Ave., Buena Park, Calif. 90620, U.S.A.