
User Manual
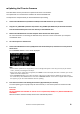

Table Of Contents

PX Series Firmware Update Guide 2
■ Updating the PX series firmware
Described below are the procedures to update the PX series unit firmware.
The update files are consisted of the firmware file and the SP PRESET file.
Uncompress the compressed file you downloaded before proceeding.
1. Connect the USB flash drive (formatted in FAT32) to the USB terminal on your computer.
2. Copy the “PX_PROG.BIN” (firmware file) and the “PX_SPP.BIN” (SP PRESET file) in the folder extracted
from the downloaded zip file to the root directory of the USB flash drive.
3. Remove the USB flash drive from the computer when the files have been copied.
For more information on removing the USB flash drive, refer to the owner's manual for your computer
and USB flash drive.
4. Turn off the power to the PX series.
5. Connect the USB flash drive to the [USB] terminal of the PX front panel, and then turn on the power to
the PX series.
The "FIRMWARE UPDATE" screen will be displayed.
NOTE
- If the firmware update file has any problem, an error message will appear. In this case, press any key to close the
screen, and then proceed again from Step 1.
- If the current version could not be recognized, the CURRENT section will display “Unknown.” However, you can still
update the firmware despite this.
- If the “FIRMWARE UPDATE” screen does not appear, make sure to confirm that the update files properly exist in
the root directory of the USB flash drive. Even if the “FIRMWARE UPDATE” screen does not appear with the update
files properly, try to use another USB flash drive for updating.
6. Press the main knob to start loading the firmware (approximately two minutes).
To cancel updating, press any key except for the main knob, or turn off the power and remove the USB
flash drive.
CAUTION:
DO NOT OPERATE ANY CONTROL OF THE PX series unit (SWITCHES, KNOBS, ETC.) WHILE UPDATING THE
FIRMWARE.
After the firmware has been loaded, the PX series automatically restarts.