CL/QLシリーズ & Shure ワイヤレスマイクシステム 3rd Edition: June 2020
はじめに ヤマハデジタルミキシングコンソール「CL/QL シリーズ」のファームウェア V4.0 では、Shure 社の Dante 対応デジタルワイヤレスマイクレシーバーシステム「ULXD」をコンソールの画 面からリモート操作、監視できるようになりました。CL/QL V4.
CL/QL シリーズ&Shure ワイヤレス 1 システム要件 ヤマハ デジタルミキシングコンソール:CL5 / CL3 / CL1 / QL5 / QL1 o ファームウェア V4.10 以降 Shure デジタルワイヤレスマイクレシーバー: o ULXD4D / ULXD4Q / ULXD4(ファームウェア V1.7.34 以降) o QLXD4(ファームウェア V1.1.15 以降) o Axient AXT400(ファームウェア V1.16.11 以降)、ShowLink アクセスポイント (AXT400 で ShowLink 機能を使用する場合) 2 ネットワークスイッチ:ヤマハ SWP1 シリーズなど CAT5e / CAT6 ケーブル Dante Controller ソフトウェアがインストールされたコンピューター o Dante Controller は以下から無償でダウンロードできます。 www.audinate.
CL/QL シリーズ&Shure ワイヤレス AES/EBU を利用することもできます。これにより、MY16-AE カードを装着した RSio64-D 経由で Dante ネットワークに接続できます。 Dante 非対応の Shure 機器 ULXD、QLXD、AXT を Dante の Primary ネットワークに接続し ます。RSio64-D を Dante 以外のオーディオとのインタフェースとして使用できます。 3 Shure ワイヤレスマイクレシーバーの設定 ULXD、QLXD、AXT のファームウェアが最新であることを確認してください。最新のバージョ ンは以下からダウンロードできます: https://www.shure.co.jp/ja/support_download/downloads/ 上記のいずれの Shure 機器も、フロントパネルに設定のためのユーザーインターフェース を装備しています。Dante 対応の ULXD では、CL/QL シリーズから操作や監視を行うため に追加の設定が必要です。 3.1 ULXD の Dante 設定 1.
CL/QL シリーズ&Shure ワイヤレス ii. iii. iv. v. vi. 「NETWORK」を 選択し、ENTER ボタンを押しま す。 画面をスクロー ルし、「DANTE」 を選択します。 「Dev.ID」を選択します。 ID MODE を「Yamaha」に設定します。 各 ULXD に対して、「Y001」から始まる個別の ID を割り当てます。 2. ネットワークポートの設定を確認します。 i. 「DEVICE UTILITIES」→「NETWORK」メニューを表示し、 「CONFIGURATION」を選択します。 ii. Dante 機器とデイジーチェーン接続する場合や、リダンダントではなく Primary ネットワークのみを使用する場合は「SWITCHED」(初期設定)を選 択します。 iii. Dante システムをリダンダントにしたい場合は、「REDUNDANT AUDIO」を選 択します(2 つの分離したネットワークを構築するために、追加でスイッチや ケーブルが必要になります)。 iv.
CL/QL シリーズ&Shure ワイヤレス ii. iii. iv. v. vi. QLXD の場合:「ENTER」ボタンを長押しし、「MENU」を押して詳細メニューを 開きます。「MENU」をもう一度押し、IP メニューを表示します。 AXT の場合:「UTILITY」ボタンを押し、「NETWORK」を選択します。 モードは初期状態で「Automatic」(QLXD の場合は「Au」)に設定されていま す。この設定が最も簡単でおすすめです。 ネットワーク上に DHCP サーバーが無い場合、IP アドレスは「169.254.*.*」 の範囲になります(*は 0 から 254 までの数字)。 DHCP サーバー(または DHCP サーバーとして動作する Wi-Fi ルーター)を 使用している場合、IP アドレスは「10.0.1.*」や「192.168.1.*」などの上記と異 なる範囲になります。IP アドレスの範囲は DHCP サーバーの設定で決まり、 アドレスは自動的に割り当てられます。 SUB(サブネットマスク)の値は自動的に設定されます。DHCP サーバーが 無い場合は「255.255.0.
CL/QL シリーズ&Shure ワイヤレス Shure 機器と同様に、まずコンソールの NETWORK 設定を確認する必要があります。 Shure 機器と同じ方法(自動または手動)で IP アドレスを設定します。ただし、CL/QL シリ ーズでは自動設定に 2 つのオプション(「DHCP」と「AUTO IP」)があります。このオプション はファームウェア V4.10 から導入されました(以前は「AUTO IP」のみ)。 1. SETUP メニューを開き、NETWORK 画面を表示します。 2. 「FOR DEVICE CONTROL」タブを選択します。ここで IP アドレスを設定して、Dante ネットワーク内の外部機器(Dante 非対応の Shure 機器を含む)を操作できるように します。 ただし、この IP アドレスとミキサーコントロール用 IP アドレスは異なるサブネットに 設定してください。たとえばこの IP アドレスを「192.168.1.*」に設定した場合は、FOR MIXER CONTROL は「192.168.0.
CL/QL シリーズ&Shure ワイヤレス 5. SETUP メニューを開き、WORD CLOCK 画面を表示します。 6. マスタークロックが 48kHz で動作していることを確認します。初期状態では「DANE 48k」が選択されていて、通常はこの設定のままでよいでしょう。 7. SETUP メニュー内の DANTE SETUP 画面を開きます。 8. SETUP タブで、コンソールの ID 番号を確認します(初期値は ID #1)。システム内に CL/QL シリーズが 1 台しかない場合、その ID を#1 にする必要があります。コンソ ールが複数ある場合、1 台の ID は#1 にする必要がありますが、各機器に異なる ID を割り当てる必要があります。 9. 「DANTE PATCH BY: THIS CONSOLE」を有効にします。ID を#1 に設定した場合 は、初期状態で有効になっています。 10. このコンソールで演奏者用のインイヤーモニターミックスを供給する場合は、レイテ ンシーを 0.25ms に設定するこ とを推奨します。 11.
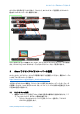
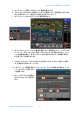
CL/QL シリーズ&Shure ワイヤレス 12. DEVICE MOUNT タブでは、24 台の機器をマウントできます。機器をマウントする と、Dante パッチと操作を行えるようになります。Dante 非対応の Shure 機器につい ても、コンソールの Dante ポート経由で操作するため、ここにマウントする必要があ ります。空いているブロックを選択して、DEVICE SELECT ポップアップ画面を開きま す。 13. ONLINE DEVICE LIST を表示します。 14. Shure 機器を選択し ます。ULXD4D/Q には「Y0**」(**は 16 進数の数値)で 始まる名前がつい ています。各対応機 器の種類が、青字 のモデル名と共に 一覧表示されます。 15. 「DEVICE IDENTIFY」ボタンを 使用して、選択した機器のフロントパネルの LED を点滅させることができます。画 面下部の「OK」をタッチします。 16. 他の対応 Shure 機器についても同様の操作を行います。最大 24 台の機器をマウ ントできます。その後、DANTE SETUP 画面を閉じます。 4.
CL/QL シリーズ&Shure ワイヤレス 20. 左欄から ULXD4D/Q を選択し、Dante 入力ポートにパッチするチャンネルを選びま す。 21. 「CLOSE」をタッチし、他の入力ポートにもパッチしていきます。 Dante 非対応の Shure 機器(AXT400、QLXD4、ULXD4)から Rio3224-D や RSio64-D など の Dante 機器にオーディオ接続している場合も、上記の画面で対応する Dante パッチを行 います。このパッチは、のちほどリモートコントロール機能に関連付ける必要があります。 5 Dante Controller での設定 Dante Controller は、www.audinate.
CL/QL シリーズ&Shure ワイヤレス レイテンシーの設定を変更するには、Device View 画面を開く必要があります。Device メニ ューから開くか、機器の名前をダブルクリックしてください。レイテンシーは Device Config タ ブで変更できます。初期値は 1ms で、多くのネットワーク環境で使用できます。演奏者がマ イクとインイヤーモニターシステムを使用する場合は、250usec を選択することを推奨しま す。 Note: ULXD4D/Q と CL/QL シリーズにはスイッチが内蔵されているため、レイテンシーを 250usec に設定する場合、これらの機器の間に入るネットワークスイッチは 1 台のみにす る必要があります。 www.yamahaproaudio.
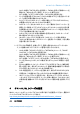
CL/QL シリーズ&Shure ワイヤレス 6 CL/QL シリーズからのワイヤレス操作 これまでの設定で、システム全体を操作・監視できるようになりました。続いて CL/QL シリ ーズで以下の設定を行います。 1. I/O DEVICE メニューを開きます。 2. WIRELESS タブを表示します。 3. 左欄から操作したい ULXD/QLXD/AXT 機器を選択します。ボタンを長押しすること で、該当機器のフロントパネルの LED を点滅させることができます(Identify 機能)。 4. コンソールの画面に、 機器の詳細設定と 「CONTROLLABLE」イ ンジケーターが表示さ れます。操作エリアを タッチして、I/O DEVICE ポップアップ 画面を開きます。 5. レシーバーのチャンネ ル名と RX.GAIN(レシ ーバー ゲイン)、 MUTE を設定します。 また、トランスミッター の周波数と RF LEVEL、バッテリーレベルを確認できます。 6. Note: AXT には TX.
CL/QL シリーズ&Shure ワイヤレス コンソールのパッチが変更されると、ULXD の設定はその Dante パッチが割り当てられた チャンネルに表示されます。 Dante ネットワーク上に他の CL/QL シリーズがある場合、UXLD4D/Q を最大 4 台のコンソ ールにマウントし、複数の場所から監視できます。ULX-D と QLX-D でコントロールできる のはレシーバー内の DIGITAL GAIN です。AXT では TX.GAIN がコントロールできます。こ れはトランスミッター内の A/D 前 ANALOG GAIN です。 6.2 ULXD4 / QLXD4 / AXT400 の入力チャンネル操作 これらの機器は Dante に対応していないため、コンソールの入力チャンネルから操作でき るようにするために追加の設定が必要です。 7. I/O DEVICE メニューに戻り、WIRELESS タブを表示して、画面左側から操作したい 機器を選択します。 8. 画面中央の操作エリアをタッチして I/O DEVICE ポップアップ画面を開きます。 9.
CL/QL シリーズ&Shure ワイヤレス その後、上記で選択した入力ポートを入力チャンネルにパッチすると、チャンネル上にワイ ヤレスレシーバーの設定が表示されます。下図の例では、QLXD4 を Dante ポート 3 にパッ チし、このポートを入力チャンネル 3 にパッチしています。また、AXT400 レシーバーを Dante ポート 5 にパッチし、このポートを入力チャンネル 5 にパッチしています。 パッチしたポートにヘッドアンプがある場合、GAIN/PATCH ポップアップ画面には入力の A.GAIN とワイヤレスレシーバーのゲイン・レベルが両方表示されることにご注意ください。 また AXT400 から AES/EBU で接続した場合、A.GAIN は表示されません。 QLXD4 と ULXD4 には RX.GAIN があり、AXT400 には TX.GAIN と RX.LEVEL があります。 TX.
CL/QL シリーズ&Shure ワイヤレス 7 トラブルシューティング Dante Controller ソフトウェアは、Dante ネットワークのトラブルシューティングに非常に役 立ち、以下から無償でダウンロードできます。 https://www.audinate.com/products/software Dante Controller ですべての機器やそれらの設定情報を検出できない場合: 始めに、コンピューターを含むすべての機器の IP アドレスを確認してください。IP ア ドレスは Dante Controller の「Device Info」タブで確認できます。 すべての機器が自動モードに設定されている場合、「169.
CL/QL シリーズ&Shure ワイヤレス Dante 対応機器 ULXD4D/Q の ID が「Y0**」(**は 01 から FF までの 16 進数)で 始まることを確認してください。 ネットワークスイッチの IGMP スヌーピング機能が有効になっているかどうか確認し てください。スイッチの種類や機器のファームウェアバージョンによっては、まれに IGMP スヌーピングによってコントロール信号が遮断され、音声のみを通過させてい る可能性があります。別のスイッチを使用するか、設定方法がわかれば IGMP スヌ ーピングを無効にしてみてください。ただし IGMP スヌーピングを無効にすることで、 ネットワーク性能が低下する可能性があることにご注意ください。設定を行う前に、 ネットワークの専門家に相談してください。 ヤマハのネットワークスイッチ SWP1 シリーズは、Dante に最適化した設定を呼び 出して、適切に動作するように設計されています。より安定性や信頼性の高いシス テムを構築したい場合にお選びください。SWP1 シリーズでは、IGMP スヌーピング 機能が初期設定されているだけでな