
User Manual

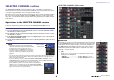


SELECTED CHANNEL section
Reference Manual
9
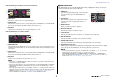
EQ parameter field
This field displays the 4-band EQ parameter settings. Press each
knob to open the HPF/EQ 1ch window.
1 Q knob
Specifies the Q for each band.
If the HIGH band filter type is set to LPF or H. SHELF (high-
shelving), or the LOW band filter type is set to L. SHELF
(low-shelving), the Q knob will not be displayed. Only the
filter type name will be displayed.
NOTE
• Fully rotating the HIGH band Q knob on the panel counter-
clockwise while pressing and holding it down will set the filter
type to LPF. Fully rotating the Q knob clockwise while pressing
and holding it down will set the filter type to high-shelving.
• Fully rotating the LOW band Q knob on the panel clockwise while
pressing and holding it down will set the filter type to low-
shelving.
• If an output channel has been selected, fully rotating the LOW
band Q knob on the panel counter-clockwise while pressing and holding it down will set the filter
type to HPF.
• You can also switch the filter type in the HPF/EQ 1ch window.
2 FREQUENCY knob
Sets the center frequency (or cutoff frequency) for each band.
3 GAIN knob
Sets the amount of cut/boost for each band.
NOTE
• If the HIGH band filter type is set to LPF, you can switch LPF on or off using the HIGH band GAIN
knob on the panel.
• If the LOW band filter type is set to HPF, you can switch HPF on or off using the LOW band GAIN
knob on the panel.
EQ graph field
This field graphically indicates the approximate response of the EQ. Press this field to open
the HPF/EQ 1ch window, in which you can set the attenuator, HPF, and EQ.
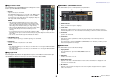
DYNAMICS 1/DYNAMICS 2 field
This field enables you to set the Dynamics 1/2 parameters.
1 OVER indicator
Warns you when the signal is clipping.
2 Level meter
Displays the output signal level (green) and the amount of gain reduction (orange)
when the Dynamics is on. The current threshold setting is shown as a white vertical line.
3 Threshold
Specifies the threshold.
4 Parameters
Indicate the values of parameters that vary depending on the currently-selected
dynamics type.
Press this field to open the DYNAMICS 1/DYNAMICS 2 1ch window, in which you can
make detailed parameter settings.
INSERT field
This field enables you to make insert settings.
1 Popup button
Press this button to open the INSERT/DIRECT OUT 1ch
window.
2 ON button
Switches the insert on or off.
3 RACK EDIT button
Appears if an effect or Premium Rack is inserted. Press this button to display the edit
screen for the inserted rack.
4 IN indicator
Appears if a port has been assigned to the insert-in patch. It lights when the signal is
sent to the insert-in.
1 2 3
1 2
3
4
1
2
43