Shure wireless system with Yamaha CL/QL consoles 4th Edition: June 2020
Welcome Since the release of firmware version 4 for Yamaha CL & QL consoles, Shure’s ULXD range of Dante equipped digital wireless mic receivers could be controlled and monitored from the console’s screen. With version 4.1 for CL/QL, the possibilities have increased, with Shure QLXD and Axient wireless mic systems being added to the list of supported devices.
Shure Wireless with Yamaha CL/QL 1 System Requirements Yamaha digital mixing console: CL5 / CL3 / CL1 / QL5 / QL1 o Firmware version 4.10 or newer Shure digital wireless mic receiver: o ULXD4D / ULXD4Q / ULXD4 (Firmware version 1.7.34 or newer) o QLXD4 (Firmware version 1.1.15 or newer) o Axient AXT400 (Firmware version 1.16.
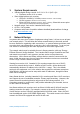
Shure Wireless with Yamaha CL/QL Connect non-Dante Shure ULXD, QLXD and AXT devices to the Dante Primary network. Yamaha RSio64-D can be used to interface with non-Dante audio. 3 Shure Wireless Mic Receiver Setup Check the ULXD/QLXD/AXT firmware is up to date. Find the latest versions here: http://www.shure.com/americas/support/downloads All these compatible Shure devices have similar front-panel user interfaces.
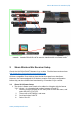
Shure Wireless with Yamaha CL/QL v. vi. Set the ID MODE to “Yamaha”. Set a unique ID number for each Shure ULXD device, starting from “Y001”. 2. Check the Network Port configuration: i. In the DEVICE UTILITIES->NETWORK menu, select CONFIGURATION. ii. Select SWITCHED (default) if using a Daisy-chain connection with the Dante devices, or if using a simple Primary network without redundancy. iii. Select REDUNDANT AUDIO if a Dante system with redundancy is required.
Shure Wireless with Yamaha CL/QL iv. v. vi. If a DHCP server is in use (some Wi-Fi routers act as DHCP servers), then the IP address will be in a different range, such as “10.0.1.*” or perhaps “192.168.1.*”. There are many possibilities, but the IP address will be provided automatically, depending on the setting of the DHCP server. The SUB number will be set automatically. If there is no DHCP server, it will be 255.255.0.0. The GW number stands for “Gateway address”. It may show “0.0.0.
Shure Wireless with Yamaha CL/QL 4 Yamaha CL / QL Setup Firstly, check the firmware of the mixer is v4.10 or newer. The latest firmware can be found at http://www.yamahaproaudio.com/global/en/downloads/firmware_software/ 4.1 NETWORK As with the Shure devices, NETWORK settings need to be checked for compatibility before continuing. Use the same IP addressing strategy for CL/QL as with the Shure devices: either “Automatic” or “Manual”.
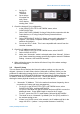
Shure Wireless with Yamaha CL/QL 4.2 DANTE SETUP The next task with the digital mixer is to check the Dante setup and Word Clock selection: 5. Open the SETUP menu, and the WORD CLOCK window. 6. Check that the master clock is running at 48kHz. The default Clock selection is “DANTE 48k”, which is usually ideal. 7. Open the DANTE SETUP window in the SETUP menu. 8. In the SETUP tab, check that the console has an ID number (ID #1 is the default).
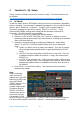
Shure Wireless with Yamaha CL/QL 12. In the DEVICE MOUNT window, there is space for 24 devices to be mounted. Once mounted, Dante patching and control can be accessed. Even the nonDante Shure devices should be mounted here, because they will be controlled via the console’s Dante port. Touch a blank space to open the DEVICE SELECT pop-up. 13. Select to view the ONLINE DEVICE LIST. 14. Select a Shure device: a ULXD4D/Q should have a name beginning with “Y0**”, where ** is a hexadecimal number.
Shure Wireless with Yamaha CL/QL 20. Select the ULXD4D/Q device in the left column, then choose which channel is going to be assigned to that Dante input. 21. Touch “CLOSE” and then assign the other inputs in turn. If the non-Dante Shure devices (including AXT400, QLXD4, ULXD4) have audio connections to Dante devices such as Rio3224-D or RSio64-D, then make the relevant Dante patch in this window. At a later stage, this patch will need to be associated with the remote control function.
Shure Wireless with Yamaha CL/QL However, to change the latency setting, the Device View window must be opened: either use the Device menu, or double-click on the device’s name. The Latency can be changed in the Device Config tab. 1ms is the default setting which can be used with many types of network. 250usec is the best choice when the microphones are used by musicians with in-ear monitor systems.
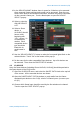
Shure Wireless with Yamaha CL/QL 6 Wireless Control from CL/QL Now the whole system is ready for control and monitoring. Follow these steps on the CL/QL console: 1. Open the I/O DEVICE menu 2. Take a look at the WIRELESS tab 3. Select the required ULXD/QLXD/AXT device from the left column. Press and hold to make the front panel LEDs flash (for easy identification of the device). 4. The device details will be shown on the console screen, with a blue “CONTROLLABLE” indicator.
Shure Wireless with Yamaha CL/QL Whenever the console patch is changed, the ULXD settings will follow the Dante patch to appear on the assigned channel. If there are additional CL/QL consoles in the Dante network, the UXLD4D/Q devices can be mounted to as many as four consoles, and monitored from multiple locations. The DIGITAL GAIN in the receiver can be controlled for the ULX-D and QLX-D. TX. GAIN, which is the ANALOG GAIN before A/D in the transmitter, can be controlled for AXT. 6.
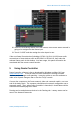
Shure Wireless with Yamaha CL/QL Now, when the chosen input port is patched to an input channel, the wireless receiver settings will be shown on that channel. In the example below, a QLXD4 is assigned to Dante port 3, which is patched to input channel 3. And an AXT400 receiver is assigned to Dante port 5, which is patched to input channel 5. Notice that both the input’s A.GAIN and the wireless receiver’s gain/level are shown in the GAIN / PATCH pop-up window, if the assigned port has a Head-Amp. So the A.
Shure Wireless with Yamaha CL/QL 7 Troubleshooting Dante Controller software is a very helpful trouble-shooting tool for Dante networks. And it is free of charge! Download it at https://www.audinate.com/products/software. If Dante Controller isn’t able to discover all the devices and their settings: begin by checking all the device IP addresses, including the computer’s. They can be monitored in the “Device Info” tab of Dante Controller.
Shure Wireless with Yamaha CL/QL disabling “IGMP Snooping” has the potential to restrict other aspects of the network’s performance. Consult with a network specialist before proceeding. Yamaha SWP1 switches are known to work correctly with their “DANTE CONFIG” enabled. Use these for a more stable and reliable experience. They include the “IGMP Snooping” function which is automatically setup by default, as well as providing some additional useful network monitoring tools.