SL-Dante-SPK User Guide English Español Deutsch ® www.presonus.
Table of Contents 1 Introduction — 1 1.1 About this Manual — 1 1.2 Summary of Features — 1 2 Networking Your StudioLive AI Loudspeaker — 2 2.1 Step 1: Installing the SL-Dante-SPK — 2 2.2 Step 2: Updating Your Loudspeaker Firmware — 4 2.3 Step 3: Selecting the Right Network Hardware — 6 2.3.1 Adding a Wireless Router — 6 2.3.2 Choosing the Right Cables — 7 2.4 Step 4: Downloading Dante Controller — 7 2.5 Step 5: Naming Your Loudspeakers — 8 2.6 Step 6: Connecting Your Network — 11 2.
1 1.1 Introduction About this Manual 1 Introduction SL-Dante-SPK User Guide Thank you for purchasing the SL-Dante-SPK option card for PreSonus® StudioLive™ AIseries Active Integration™ loudspeakers. PreSonus StudioLive AI-series loudspeakers offer a wealth of system-control and performance-monitoring features that give you unprecedented control. The SL-Dante-SPK option card allows you add your StudioLive AI-series loudspeakers to any standard Dante™ network.
2 2.1 Networking Your StudioLive AI Loudspeaker Step 1: Installing the SL-Dante-SPK 2 Networking Your StudioLive AI Loudspeaker SL-Dante-SPK User Guide Your SL-Dante-SPK option card allows any StudioLive AI-series loudspeaker in which it’s installed to connect to a Dante network using an Ethernet cable. It is important to mention that once the SL-Dante-SPK option card is installed, you can no longer wirelessly control your loudspeaker using the USB Wi-Fi LAN adapter.
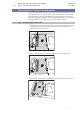
2 2.1 Networking Your StudioLive AI Loudspeaker Step 1: Installing the SL-Dante-SPK SL-Dante-SPK User Guide 4. Slide the SL-Dante-SPK option card into the slot and line up the screw holes. 5. Push the SL-Dante-SPK option card until it locks into the internal connector and tighten the thumbscrews. 6. Screw the four Phillips screws back in.
2 2.2 Networking Your StudioLive AI Loudspeaker Step 2: Updating Your Loudspeaker Firmware 2.2 Step 2: Updating Your Loudspeaker Firmware SL-Dante-SPK User Guide SL-Dante-SPK requires a firmware recovery for your StudioLive AI loudspeaker. The firmware is available from your My PreSonus account at https://my.presonus.com. Power User Tip: You must register your SL-Dante-SPK option card to ensure that you have the correct firmware in your account. 1. Log into your My PreSonus account. 2.
2 2.2 Networking Your StudioLive AI Loudspeaker Step 2: Updating Your Loudspeaker Firmware SL-Dante-SPK User Guide 11. Power on your StudioLive AI loudspeaker while holding down any button on its back panel. Press and Hold any button On 12. Continue holding the button for 10 full seconds (1-Louisiana, 2-Louisiana, etc.). 1 Louisiana 2 Louisiana 3 Louisiana 4 Louisiana 5 Louisiana 13. The lights on the back panel of your StudioLive AI loudspeaker will cycle until the firmware update is complete.
2 2.3 Networking Your StudioLive AI Loudspeaker Step 3: Selecting the Right Network Hardware 2.3 Step 3: Selecting the Right Network Hardware SL-Dante-SPK User Guide While Dante is compatible with standard network hardware, there are a few basic requirements to keep in mind when choosing your network switch. The following recommendations are based on the needs of a high-channel-count system (more than 32 channels). •• N on-blocking layer-2 gigabit switch with a packet-forwarding rate of 1.
2 2.4 Networking Your StudioLive AI Loudspeaker Step 4: Downloading Dante Controller SL-Dante-SPK User Guide 2.3.2 Choosing the Right Cables Be sure to use CAT5e or higher (CAT6 or CAT7) network cable. The CATE5e specification supports transmitting data up to 100 meters but cable and termination quality, as well as the environment in which the cable is used, can shorten this potential transmission distance.
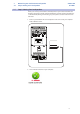
2 2.5 Networking Your StudioLive AI Loudspeaker Step 5: Naming Your Loudspeakers 2.5 Step 5: Naming Your Loudspeakers SL-Dante-SPK User Guide When you connect your StudioLive AI loudspeakers to your Dante network for the first time, they will be named “SL-AI-PA-” followed by a unique numeric identifier (e.g. SL-AI-PA-0123a4). Taking a moment to give your speakers a custom name will save time later. 1. Turn on your StudioLive AI-series loudspeaker and connect it to your computer with an Ethernet cable.
2 2.5 Networking Your StudioLive AI Loudspeaker Step 5: Naming Your Loudspeakers SL-Dante-SPK User Guide 3. You will see your loudspeaker on the Routing tab. 4. Open the Device view by double-clicking on the speaker name or by selecting Device>Device View.
2 2.5 Networking Your StudioLive AI Loudspeaker Step 5: Naming Your Loudspeakers SL-Dante-SPK User Guide Click on the Device Config tab and give your loudspeaker a descriptive name (FOH Left, Center Balcony, etc.). Power User Tip: Dante device names can be up to 31 characters and are not case sensitive (e.g., “Guitar wedge” and “guitar Wedge” are treated as the same label). Device names must start with a letter of the alphabet but numbers and hyphens may also be used. 5.
2 2.6 Networking Your StudioLive AI Loudspeaker Step 6: Connecting Your Network 2.6 Step 6: Connecting Your Network SL-Dante-SPK User Guide The diagram below shows a standard Dante configuration with a wireless router for operating SL Room Control and other iOS remote apps. The wireless router is connected to a port on a managed switch that has Multicast Filtering enabled so that wireless SL Room Control data and Dante audio can be run on the same switch.
2 2.7 Networking Your StudioLive AI Loudspeaker Step 7: Routing Audio 2.7 Step 7: Routing Audio SL-Dante-SPK User Guide Before you start routing audio to your Dante network, there are a few terms with which you should become familiar: •• Device: A device means a Dante-enabled device (e.g., your StudioLive AI-series loudspeaker with the SL-Dante-SPK option installed). •• Transmit (Tx) channel: As its name suggests, a Transmit channel transmits audio from the audio hardware to the network.
2 2.7 Networking Your StudioLive AI Loudspeaker Step 7: Routing Audio SL-Dante-SPK User Guide Once you have connected all your devices, launch Dante Controller. 1. On the Routing tab, you will see all your connected devices. Click on the “+” next to each device to view its Transmit or Receive channels. 2. Patch a Transmit channel from your mixer to the first Receive channel (RxChan 0) of your loudspeaker. 3.
2 2.7 SL-Dante-SPK User Guide Networking Your StudioLive AI Loudspeaker Step 7: Routing Audio 2.7.1 Yamaha CL- and QL-series Console Routing Yamaha CL- and QL-series consoles feature integrated Dante routing. When using these consoles, you have the option not to use the Dante Controller application to route audio. This section is a brief tutorial on using Yamaha CL-series consoles’ onboard routing features with StudioLive AI-series loudspeakers.
SL-Dante-SPK User Guide 3 3.1 SL Room Control Input Modes 3 SL Room Control Once a StudioLive AI-series loudspeaker has the SL-Dante-SPK option installed, Input Mode switching and Dante network detection will be available in SL Room Control. 3.1 Input Modes Dante-enabled StudioLive AI-series loudspeakers are provided with three input modes: •• Dante Only: This mode disables the analog inputs on your loudspeaker whether or not it is on the Dante network.
SL-Dante-SPK User Guide 4 4.1 Alternative Network Configuration Analog Failover 4 Alternative Network Configuration 4.
4 4.2 Alternative Network Configuration Integrating an Analog Console 4.
5 Frequently Asked Questions 5 Frequently Asked Questions Monitor Station V2 Owner’s Manual Can I connect a Dante device directly to my computer? Yes. Simply connect your Dante-enabled devices to an Ethernet switch, using CAT5e or CAT6 Ethernet cable, then connect your computer to the same switch. If you have only one Dante-enabled device to connect to your computer, you can eliminate the switch and simply connect the two with a CAT5e or CAT6 Ethernet cable.
5 Frequently Asked Questions SL-Dante-SPK User Guide Does Dante require special switches? No. However, we strongly recommend that gigabit switches be used due to the clear advantages in performance and scalability. What is the minimum requirement for switches in a Dante network? All Ethernet switches are capable of working with Dante. However, please be aware that there are some features on some kinds of switches that will allow you to build larger and more reliable Dante networks.
5 SL-Dante-SPK User Guide Frequently Asked Questions When do I need to use QoS in a Dante network? QoS is required when using Dante in networks that have 100 Mbps devices and is optional in networks with gigabit devices. We recommend that QoS be enabled in all Dante networks in order to ensure proper operation under all possible conditions.
® 18011 Grand Bay Ct. • Baton Rouge, Louisiana 70809 USA• 1-225-216-7887 www.presonus.