
User guide


4
2 Networking Your StudioLive AI Loudspeaker
2.2 Step 2: Updating Your Loudspeaker Firmware
SL-Dante-SPK
User Guide
2.2 Step 2: Updating Your Loudspeaker Firmware
SL-Dante-SPK requires a rmware recovery for your StudioLive AI loudspeaker. The
rmware is available from your My PreSonus account at https://my.presonus.com.
Power User Tip: You must register your SL-Dante-SPK option card to ensure that you
have the correct rmware in your account.
1. Log into your My PreSonus account.
2. Download the rmware recovery .zip archive for your loudspeaker.
3. Open your Downloads folder and locate the StudioLive rmware folder.
4. Depending on your system preferences, the .zip archive containing the rmware
folder might not automatically decompress. To expand it, simply double-click it.
5. Open the rmware folder; you will nd four les inside: inivars.scr, recovery.scr,
rootfs.img, and ulmage.
6. Connect a FAT32-formatted USB thumb drive to your computer.
Power User Tip: Most small USB drives (16 GB or less) are already formatted correctly,
so no formatting is required. If your loudspeaker does not detect your thumb drive,
verify that the drive is formatted correctly.
7. Select all four of the rmware recovery les and either copy/paste or drag them
to the root of your thumb drive. Eject your drive and disconnect it from your
computer.
8. Label the drive with the model rmware you copied to it.
NOTE: Each StudioLive AI loudspeaker model has its own rmware les. Installing
the wrong model’s rmware on a loudspeaker will cause it to behave abnormally and
may require a repair. For example, don’t install 315AI rmware on a 312AI. If you are
upgrading rmware on multiple StudioLive AI-series models, we recommend that
you label each thumb drive to ensure that the correct rmware is loaded onto each
loudspeaker.
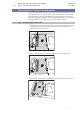
9.
Off
Power o your StudioLive AI loudspeaker.
10.
USB Drive
Connect the USB thumb drive to the USB connection on your StudioLive AI
loudspeaker.