UAB Compact Disc Player Lecteur Compact Disque OWNER’S MANUAL MODE D’EMPLOI
IMPORTANT SAFETY INSTRUCTIONS IMPORTANT SAFETY INSTRUCTIONS CAUTION RISK OF ELECTRIC SHOCK DO NOT OPEN CAUTION: TO REDUCE THE RISK OF ELECTRIC SHOCK, DO NOT REMOVE COVER (OR BACK). NO USER-SERVICEABLE PARTS INSIDE. REFER SERVICING TO QUALIFIED SERVICE PERSONNEL.
IMPORTANT SAFETY INSTRUCTIONS FCC INFORMATION (for US customers) 1 IMPORTANT NOTICE: DO NOT MODIFY THIS UNIT! This product, when installed as indicated in the instructions contained in this manual, meets FCC requirements. Modifications not expressly approved by Yamaha may void your authority, granted by the FCC, to use the product. 2 IMPORTANT: When connecting this product to accessories and/or another product use only high quality shielded cables. Cable/s supplied with this product MUST be used.
CAUTION: READ THIS BEFORE OPERATING YOUR UNIT. CAUTION: READ THIS BEFORE OPERATING YOUR UNIT. 1 To assure the finest performance, please read this manual carefully. Keep it in a safe place for future reference. 2 Install this sound system in a well ventilated, cool, dry, clean place – away from direct sunlight, heat sources, vibration, dust, moisture, and/or cold.
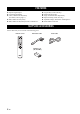
CONTENTS INTRODUCTION INTRODUCTION FEATURES............................................................. 2 SUPPLIED ACCESSORIES ................................. 2 CONTROLS AND FUNCTIONS ......................... 3 PREPARATION Front panel ................................................................. 3 Front panel display .................................................... 4 Remote control........................................................... 5 Installing batteries in the remote control ........
INTRODUCTION FEATURES ◆ Optical Digital Output ◆ Coaxial Digital Output ◆ CD-R, CD-RW Disc Playability (For details, refer to page 17.
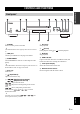
CONTROLS AND FUNCTIONS INTRODUCTION Front panel 1 POWER Press to turn the power to ON/OFF. 7 (Play) Start playback. y 8 (Pause) Pause playback. Press The POWER indicator above lights up when this unit is turned on. or to resume playback. 9 (Stop) Stop playback. 2 USB port Connect your USB device. See page 8 for details. 3 PURE DIRECT Turn PURE DIRECT mode on or off to improve audio quality. y The PURE DIRECT indicator above lights up when this unit is in PURE DIRECT mode. See page 10 for details.
CONTROLS AND FUNCTIONS Front panel display 1 Lights up the icon for the selected playback mode. 2 Shows the time displays. (Refer to page 12.) 3 Shows the track number selected or being played back. 4 Shows the file number. 5 Lights up when this unit is in disc mode (refer to page 9) and Audio CD also when an Audio CD is recognized on the tray. 6 Lights up when MP3 file is played back. 7 Lights up when WMA file is played back.
CONTROLS AND FUNCTIONS Remote control INTRODUCTION 1 Infrared signal transmitter (p. 6) Send infrared signals to this unit. 2 CD/USB (p. 9) Switch between disc mode and USB mode. 3 DIMMER (p. 12) Select brightness level for the front panel display. 4 Numeric buttons (p. 10) Select a track directly. 5 PROGRAM (p. 15) Turn program mode on or off. 6 / (Search backward/forward) (p. 11) Search tracks backward/forward. 7 / (Skip backward/forward) (p.
CONTROLS AND FUNCTIONS Installing batteries in the remote control Using the remote control The remote control transmits a directional infrared beam. Be sure to aim the remote control directly at the remote control sensor on the front panel of this unit during operation. Within 6 m (20 ft) 1 Press the part and slide the battery compartment cover off. 2 Insert two supplied batteries (AA, R6, UM-3) according to the polarity markings (+ and –) on the inside of the battery compartment.
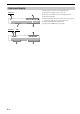
PREPARATION CONNECTIONS Connecting your amplifier CAUTION • Before making any connection, switch OFF the power to the unit, the amplifier and any other component. • Connections should be made to the correct input terminals of the amplifier or another component. • If the placement of this unit causes noise to another equipment, such as a tuner, move them further away from each other.
CONNECTIONS Connecting the supplied power cable Asia and General models only Connecting USB devices This unit has a USB port and can access MP3 or WMA files saved on your USB device. Connect your USB device to the USB port on the front panel of this unit. CAUTION Do not disconnect your USB device while playing back from the USB device, or when the USB indicator blinks. Europe and U.K.
OPERATION This manual describes how to operate this unit by using the remote control. To operate this unit from the front panel, use the corresponding buttons on the front panel. The Audio CD , Data Disc and icons indicate music data formats that can be USB used in the operation. BASIC OPERATION Notes • When you load a disc, set the disc on the inside of the disc guides (4 marks on the disc tray). • The disc may not be read correctly, if it is set incorrectly.
BASIC OPERATION ■ Playing back USB devices USB Connect your USB device to the USB port on the front panel. (For details, refer to page 8.) When USB mode is selected (USB indicator lights up), first filename is displayed in the front panel display (refer to page 12), and playback starts automatically in order by date and time of creation if playable files are in the USB device. To disconnect USB devices Press to stop playback, and then disconnect the USB device. Turning off the power Press POWER again.
BASIC OPERATION y • Press PURE DIRECT again to turn off PURE DIRECT mode. • This setting is retained even if you turn off this unit. Skipping to the beginning of a desired track Audio CD Data Disc USB Advancing or reversing playback rapidly Audio CD Data Disc To advance rapidly, press playback. USB once during To play back from the beginning of the next track, press once. To play back from the beginning of the current track, press once.
BASIC OPERATION Changing front panel display ■ When playing back an Audio CD Audio CD You can select the following front panel displays (1 - 3) by pressing DISPLAY. 1 Elapsed time of the current track (Default) 2 Remaining time of the current track 3 Remaining time of the disc ■ When playing back a Data Disc or USB device Data Disc USB You can temporarily display the filename by pressing DISPLAY. These front panel display examples are for an MP3 file.
RANDOM-SEQUENCE PLAY Audio CD Data Disc Note USB You can play back the tracks in random sequence. These operations can also be performed for Data Disc/USB. To perform random-sequence play Press , and then, RANDOM. + To cancel random-sequence play Press . OPERATION REPEAT PLAY Repeating a selected item Audio CD Data Disc USB You can play back a single track or all tracks repeatedly by pressing REPEAT during playback. The repeat playback mode changes each time you press REPEAT.
REPEAT PLAY Repeat A-B Audio CD You can repeat a specified section of a track by pressing A/B during playback to set two points (start and end points). 1 Press A/B to select the start point of repeat play. “A-” lights up. 2 Press A/B to select the end point of repeat play. “A-B” lights up. The selected section is played back repeatedly. 14 En To cancel repeat A-B Press A/B again to make “A-B” disappear from the front panel display.
PROGRAM PLAY Following information is displayed. When you press “6”: Audio CD You can customize the playback order of up to 50 tracks stored on an Audio CD. This operation is not available for Data Disc and USB. The selected track number When you press ENTER: Total number of tracks currently programmed Total time of the tracks currently programmed 1 Press s to stop playback. Note Pressing PROGRAM in program input mode exits to normal playback mode, though programmed tracks are stored.
PROGRAM PLAY Stopping program playback Press s. To restart program play, press h after pressing PROGRAM. Playback starts from the first programmed track number. Clearing programmed track There are several methods, as described below. ■ Clearing the last programmed track Press CLEAR during program input mode. Following information is displayed. Total number of the tracks currently programmed Total time of the tracks currently programmed The last programmed track is cleared.
ADDITIONAL INFORMATION NOTES ABOUT DISCS/MP3, WMA FILES ■ Discs playable with this unit Audio CD Data Disc This player is designed for playing back compact discs bearing the marks shown below. Never attempt to load any other type of disc into the unit. The unit can also play back 8-cm (3-inch) compact discs. .... Compact discs (digital audio) The most popular discs for commercially available audio CDs. ....
NOTES ABOUT DISCS/MP3, WMA FILES ■ Notes about handling compact discs • Always handle a disc with care so that its surface is not scratched. • Compact discs are not subjected to wear during playback, but damage to the disc surface when the disc is being handled can adversely affect the disc playback. • Be sure to use a felt-tip pen or similar writing tool when writing on the label side of the disc.
TROUBLESHOOTING If the unit fails to operate normally, check the following points to determine whether the problem can be corrected by the simple measures suggested. If it cannot be corrected, or if the problem is not listed in the Problems column, disconnect the power cable and contact your authorized Yamaha dealer or service center for help. Possible Causes This unit fails to turn on. The power cable is not connected to the AC IN inlet on the rear panel or not plugged in the wall outlet.
TROUBLESHOOTING Problems The remote control does not work or function properly. Solutions Refer to page The remote control functions within a maximum range of 6 m (20 ft) and no more than 30 degrees off-axis from the front panel. 6 Possible Causes Wrong distance or angle. Direct sunlight or lighting (from an inverter type of fluorescent lamp, etc.) is striking the remote control sensor of this unit. Reposition this unit. The batteries are weak. Replace all batteries.
Limited Guarantee for European Economic Area (EEA) and Switzerland Thank you for having chosen a Yamaha product. In the unlikely event that your Yamaha product needs guarantee service, please contact the dealer from whom it was purchased. If you experience any difficulty, please contact Yamaha representative office in your country. You can find full details on our website (http://www.yamaha-hifi.com/ or http://www.yamaha-uk.com/ for U.K. resident).
© 2008 Yamaha Corporation All rights reserved.