U Receiver OWNER’S MANUAL
IMPORTANT SAFETY INSTRUCTIONS IMPORTANT SAFETY INSTRUCTIONS CAUTION RISK OF ELECTRIC SHOCK DO NOT OPEN CAUTION: TO REDUCE THE RISK OF ELECTRIC SHOCK, DO NOT REMOVE COVER (OR BACK). NO USER-SERVICEABLE PARTS INSIDE. REFER SERVICING TO QUALIFIED SERVICE PERSONNEL.
IMPORTANT SAFETY INSTRUCTIONS FCC INFORMATION (for US customers) 1 IMPORTANT NOTICE: DO NOT MODIFY THIS UNIT! This product, when installed as indicated in the instructions contained in this manual, meets FCC requirements. Modifications not expressly approved by Yamaha may void your authority, granted by the FCC, to use the product. 2 IMPORTANT: When connecting this product to accessories and/or another product use only high quality shielded cables. Cable/s supplied with this product MUST be used.
CAUTION: READ THIS BEFORE OPERATING YOUR UNIT. CAUTION: READ THIS BEFORE OPERATING YOUR UNIT. 1 2 3 4 5 6 7 8 9 10 11 12 13 14 15 16 To assure the finest performance, please read this manual carefully. Keep it in a safe place for future reference. Install this sound system in a well ventilated, cool, dry, clean place - away from direct sunlight, heat sources, vibration, dust, moisture, and/or cold. For proper ventilation, allow the following minimum clearances around this unit.
CONTENTS BASIC OPERATION USEFUL FEATURES ............................................ 1 SUPPLIED ACCESSORIES ................................. 1 CONTROLS AND FUNCTIONS ......................... 2 Playing a source....................................................... 12 Using the sleep timer ............................................... 13 FM/AM TUNING..................................................14 Using preset functions .............................................
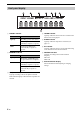
INTRODUCTION CONTROLS AND FUNCTIONS Front panel 1 A (power) Turns this unit on, or sets it to standby mode. Note This unit consumes a small amount of power even when in standby mode. 5 MEMORY Stores the current FM/AM station as a preset when TUNER is selected as the input source (see page 15). 6 FM/AM Sets the FM/AM tuner band to FM or AM when TUNER is selected as the input source (see page 14).
CONTROLS AND FUNCTIONS INTRODUCTION 0 PHONES jack Outputs audio to your headphones for private listening. Note Press SPEAKERS A/B so that the SP A/B indicators (see page 4) turn off before you connect your headphones to the PHONES jack. A SPEAKERS A/B Turns on or off the speaker set connected to the SPEAKERS A and/or SPEAKERS B terminals on the rear panel each time the corresponding button is pressed (see page 12). B BASS –/+ Increases or decreases the low frequency response.
CONTROLS AND FUNCTIONS Front panel display 1 PRESET indicator Indicator lights up blinks Status Recalling a preset radio station. Searching an FM/AM station manually to register as a preset. 5 SLEEP indicator Lights up when the sleep timer is turned on (see page 13). Scanning for FM stations automatically to register as presets. 6 ST indicator Lights up when this unit is in stereo mode and tuning in an FM station with a stereo broadcast.
CONTROLS AND FUNCTIONS Rear panel INTRODUCTION 1 ANTENNA terminals Used to connect FM and AM antennas (see page 11). 2 Power cable For connecting this unit to an AC wall outlet (see page 11). 3 CD jacks Used to connect a CD player (see page 9). 4 LINE 1-2 jacks Used to connect audio components (see page 9). 5 LINE 3 jacks PB (Playback) jacks Used to connect to audio output jacks of an audio component. REC (Recording) jacks Used to connect to audio input jacks of an audio component.
CONTROLS AND FUNCTIONS Remote control 4 Input selector buttons Select the input source you want to listen to. y • The input source names correspond to the names of the connection jacks on the rear panel. • To select TUNER as the input source using the remote control, press FM or AM. 5 TREBLE –/+ Increases or decreases the high frequency response. Control range: –10 dB to +10 dB 6 BASS –/+ Increases or decreases the low frequency response.
CONTROLS AND FUNCTIONS ■ FM/AM controls ■ Yamaha CD player controls D TUNING jj / ii Selects the tuning frequency (see page 14). E Yamaha CD player control buttons s Stops playback e Pauses playback p Starts playback DISC SKIP Skips to the next disc in a CD changer b Skips backward a Skips forward Ejects the disc w Rewinds playback f Fast-forwards playback The following buttons can be used when TUNER is selected as the input source. MEMORY Stores the current FM/AM station as a preset (see page 15).
CONTROLS AND FUNCTIONS Using the remote control ■ Installing batteries ■ Operation range Point the remote control at the remote control sensor on this unit and remain within the operating range shown below. Approximately 6 m (20 ft) AA, R6, UM-3 batteries Remote control ■ • • • • • • • • • • • • • Notes on remote control and batteries The area between the remote control and this unit must be clear of large obstacles. Be careful not to spill water or other liquids on the remote control.
PREPARATION CONNECTIONS Connecting speakers and source components Make sure to connect L (left) to L, R (right) to R, “+” to “+” and “–” to “–”. If the connections are faulty, no sound will be heard from the speakers, and if the polarity of the speaker connections is incorrect, the sound will be unnatural and lack bass. Refer to the owner’s manual for each of your components. Make sure to use RCA cables to connect audio components. CAUTION Speakers A Right Tape deck, etc.
CONNECTIONS ■ REC jacks • The REC jacks output audio signals of the currently selected input (except when LINE 3 is selected). • Volume level, tone control and balance settings do not affect the REC jacks. ■ Connecting speaker cables ■ Bi-wire connection Bi-wire connection separates the woofer from the combined midrange and tweeter section. A bi-wire compatible speaker has four binding post terminals. These two sets of terminals allow the speaker to be split into two independent sections.
CONNECTIONS Connecting the FM and AM antennas ■ Assembling the supplied AM loop antenna Indoor antennas for receiving FM and AM broadcasts are included with this unit. In general, these antennas should provide sufficient signal strength. Connect each antenna correctly to the designated terminals. Note ■ Connecting the wire of the AM loop antenna Outdoor FM antenna Outdoor AM antenna* PREPARATION If you experience poor reception quality, install an outdoor antenna.
BASIC OPERATION PLAYBACK Playing a source A (power) 1 Press A (power) to turn on this unit. 2 Press one of the Input selector buttons to select the desired input source. 3 Press SPEAKERS A and/or SPEAKERS B to select desired speaker(s). Input selector buttons Notes TREBLE –/+ SPEAKERS A/B • When one set of speakers is connected using bi-wire connections, or when using two sets of speakers simultaneously (A and B), make sure SP A and SP B are displayed on the front panel display.
PLAYBACK Using the sleep timer Use this feature to automatically set this unit to standby mode after a certain amount of time. The sleep timer is useful when you are going to sleep while this unit is playing or recording a source. SLEEP A (power) Press SLEEP repeatedly to set the amount of time before this unit is set to standby mode. Each time you press SLEEP, the front panel display changes cyclically as shown below.
FM/AM TUNING Notes • The radio frequencies differ depending on the country or region where this unit is being used. Front panel display illustrations shown in this section are based on Europe model. • Only for Asia and General models: Be sure to set the tuner frequency step according to the frequency spacing in your area before you tune into a radio station (see page 19). Using preset functions You can register up to 40 radio stations as presets.
FM/AM TUNING 1 Press FM to select TUNER as the input source. 1 Tune in to the desired FM/AM station. See page 14 for tuning instructions. 2 Press MENU to enter the Option menu. The Option menu for TUNER is displayed (see page 19). 2 Press MEMORY. “MANUAL PRESET” is displayed briefly on the front panel display, and then the preset number to which the station will be registered is displayed. 3 Press B / C to select “AUTO PRESET”, and then press ENTER.
FM/AM TUNING ■ Recalling a preset station You can recall preset stations that were registered by presetting automatically or manually. ■ Clearing a preset station Follow the steps below to clear a preset station. FM/AM FM/AM PRESET j / i PRESET j / i 1 Press FM/AM to select TUNER as the input source. 2 Press PRESET j / i to select a preset number. B/C/D ENTER y • Preset numbers to which no stations are registered are skipped.
FM/AM TUNING 5 Press ENTER again to confirm. “CLEARED” is displayed on the front panel display. Then, another preset station is shown on the front panel display. When there is no more preset station, “NO PRESET” is displayed, and then the display returns to the Option menu. To return the display to the original state, press MENU. ■ Clearing all preset stations 1 Press FM/AM to select TUNER as the input source. 2 Press MENU to enter the Option menu.
FM/AM TUNING Receiving Radio Data System information (Only for Europe model) Radio Data System is a data transmission system used by FM stations in many countries. FM INFO 1 2 3 Press FM to select TUNER as the input source. Tune in to the desired Radio Data System broadcasting station. Press INFO repeatedly to select the desired Radio Data System display mode. Choice Description Frequency This unit displays the frequency of the current station. Program Service Default setting.
ADVANCED OPERATION SETTING THE OPTION MENU FOR EACH INPUT SOURCE The Option menu allows you to configure various settings for each input source and recall those settings automatically when an input source is selected. Input selector buttons 1 Press one of the Input selector buttons to select the desired input source. 2 Press MENU. 3 Press B / C to select the desired menu item, and then press ENTER. 4 Press B / C to change the settings.
ADDITIONAL INFORMATION TROUBLESHOOTING Refer to the chart below if this unit does not function properly. If the problem you are experiencing is not listed below or if the instructions below do not help, set this unit to standby mode, disconnect the power cable, and then contact the nearest authorized Yamaha dealer or service center. ■ General Problem Cause Remedy See page The power cable is not connected or the plug is not completely inserted. Connect the power cable firmly.
TROUBLESHOOTING Problem Cause The sound is degraded when listening with headphones connected to a CD player connected to this unit. This unit has been set to standby mode. The remote control does not work nor function properly. Wrong distance or angle. Remedy See page Turn on the power of this unit. 12 The remote control will function within a maximum range of 6 m (20 ft) and no more than 30 degrees offaxis from the front panel.
TROUBLESHOOTING ■ Tuner Problem FM FM/ AM Remedy See page FM stereo reception is noisy. The particular characteristics of the FM stereo broadcasts being received may cause this problem when the transmitter is too far away or the antenna input is poor. Check the antenna connections. Try using a high-quality directional FM antenna. 11 Switch to monaural mode. 14 There is distortion, and clear reception cannot be obtained even with a good FM antenna. There is multipath interference.
SPECIFICATIONS AUDIO SECTION AM SECTION • Minimum RMS output power (8 Ω, 40 Hz to 20 kHz, 0.2% THD) [North America, General, Australia and Europe models] ........................................................................... 100 W + 100 W [Asia model] ......................................................... 85 W + 85 W • Input sensitivity/Input impedance (1 kHz, 100 W/8 Ω) CD, etc. ................................................................. 500 mV/47 kΩ • Output level/Output impedance CD, etc.
© 2013 Yamaha Corporation Printed in Malaysia ZH10630