
User Manual
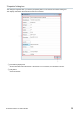
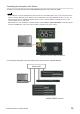
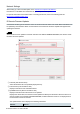
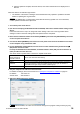
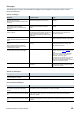
Table Of Contents

R Remote Version 5.0 User’s Guide 38
6. After the update is complete, reboot the device, and confirm that the device is displayed on R
Remote.
When the device’s red indicators light or flash
The firmware of the device is damaged. Use R Remote Recovery Updater to update the firmware.
Details on updating are as given below.
The RMio64-D is not supported by the R Remote Recovery Updater. For more information,
contact qualified Yamaha service personnel.
1. Turn off the power to the device.
2. (For devices excepting the Rio3224-D2 and Rio1608-D2) Take note of the DIP switch settings of the
device.
Follow the instructions in step 5 to change DIP switch settings. Take note of the original DIP switch
settings in order to restore the settings after the update has been completed.
3. Disconnect the Ethernet cable from the Dante [PRIMARY] connector and [SECONDARY] connector
on the rear panel of the device.
4. Connect the Dante [PRIMARY] connector on the rear panel of the device to the Ethernet connector
on the computer using an Ethernet cable.
5. For the Rio3224-D2 and Rio1608-D2, turn the device on while simultaneously hold down the
(INC) button and the encoder.
In except for Rio3224-D2 and Rio1608-D2, set the DIP switch 8 down (ON), the other switches up
(OFF), and then turn the device on.
The device starts in Update mode. The device in Update mode shows:
Rio3224-D, Rio1608-D,
Ri8-D, Rio3224-D2,
Rio1608-D, Ri8-D2
All the +48V indicators starts flashing.
Ro8-D
The right red [SYSTEM] indicator and the right orange [SYNC] indicator start flashing.
RSio64-D
All the red indicators of SLOT and WORD CLOCK, and the right red indicator of
SYSTEM and the right orange indicator of SYNC light up.
Tio1608-D
The STATUS INPUT/OUTPUT indicators start flashing.
6. Set your computer’s IP address and subnet mask.
For details on settings, refer to the instructions in “Specify the computer's IP address on page 10
.”
IP address: 192.168.0.101
Subnet mask: 255.255.255.0
7. Start the R Remote Recovery Updater.
Within Windows, the “User Account Control” dialog box may appear. Click [Continue] or [Yes].