
User Manual


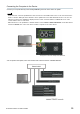


Table Of Contents

R Remote Version 5.8 User’s Guide 37
Detecting the device
If you select the firmware file, all detected devices on the network that correspond to the file are displayed on
the Device information area. Also, until the update is actually started, new detected devices corresponding to
the file are added to the list as needed. Conversely, when a device is missing or disconnected due to the cable
having been unplugged or some other reason, a “disconnected” indication is shown on the Firmware Version
column of the device.
In case of failure in updating the firmware
Even if the update has failed, you can update the firmware again after R Remote detects the device. However,
when a device is turned off while the update is in progress, the device cannot be started up, and it will not be
shown on the Device information area of the R Remote, making it necessary to take the following actions for
each problem.
When the device name is shown in red on the network grid view of the Dante Controller
Dante firmware has entered failsafe mode. Restore the Dante firmware and import and update the
latest Dante firmware using Dante Updater that comes with the Dante Controller.
You can get the Dante firmware from the firmware of R series or Tio1608-D.
Open the R Remote and perform steps 1 through 3 of the “Update operation
” (first t
ime only).
The “RRMT_****” folder is generated below your User folder of the computer.
Do not close the R Remote Firmware Update window until updating by Dante firmware
import is complete.
For detailed procedures, please refer to "Fail-Safe Mode" and "Updating the firmware" in the Dante Firmware
Update Guide.
When the device’s red indicators light or flash
The firmware of the device is damaged. Use R Remote Recovery Updater to update the firmware.
Details on updating are as given below.
The RMio64-D is not supported by the R Remote Recovery Updater. For more information,
contact qualified Yamaha service personnel.
1. Turn off the power to the device.
2. (For devices excepting the Rio3224-D2 and Rio1608-D2) Take note of the DIP switch settings of the
device.
Follow the instructions in step 5 to change DIP switch settings. Take note of the original DIP switch
settings in order to restore the settings after the update has been completed.
3. Disconnect the Ethernet cable from the Dante [PRIMARY] connector and [SECONDARY] connector
on the rear panel of the device.
4. Connect the Dante [PRIMARY] connector on the rear panel of the device to the Ethernet connector
on the computer using an Ethernet cable.
5. For the Rio3224-D2 and Rio1608-D2, turn the device on while simultaneously hold down the
(INC) button and the encoder.
In except for Rio3224-D2 and Rio1608-D2, set the DIP switch 8 down (ON), the other switches up
(OFF), and then turn the device on.
The device starts in Update mode. The device in Update mode shows:
Rio3224-D, Rio1608-D,
Ri8-D, Rio3224-D2,
All the +48V indicators starts flashing.