ABLV INTEGRATED AUDIO SYSTEM ISX-B820 OWNER’S MANUAL MANUAL DE INSTRUCCIONES
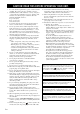
CAUTION: READ THIS BEFORE OPERATING YOUR UNIT. 1 2 3 4 5 6 7 8 9 10 11 12 13 14 15 16 17 i En To assure the finest performance, please read this manual carefully. Keep it in a safe place for future reference. Install this unit in a well ventilated, cool, dry, clean place – away from direct sunlight, heat sources, vibration, dust, moisture and cold. For proper ventilation, allow the following minimum clearances. Top: 15 cm (6 in) Rear: 2.
CONTENTS USING THE ALARM FUNCTION ............................................14 USING THE SLEEP TIMER .....................................................17 TONE CONTROL.....................................................................17 ADJUST BRIGHTNESS OF FRONT PANEL DISPLAY .........17 TROUBLESHOOTING .............................................................18 NOTES ON DISCS AND USB DEVICES.................................21 SPECIFICATIONS .......................................................
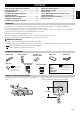
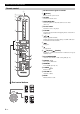
NAMES OF PARTS AND THEIR FUNCTIONS Top panel AUTO 2 SET 1 a 2 3 4 SOURCE + BEEP BEEP 1 SOURCE CLOCK ALARM TYPE USB VOLUME 2 1 DIMMER LABEL SIDE SOURCE ALARM 5 6 SNOOZE SLEEP 7 PRESET 8 9 j k l g SNOOZE/SLEEP (Power) Set the sleep timer or switch the alarm to snooze mode (P. 16, 17). Press to turn the system on/off. Time is displayed on the front panel even when the system is off.
NAMES OF PARTS AND THEIR FUNCTIONS Front panel display 1 Play/shuffle/repeat indicator 1 English Displays the playback mode (P. 6, 9). b Remote control signal receiver c Clock indicator 2 3 9 4 8 e Bluetooth indicator 7 f Sleep indicator Shows the clock hour hand (P. 5). d Source indicator Shows selected source. Turns on if this unit is connecting via Bluetooth (P. 10, 11). Turns on if the sleep timer has been set (P. 17). g Alarm indicator Turns on if the alarm has been set (P. 14).
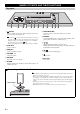
NAMES OF PARTS AND THEIR FUNCTIONS Remote control a Remote control signal transmitter 1 2 b 3 c ALARM (Power) Press to turn the system on/off. Switches the alarm on/off. 4 d SNOOZE/SLEEP Bluetooth Set the sleep timer or switch the alarm to snooze mode (P. 16, 17). e Source button Switch the source to be played. 5 f FOLDER Switch the playback folder when playing music on data CDs or USB devices. g / Skip the playback track/file.
ADJUSTING THE CLOCK Setting the time AUTO 2 SET 2 Rear panel SOURCE + BEEP BEEP 1 1 SOURCE DIMMER CLOCK ALARM TYPE SET USB VOLUME LABEL SIDE SOURCE ALARM SNOOZE SLEEP PRESET 2 2 Set the time with / . Set time (flashing) 3 Move the CLOCK switch on the rear panel to CLOCK1 or CLOCK2. y • Connecting an iPod to the iPod dock in step 2 will copy the time on the iPod to the unit.
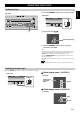
LISTENING TO iPod Playing the iPod For details on compatible iPod models, refer to “SPECIFICATIONS” (P. 22). 1 Connect an iPod to the iPod dock. Top panel AUTO 2 SET 2 2 Press SOURCE and set iPod as the playback SOURCE + BEEP BEEP 1 1 SOURCE DIMMER CLOCK ALARM TYPE source. 3 Play the iPod by pressing USB VOLUME LABEL SIDE SOURCE ALARM SNOOZE SLEEP / . Playback can be controlled with either the remote control, iPod or the top panel on this unit.
LISTENING TO CD AND USB DEVICES The unit will operate as follows when playing back tracks/files on CD/USB devices. – For audio CD : from the first track of the CD. – For data CD/USB device: from the first track of the folder that contains the track that was played last. • This system turns off automatically if no operation has been performed for 60 minutes after CD/USB device playback is stopped. y For details on playable discs and files, refer to “NOTES ON DISCS AND USB DEVICES” (P. 21).
LISTENING TO CD AND USB DEVICES Listening to a data CD 1 Press SOURCE to set CD as the playback source. Top panel AUTO 2 SET 2 2 Insert the data CD into the Disc slot with the SOURCE + BEEP BEEP 1 1 SOURCE DIMMER CLOCK ALARM TYPE label side facing toward the front of the unit. Playback starts automatically. The folder/file number is shown for a while when starting playback or skipping tracks.
LISTENING TO CD AND USB DEVICES Listening to a USB device 1 Press SOURCE and set USB as the playback Top panel 2 SET 2 English source. AUTO SOURCE + BEEP BEEP 1 1 SOURCE DIMMER CLOCK ALARM TYPE 2 Connect a USB device to the USB port. Playback starts automatically. The folder/file number is shown for a while when starting playback or skipping tracks.
LISTENING TO MUSIC FROM YOUR Bluetooth COMPONENT This unit provides Bluetooth functionality. You can enjoy wireless music playback from your Bluetooth component (mobile phone, digital audio player, etc.). Please also refer to the owner’s manual of your Bluetooth component. Pairing this unit with your Bluetooth component Pairing is an operation that registers the communicating component (subsequently called “the other component”) with this unit.
LISTENING TO MUSIC FROM YOUR Bluetooth COMPONENT Listening to a Bluetooth component 1 Press the SOURCE button to switch the playback Top panel 2 SET 2 SOURCE + BEEP BEEP 1 1 SOURCE DIMMER CLOCK ALARM TYPE 2 Connect this unit and your other component via Bluetooth. USB VOLUME 3 Play back music from your Bluetooth component. LABEL SIDE SOURCE ALARM SNOOZE SLEEP PRESET Note Take care that the volume setting of this unit is not too high.
LISTENING TO FM STATIONS Selecting the FM station 1 Press SOURCE and set FM as the playback source. Top panel AUTO 2 SET 2 SOURCE + BEEP BEEP 1 1 SOURCE DIMMER CLOCK ALARM TYPE Reception frequency FM USB VOLUME LABEL SIDE SOURCE ALARM SNOOZE SLEEP PRESET 2 Press / to tune the FM station. Tuning type 1 2 Top panel Note If you tune to an FM station manually, the sound will be in monaural. Remote control Operation Automatic Press and hold down tuning or .
LISTENING TO EXTERNAL SOURCES Selecting a preset FM station 1 Press SOURCE and set FM as the playback source. Top panel 2 SET 2 2 Press PRESET repeatedly to select the preset FM SOURCE + BEEP BEEP 1 1 SOURCE DIMMER CLOCK ALARM TYPE station. Using the remote control USB VOLUME LABEL SIDE SOURCE 1 ALARM SNOOZE SLEEP Press PRESET / . PRESET 2 LISTENING TO EXTERNAL SOURCES Turn the system off before connecting audio cables. Remove the terminal cover before connecting external devices.
USING THE ALARM FUNCTION The unit includes an alarm function (IntelliAlarm) that plays back music sources or set of beeps at the set time in a variety of different methods. The alarm function has following features. 3 types of alarms Select from 3 alarm types, combining music and beep sounds. The selected audio source and beep sound are played at the set time. This mode is recommended for the best possible start to the day.
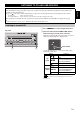
USING THE ALARM FUNCTION Set the alarm time and alarm type 5 (when alarm types other than BEEP are selected) Top panel 2 SET 2 SOURCE + BEEP BEEP 1 1 SOURCE DIMMER CLOCK ALARM TYPE Specify the track, folder or FM station to be played. If iPod is set as the source: No settings required. USB If CD/USB/FM is selected as the source: Press PRESET to select the track (audio CD), folder (data CD/USB devise) or FM station to be played.
USING THE ALARM FUNCTION Turning the alarm on/off 1 Press ALARM. Top panel AUTO 2 SET 2 1 1 DIMMER CLOCK BEEP SOUR ALARM When the alarm is on, the alarm indicator ( ) is shown, and the alarm time is shown for a while. If you press ALARM again, the alarm indicator ( ) and the alarm will turn off. y USB VOLUME The set alarm time will be saved even if the alarm is turned off. If the alarm is turned on again by pressing ALARM, the alarm will sound with the previously alarm settings.
USING THE SLEEP TIMER You can set the time to turn off the system automatically. 1 Press SNOOZE/SLEEP a number of times to set Top panel AUTO 2 SET 2 1 CLOCK USB SOURC ALARM T LABEL SIDE the time until the system turns off. The sleep timer can be set to 30, 60, 90 and 120 minutes. When the time is set, the sleep indicator ( ) is shown on the front panel display. y If you press SNOOZE/SLEEP while the sleep timer is activated, the sleep timer setting will be canceled.
TROUBLESHOOTING If there is a problem with the unit, check the following list first. If you cannot resolve the problem with the suggested solutions or if the problem is not listed below, turn off and unplug the system, and consult the nearest authorized Yamaha dealer or service center. General Problem Cause Solution Can’t turn on the unit. The power cable is not connect firmly. The speakers make no sound. The volume may be set to the minimum level. Adjust the volume level.
TROUBLESHOOTING CD playback Problem Cause Solution Press Some button operations do not work. The disc loaded into the unit may not be compatible. Use a disc supported by the unit (☞ P. 21). Playback does not start immediately after The disc may be dirty. pressing / . The disc loaded into the unit may not be to cancel the power save mode (☞ P. 2). Wipe the disc clean. Use a disc supported by the unit (☞ P. 21). compatible.
TROUBLESHOOTING Bluetooth Problem Cannot make this unit paired with the other component. Cause Solution The other component does not support A2DP. Perform pairing operations with a component which supports A2DP. A Bluetooth adaptor, etc. that you want to pair with this unit has a password other than “0000”. Use a Bluetooth adaptor, etc. whose password is “0000”. This unit and the other component are too far apart. Move the other component closer to this unit.
NOTES ON DISCS AND USB DEVICES CD information USB device information This unit supports USB mass storage class devices (e.g., flash memories or portable audio players) using FAT16 or FAT32 format. Notes • Some devices may not work properly even if they meet the requirements. • Do not connect devices other than USB mass storage class devices (such as USB chargers or USB hubs), PCs, card readers, an external HDD, etc.
SPECIFICATIONS PLAYER SECTION TUNER iPod (Digital connection) • Tuning range FM ..........................................................................87.50 to 108.00 MHz [As of October, 2012] • Compatible iPod models .... iPod touch (1st, 2nd, 3rd and 4th generations) iPod classic iPod nano (2nd, 3rd, 4th, 5th and 6th generations) • Compatible iPhone models ................................
Information for Users on Collection and Disposal of Old Equipment and Used Batteries [Information on Disposal in other Countries outside the European Union] These symbols are only valid in the European Union. If you wish to discard these items, please contact your local authorities or dealer and ask for the correct method of disposal. Note for the battery symbol (bottom two symbol examples): This symbol might be used in combination with a chemical symbol.
PRECAUCIÓN: LEA LAS INDICACIONES SIGUIENTES ANTES DE UTILIZAR ESTE APARATO. 1 2 3 4 5 6 7 8 9 10 11 12 13 14 15 i Es Para asegurar el mejor rendimiento de este aparato, lea atentamente este manual. Y luego guárdelo en un lugar seguro para poder consultarlo en el futuro en caso de ser necesario. Instale esta unidad en un lugar bien ventilado, fresco, seco y limpio, alejado de la luz directa del sol, fuentes de calor, vibración, polvo, humedad y frío.
CONTENIDO USAR LA FUNCIÓN DE ALARMA..........................................14 USO DEL TEMPORIZADOR PARA DORMIR.........................17 CONTROL DEL TONO ............................................................17 AJUSTAR EL BRILLO DE LA PANTALLA DEL PANEL FRONTAL ................................................................................17 SOLUCIÓN DE PROBLEMAS.................................................18 NOTAS SOBRE LOS DISCOS Y LOS DISPOSITIVOS USB ....21 ESPECIFICACIONES ...............
NOMBRES DE LAS PARTES Y SUS FUNCIONES Panel superior AUTO 2 SET 1 a 2 3 4 SOURCE + BEEP BEEP 1 SOURCE CLOCK ALARM TYPE USB VOLUME 2 1 DIMMER LABEL SIDE SOURCE ALARM 5 6 SNOOZE SLEEP 7 PRESET 8 9 j k l f ALARM (Alimentación) Pulse este botón para encender o apagar el sistema. Cuando el sistema está apagado, aparece indicada la hora en el panel frontal. Activa o desactiva la alarma y permite ajustar varias configuraciones de alarmas (P. 15, 16).
NOMBRES DE LAS PARTES Y SUS FUNCIONES Pantalla del panel frontal 1 Indicador de reproducción/reproducción 1 Français aleatoria/repetición Muestra el modo de reproducción (P. 6, 9). b Receptor de señales del mando a distancia 2 3 9 4 8 c Indicador de reloj Muestra la manecilla de hora del reloj (P. 5). 7 Español d Indicador de fuente Muestra la fuente seleccionada. e Indicador Bluetooth Se activa si esta unidad realiza la conexión por Bluetooth (P. 10, 11).
NOMBRES DE LAS PARTES Y SUS FUNCIONES Mando a distancia a Transmisor de señales del mando a distancia 1 2 b 3 c ALARM (Alimentación) Pulse este botón para encender o apagar el sistema. Activa o desactiva la alarma. 4 d SNOOZE/SLEEP Bluetooth Configure el temporizador para dormir o cambie la alarma al modo de repetición (P. 16, 17). e Botón de fuente Cambie la fuente que va a reproducir.
AJUSTE DEL RELOJ Configuración de la hora a SET. AUTO 2 SET 2 SOURCE + BEEP BEEP 1 1 SOURCE DIMMER CLOCK ALARM TYPE Panel posterior Français 1 Mueva el conmutador CLOCK del panel posterior Panel superior SET VOLUME Español USB LABEL SIDE SOURCE ALARM SNOOZE SLEEP PRESET 2 2 Programe la hora con / . Programar la hora (parpadeando) 3 Mueva el conmutador CLOCK del panel posterior a CLOCK 1 o CLOCK2.
ESCUCHAR EL iPod Reproducir el iPod Para obtener información sobre los modelos de iPod compatibles, consulte “ESPECIFICACIONES” (P. 22). 1 Conecte un iPod a la base para iPod. Panel superior AUTO 2 SET 2 2 Pulse SOURCE y configure iPod como la fuente de SOURCE + BEEP BEEP 1 1 SOURCE DIMMER CLOCK ALARM TYPE reproducción. 3 Reproduzca el iPod pulsando USB VOLUME LABEL SIDE SOURCE ALARM SNOOZE SLEEP / .
ESCUCHAR UN CD Y UN DISPOSITIVO USB La unidad funcionará del siguiente modo al reproducir pistas o archivos de CD/dispositivos de USB. – CD de audio: – Para un CD de datos/dispositivo USB: desde la primera pista del CD. desde la primera pista de la carpeta que contenga la pista que se reprodujo la última vez.
ESCUCHAR UN CD Y UN DISPOSITIVO USB Cómo escuchar un CD de datos 1 Pulse SOURCE y configure CD como la fuente de Panel superior reproducción. AUTO 2 SET 2 SOURCE + BEEP BEEP 1 1 SOURCE DIMMER CLOCK ALARM TYPE 2 Introduzca el CD de datos en la ranura del disco con la cara de la etiqueta mirando hacia la parte frontal de la unidad. USB VOLUME La reproducción empezará automáticamente. El número de carpeta o archivo aparece durante unos segundos al empezar a reproducir o saltar pistas.
ESCUCHAR UN CD Y UN DISPOSITIVO USB Escuchar un dispositivo USB 1 Pulse SOURCE y configure USB como la fuente de reproducción. AUTO USB 2 SET 2 SOURCE + BEEP BEEP 1 1 SOURCE DIMMER CLOCK ALARM TYPE 2 Conecte un dispositivo USB al puerto USB. La reproducción empezará automáticamente. El número de carpeta o archivo aparece durante unos segundos al empezar a reproducir o saltar pistas.
ESCUCHAR MÚSICA DESDE EL COMPONENTE Bluetooth Esta unidad proporciona funcionalidad de Bluetooth. Puede disfrutar de reproducción de música inalámbrica desde su componente Bluetooth (teléfono móvil, reproductor de audio digital, etc.). Consulte también el manual de instrucciones de su componente Bluetooth. Vinculación de esta unidad con su componente Bluetooth La vinculación es una operación que registra el componente de comunicación (en adelante llamado “el otro componente”) con esta unidad.
ESCUCHAR MÚSICA DESDE EL COMPONENTE Bluetooth Escuchar un componente Bluetooth 1 Pulse el botón SOURCE para cambiar la fuente de reproducción a Bluetooth. AUTO 2 SET 2 SOURCE + BEEP BEEP 1 1 SOURCE DIMMER CLOCK ALARM TYPE 2 Conecte esta unidad y el otro componente por Bluetooth. USB 3 Reproduzca música desde su componente Bluetooth. LABEL SIDE SOURCE ALARM SNOOZE SLEEP PRESET Nota Asegúrese de que el ajuste de volumen de esta unidad no sea demasiado elevado.
PARA ESCUCHAR EMISORAS DE RADIO Selección de la emisora FM 1 Pulse SOURCE y configure FM como la fuente de Panel superior reproducción. AUTO 2 SET 2 SOURCE + BEEP BEEP 1 1 SOURCE DIMMER CLOCK ALARM TYPE USB Frecuencia de recepción LABEL SIDE FM VOLUME SOURCE ALARM SNOOZE SLEEP PRESET 2 Pulse 1 / para sintonizar la emisora FM.
ESCUCHAR UNA FUENTE EXTERNA Selección de una emisora de FM presintonizada 1 Pulse SOURCE y configure FM como la fuente de Panel superior 2 SET 2 reproducción. SOURCE + BEEP BEEP 1 1 SOURCE DIMMER CLOCK ALARM TYPE 2 Pulse PRESET varias veces para seleccionar la emisora FM presintonizada. USB Uso del mando a distancia LABEL SIDE SOURCE 1 ALARM SNOOZE SLEEP / Español Pulse PRESET VOLUME . PRESET 2 ESCUCHAR UNA FUENTE EXTERNA Apague el sistema antes de conectar cables de audio.
USAR LA FUNCIÓN DE ALARMA La unidad incluye una función de alarma (IntelliAlarm) que reproduce fuentes de música o conjunto de sonidos a la hora establecida con distintos métodos. La función de alarma incluye las siguientes prestaciones. 3 tipos de alarmas Seleccione entre 3 tipos de alarma, que combinan la música con el sonido de pitido. La fuente de audio seleccionada y el sonido de pitido se reproducen a la hora programada. Este modo se recomienda para empezar el día lo mejor posible.
USAR LA FUNCIÓN DE ALARMA Ajuste de la hora y del tipo de alarma 4 (cuando se seleccionan tipos de alarmas distintos de AUTO 2 SET 2 SOURCE + BEEP BEEP 1 1 SOURCE DIMMER CLOCK ALARM TYPE BEEP) Pulse SOURCE para seleccionar la fuente de música. Puede seleccionar cualquier fuente distinta de AUX y Bluetooth. USB ALARM SNOOZE SLEEP 4 17 PRESET 5 2 Nota La programación de la alarma se borrará si se apaga el sistema sin terminarla correctamente. 1 Mantenga pulsado ALARM.
USAR LA FUNCIÓN DE ALARMA Activación/desactivación de la alarma 1 Pulse ALARM. Panel superior AUTO 2 SET 1 CLOCK USB VOLUME 2 1 DIMMER BEEP SOUR ALARM y LABEL SIDE SOURCE ALARM Cuando la alarma está activada, el indicador de alarma ( ) se ilumina y la hora de alarma se muestra por un instante. Si pulsa ALARM de nuevo, se desactivarán el indicador de alarma ( ) y la alarma. La hora de alarma programada se guardará aunque se apague la alarma.
USO DEL TEMPORIZADOR PARA DORMIR Puede establecer la hora a la que desea apagar el sistema automáticamente. 1 Pulse SNOOZE/SLEEP varias veces para Panel superior 2 SET 2 1 1 DIMMER CLOCK USB BEEP SOURC ALARM T LABEL SIDE programar el tiempo de desactivación del sistema. Usted puede programar el temporizador para dormir en 30, 60, 90 ó 120 minutos. Al programar el tiempo, se muestra el indicador de temporización de apagado ( ) en la pantalla del panel frontal.
SOLUCIÓN DE PROBLEMAS Si tiene algún problema con la unidad, compruebe primero la siguiente lista. Si no puede solucionar su problema con las siguientes soluciones o si el problema no está en la lista, apague y desenchufe la unidad y a continuación, consulte al concesionario o centro de servicio Yamaha autorizado más cercano. General Problema Causa Solución La unidad no se puede encender. El cable de alimentación no está bien conectado. Los altavoces no suenan.
SOLUCIÓN DE PROBLEMAS Reproducción de CD Problema Causa Solución Pulse para cancelar el modo de ahorro de energía (☞ P. 2). Algunas operaciones que se realizan con los botones no funcionan. Es posible que el disco cargado en la unidad no sea compatible. Utilice un disco compatible con la unidad (☞ P. 21). La reproducción no empieza inmediatamente tras pulsar Es posible que el disco esté sucio. Limpie el disco. Es posible que el disco cargado en la unidad no sea compatible.
SOLUCIÓN DE PROBLEMAS Bluetooth Problema Esta unidad no puede vincularse con el otro componente. Causa Solución El otro componente no es compatible con A2DP. Realice las operaciones de vinculación con un componente compatible con A2DP. El adaptador de Bluetooth, etc. que desea vincular con esta unidad tiene una contraseña que no es “0000”. Utilice un adaptador de Bluetooth, etc. cuya contraseña sea “0000”. Esta unidad y el otro componente están demasiado alejados.
NOTAS SOBRE LOS DISCOS Y LOS DISPOSITIVOS USB Información del disco compacto y Esta unidad puede reproducir discos que lleven cualquiera de las marcas de logotipos anteriores. La marca del logotipo del disco se imprime en el disco y en la carátula. Notas • No cargue ningún otro tipo de disco en esta unidad. Podría dañarla. • CD-R/RW no puede reproducirse hasta que no finalice. • Algunos discos no se pueden reproducir debido a las características del disco o a las condiciones de grabación.
ESPECIFICACIONES SECCIÓN DEL REPRODUCTOR GENERALIDADES iPod (conexión digital) • Alimentación Modelo para Reino Unido ............................................. CA 230 V, 50 Hz Modelo para Australia ................................................... CA 240 V, 50 Hz Modelo para Asia ......................................... De 220 a 240 CA, 50/60 Hz Modelo para Taiwán .......................................... De 110 a 120 CA, 60 Hz • Consumo .......................................................
Información para usuarios sobre recolección y disposición de equipamiento viejo y baterías usadas Nota sobre el símbolo de la batería (ejemplos de dos símbolos de la parte inferior): Este símbolo podría ser utilizado en combinación con un símbolo químico. En este caso el mismo obedece a un requerimiento dispuesto por la Directiva para el elemento químico involucrado. El componente láser de este producto es capaz de emitir radiación que sobrepasa el límite establecido para la clase 1.
VAROITUS Muiden kuin tässä esitettyjen toimintojen säädön tai asetusten muutto saattaa altistaa vaaralliselle säteilylle tai muille vaarallisille toiminnoille. ◆ For U.K. customers If the socket outlets in the home are not suitable for the plug supplied with this appliance, it should be cut off and an appropriate 3 pin plug fitted. For details, refer to the instructions described below. DK Advarsel: Usynlig laserstråling ved åbning når sikkerhedsafbrydere er ude af funktion. Undgå utsættelse for stråling.
© 2012 Yamaha Corporation Printed in China ZF20180