AB INTEGRATED AUDIO SYSTEM OWNER’S MANUAL
CAUTION: READ THIS BEFORE OPERATING YOUR UNIT. 1 2 3 4 5 6 7 8 9 10 11 12 13 14 15 16 17 i En To assure the finest performance, please read this manual carefully. Keep it in a safe place for future reference. Install this unit in a well ventilated, cool, dry, clean place – away from direct sunlight, heat sources, vibration, dust, moisture and cold. For proper ventilation, allow the following minimum clearances. Top: 15 cm (6 in) Rear: 2.
CONTENTS NAMES OF PARTS AND THEIR FUNCTIONS.........................2 ADJUSTING THE CLOCK.........................................................5 INSTALLING “DTA CONTROLLER” ........................................6 LISTENING TO CD AND USB DEVICES ..................................7 LISTENING TO MUSIC FROM YOUR Bluetooth DEVICE.....10 LISTENING TO DAB STATIONS (ISX-803D) .........................13 LISTENING TO FM STATIONS ...............................................15 LISTENING TO EXTERNAL SOURCES ...
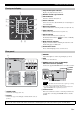
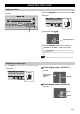
NAMES OF PARTS AND THEIR FUNCTIONS Top panel AUTO 2 SET 1 a 2 3 4 SOURCE + BEEP BEEP 1 SOURCE CLOCK ALARM TYPE USB VOLUME 2 1 DIMMER LABEL SIDE SOURCE ALARM 5 6 SNOOZE SLEEP 7 PRESET 8 9 j kl m n g SNOOZE/SLEEP (Power) Press to turn on the system or enter standby mode. Time is displayed on the front panel even when the system is in standby mode. Set the sleep timer or switch the alarm to snooze mode (☞ P. 19, 21).
NAMES OF PARTS AND THEIR FUNCTIONS Front panel display 1 Play/shuffle/repeat indicator 1 Displays the playback mode (☞ P. 7, 9). b Remote control signal receiver c Clock indicator 2 3 9 4 8 Shows the clock hour hand (☞ P. 5). d Source indicator 7 Shows selected source. (The DAB indicator is only displayed on the ISX-803D.) e Bluetooth indicator Turns on if this unit is connecting via Bluetooth (☞ P. 10, 12). f Sleep indicator Turns on if the sleep timer has been set (☞ P. 21).
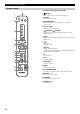
NAMES OF PARTS AND THEIR FUNCTIONS Remote control a Remote control signal transmitter 1 b 2 (Power) Press to turn on the system or enter standby mode. 3 c ALARM Switches the alarm on/off. 4 d SNOOZE/SLEEP Set the sleep timer or switch the alarm to snooze mode (☞ P. 19, 21). Bluetooth e Source button Switch the source to be played. 5 f (Repeat)/ (Shuffle) Play music on an audio/data CD or USB device in repeat/ shuffle (☞ P. 7, 9).
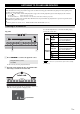
ADJUSTING THE CLOCK Setting the time 1 Move the CLOCK switch on the rear panel to SET. Top panel AUTO 2 SET 2 Rear panel SOURCE + BEEP BEEP 1 1 SOURCE DIMMER CLOCK ALARM TYPE SET USB VOLUME LABEL SIDE SOURCE ALARM SNOOZE SLEEP PRESET 2 2 Set the time with / . Set time (flashing) 3 Move the CLOCK switch on the rear panel to CLOCK1 or CLOCK2 to end the time setting. y • Pressing SNOOZE/SLEEP in step 2 will switch between the 12 and 24 hour clock display.
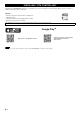
INSTALLING “DTA CONTROLLER” Installing DTA CONTROLLER application on a mobile device, such as a smartphone or tablet computer, allows you to use a variety of additional convenient features of this unit. Features • • • • Turning on the unit or setting the unit to standby mode Adjusting volume Setting of the alarm function (IntelliAlarm) (☞ P. 20) Playing back songs stored in an iPhone The mobile device needs to be connected with the unit via Bluetooth connection (☞ P. 10). Google PlayTM http://itunes.
LISTENING TO CD AND USB DEVICES The unit will operate as follows when playing back tracks/files on CD/USB devices. • If the CD/USB device being played back is stopped, the track that was being played back will start playing from the beginning of the track the next time playback begins. • If you press on the remote control while playback is stopped, the next time playback begins, the unit will play tracks as follows: – For audio CD: from the first track of the CD.
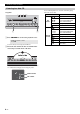
LISTENING TO CD AND USB DEVICES Listening to a data CD Use the following buttons to control the unit while playing back tracks on data CDs. Top panel AUTO 2 SET 2 Button SOURCE + BEEP BEEP 1 1 SOURCE DIMMER CLOCK ALARM TYPE Function Play/Pause / Skip USB / Top Panel LABEL SIDE PRESET VOLUME SOURCE ALARM SNOOZE SLEEP PRESET Search backward/forward (press and hold down) Change the playback folder Eject the CD Play/Pause 1 Skip 2 1 Press SOURCE to set CD as the playback source.
LISTENING TO CD AND USB DEVICES Listening to a USB device Use the following buttons to control the unit while playing back tracks on USB devices.
LISTENING TO MUSIC FROM YOUR Bluetooth DEVICE This unit provides Bluetooth functionality. You can enjoy wireless music playback from your Bluetooth device (smartphone, digital audio player, etc.). Please also refer to the owner’s manual of your Bluetooth device. Pairing this unit with your Bluetooth device Pairing is an operation that registers the communicating device (hereafter called “the connecting device”) with this unit.
LISTENING TO MUSIC FROM YOUR Bluetooth DEVICE Easy pairing For the smartphone with NFC (Near Field Communication) function, you can easily perform the pairing operation just by holding the smartphone over the NFC mark (you need to turn the system on and turn on the NFC function of the smartphone beforehand). 1 Press 2 3 Hold the smartphone over the NFC mark. to turn the system on. Perform the pairing operation at the smartphone (for details, please read the owner’s manual of the smartphone).
LISTENING TO MUSIC FROM YOUR Bluetooth DEVICE Connecting an already-paired device via Bluetooth Once pairing has been completed, connecting a Bluetooth will be easy the next time. Connecting from this unit 1 Press the SOURCE button to switch the playback Top panel AUTO 2 SET 2 SOURCE + BEEP BEEP 1 1 SOURCE DIMMER CLOCK ALARM TYPE source to Bluetooth. Using the remote control Press Bluetooth.
LISTENING TO DAB STATIONS (ISX-803D) DAB (Digital Audio Broadcasting) and DAB+ use digital signals for clearer sound and more stable reception compared to analog signals. DAB+ is based on the original DAB standard but uses a more efficient audio codec. DAB and DAB+ are broadcast in blocks of data called “ensembles” containing up to several radio stations that are simultaneously broadcast. DAB and DAB+ can also include an extensive amount of text information, enabling you to select a station by name.
LISTENING TO DAB STATIONS (ISX-803D) Switching DAB station information 1 Select DAB information by pressing DISPLAY Top panel SET 2 repeatedly. SOURCE + BEEP BEEP 1 SOURCE CLOCK ALARM TYPE Information is displayed in the order shown below. LABEL SIDE NOOZE SLEEP PRESET DISPLAY Text information ¨ Ensemble name ( is displayed before the ensemble name.) ¨ Status 1 (channel label and frequency) ¨ Status 2 (DAB or DAB+ and signal quality) ¨ Back to the top.
LISTENING TO FM STATIONS Selecting the FM station 1 Press SOURCE and set FM as the playback source. Top panel AUTO 2 SET 2 SOURCE + BEEP BEEP 1 1 SOURCE DIMMER CLOCK ALARM TYPE Reception frequency FM USB VOLUME LABEL SIDE SOURCE ALARM SNOOZE SLEEP PRESET Using the remote control Press RADIO. 1 2 2 Press / to tune the FM station. Tuning type Note If you tune to an FM station manually, the sound will be in monaural.
LISTENING TO EXTERNAL SOURCES Selecting a preset FM station 1 Press SOURCE and set FM as the playback source. Top panel AUTO 2 SET 2 2 Press PRESET repeatedly to select the preset FM SOURCE + BEEP BEEP 1 1 SOURCE DIMMER CLOCK ALARM TYPE station. Using the remote control USB VOLUME Press PRESET LABEL SIDE SOURCE 1 ALARM SNOOZE SLEEP / . PRESET 2 LISTENING TO EXTERNAL SOURCES Set the system to standby mode before connecting audio cables.
USING THE ALARM FUNCTION The unit includes an alarm function (IntelliAlarm) that plays back music sources or set of beeps (built-in alarm) at the set time in a variety of different methods. The alarm function has following features. 3 types of alarms Select from 3 alarm types, combining music and beep sounds. The selected audio source and beep sound are played at the set time. This mode is recommended for the best possible start to the day.
USING THE ALARM FUNCTION Set the alarm time and alarm type 4 (when alarm types other than BEEP are selected) Top panel AUTO SET 2 SOURCE + BEEP BEEP 1 1 SOURCE DIMMER CLOCK ALARM TYPE USB Press SOURCE to select music source. Sources other than AUX and Bluetooth can be selected. Using the remote control Press the USB, CD, or RADIO button to select the music source.
USING THE ALARM FUNCTION Turning the alarm on/off 1 Press ALARM. Top panel AUTO 2 SET 1 CLOCK USB VOLUME 2 1 DIMMER When the alarm is on, the alarm indicator ( ) is shown, and the alarm time is shown for a while. If you press ALARM again, the alarm indicator ( ) and the alarm will turn off. When alarm mode is Weekly Alarm (☞ P. 20), the Weekly Alarm indicator ( ) will also turn on/off. BEEP SO ALAR y LABEL SIDE SOURCE ALARM The alarm setting will be saved even if the alarm is turned off.
USING THE ALARM FUNCTION Setting Weekly Alarm With DTA CONTROLLER (☞ P. 6), you can use Weekly Alarm, which allows you to set alarm times respectively for each day of the week. First, make the Weekly Alarm settings on DTA CONTROLLER. Setting Weekly Alarm with DTA CONTROLLER 1 Tap (IntelliAlarm icon) in DTA CONTROLLER to open the IntelliAlarm setting screen. IntelliAlarm setting screen 2 Perform the operations below on the IntelliAlarm setting screen. a Select [Week] (Weekly Alarm).
USING THE SLEEP TIMER You can set the time until the system automatically enters standby mode. 1 Press SNOOZE/SLEEP a number of times to set Top panel AUTO 2 SET 2 1 1 SOURCE DIMMER CLOCK ALARM TYPE USB the time until the system enters standby mode. SOURCE + BEEP BEEP The sleep timer can be set to 30, 60, 90 and 120 minutes. When the time is set, the sleep indicator ( ) is shown on the front panel display.
TROUBLESHOOTING If there is a problem with the unit, check the following list first. If you cannot resolve the problem with the suggested solutions or if the problem is not listed below, set the system to standby mode, unplug it, and consult the nearest authorized Yamaha dealer or service center. General Problem Cannot turn on the unit. The speakers make no sound. Cause Solution The power cable is not connected firmly. Reconnect the power cable into the wall outlet and the unit firmly.
TROUBLESHOOTING USB device playback Problem MP3/WMA file on the USB device does not play. Cause The USB device is not recognized. Solution Set the system to standby mode and disconnect the USB device. Then, turn the system on and reconnect the USB device. Connect an AC adapter if supplied with the device. If the solutions above do not resolve the problem, the USB device is not playable on the unit. The USB indicator flashes twice, and repeated 3 times, after connecting a USB device.
TROUBLESHOOTING DAB reception (ISX-803D only) Problem Cannot tune into any DAB stations. Cause Solution The initial scan operations were not performed. Perform the initial scan operations (☞ P. 13). There is no DAB coverage in your area. Check with your dealer or WorldDMB Online at “http://www.worlddab.org” for a listing of the DAB coverage in your area. The DAB signals are too weak. Change the height, direction, or placement of the antenna.
NOTES ON DISCS AND USB DEVICES CD information USB device information This unit is designed for use with audio CD, CD-R*, and CD-RW* with the logos followings. This unit supports USB mass storage class devices (e.g., flash memories or portable audio players) using FAT16 or FAT32 format. Notes • Some devices may not work properly even if they meet the requirements. • Do not connect devices other than USB mass storage class devices (such as USB chargers or USB hubs), PCs, card readers, an external HDD, etc.
SPECIFICATIONS PLAYER CD • Media ...................................................................................CD, CD-R/RW • Audio format .........................................................Audio CD, MP3, WMA Laser • Type .................................................... Semiconductor laser GaAs/GaAlAs • Wave length ..................................................................................... 790 nm • Output power.......................................................................
SPECIFICATIONS Bluetooth • Bluetooth is a technology for wireless communication between devices within an area of about 10 meters (33 ft) employing the 2.4 GHz frequency band, a band which can be used without a license. • Bluetooth is a registered trademark of the Bluetooth SIG and is used by Yamaha in accordance with a license agreement. Handling Bluetooth communications • The 2.4 GHz band used by Bluetooth compatible devices is a radio band shared by many types of equipment.
The name plate is located on the rear panel of the unit.
© 2014 Yamaha Corporation Printed in China ZN80010