
User Manual


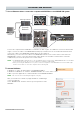
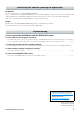
Table Of Contents

RIVAGE PM Editor Installation Guide 6
1
Use an Ethernet cable to connect the computer with PM Editor to the RIVAGE PM system.
Connect the computer where PM Editor is installed to the DSP engine. To establish a connection with the DSP
engine, connect the cable to the NETWORK terminal (PC) located next to the TO CONSOLE terminal. Never
connect the cable to the NETWORK terminal above the HY card slots.
Alternatively, you can connect the cable to the NETWORK terminal on the control surface. Note that in the
RIVAGE PM10 system, connection with the DSP engine will be cut off and the communication cannot be
established if you turn off the power to the control surface.
NOTE
• For RIVAGE PM Editor earlier than V2.0.0, only one PM Editor can be used per system. RIVAGE PM Editor V2.0.0 or later allows
use of up to two per system. Do not connect computers exceeding the usable number.
• When you are using two PM Editors for one system, connect the computers to each NETWORK connector of the DSP engine
and the console surface or connect the computers via the switching hub.
2 Activate PM Editor.
In Windows 7: “Start” “All Programs” “RIVAGE PM Editor”
In Windows 8.1/Windows 10: Click the “RIVAGE PM Editor” tile on the “Start” screen
In Mac: Open the “Applications,” and then double-click “RIVAGE PM Editor”
NOTE
If the “User Account Control” dialog box appears, click [Yes].
After you activate the software, a popup window for establishing a
connection appears.
Select “MIXER TYPE,” and then click the [Connect] button to start
PM Editor.
Connection and Activation
Computer with
PM Editor
DSP Engine DSP-R10
Control Surface
or
Console
Network