
User Manual
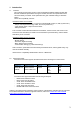
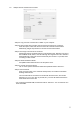
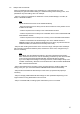


Table Of Contents
- 1. Introduction
- 2. Conversion procedure
- 3. Reference

5
2.3. <Step2> Execute Console File Converter
This screenshot is an example.
- Step 2a. Copy a source Console File to a folder on your computer.
- Step 2b. Start Console File Converter, then choose the source file for conversion:
Press the “Open” button and choose a source file in the file browse window.
Alternatively, drag & drop the file icon into the File Converter window.
- Step 2c. Set range of Scenes to be converted:
Change the range by up/down buttons or manual direct input. Range is from 001 to
300 in PM5D, CL/QL, M7CL, and LS9. Although the range is from 1.00 to 999.99 in
the RIVAGE PM, scenes are stored consecutively from number 1 up to 300, when
converting to other models.
- Step 2d. Select Destination Model:
Compatible models will be shown in the drop-down menu.
- Step 2e. Choose conversion options:
Tick or un-tick options as desired. Details are explained below in section 3.1.
- Step 2f. Convert the file.
Press “Convert” button. If the same file already exists, an overwrite confirmation
message will be shown.
The source file will be converted to a new file with the same name, but new file
extension (e.g. m7c, pm5, l9a, clf, pm10all, etc.). The new file will be saved in the
same folder as the source file.
- For converting to RIVAGE PM, the extension will be “.PM10ALL”. You can read it as is in
other than PM10.