
User Manual


6
RS10-HXR Owner’s Manual
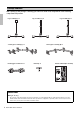
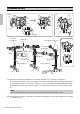
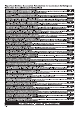
1. Attach the curved pipe assembly (L) e to the leg assemblies (L) q and (C) w and secure.
Loosen the fixing bolts t on the open clamps r attached to both ends of the curved pipe assembly (L)
e, then align the sleeve y and memory clamp u on the leg assemblies and attach. When attaching,
make sure that the nub on the memory clamp u is aligned with the indent on the open clamp r (Fig.
A).
2. Use the same procedure to attach the curved pipe assembly (R) o to the leg assemblies (C) w and (R)
i, and then secure.
Assembling the Rack
NOTE
The correct leg orientation is for the screw on the leg to be outward with respect to the curved pipe assembly.
4
1, 2
1, 3
a
2, 3
2, 3
3
5
1, 3
e!1
!8
!7
!6
w
i
r
o
u
r
u
r
u
q
r
u
!2
!3
!5
!4
!0
u
t
eo
r
y
u
r
u
r
t
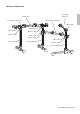
Leg assembly (L)
Curved pipe
assembly (R)
Bubble level
Drum trigger module arm
Leg assembly
(C)
Leg assembly (R)
Curved pipe
assembly (L)
[Fig. A]
[Fig. B]
Parallel