ELECTRONIC DRUM RACK RS500 RS700 Manual do Proprietário PT
For details of products, please contact your nearest Yamaha representative or the authorized distributor listed below. NORTH AMERICA CANADA Yamaha Canada Music Ltd. 135 Milner Avenue, Scarborough, Ontario, M1S 3R1, Canada Tel: 416-298-1311 U.S.A. Yamaha Corporation of America 6600 Orangethorpe Ave., Buena Park, Calif. 90620, U.S.A. Tel: 714-522-9011 CENTRAL & SOUTH AMERICA MEXICO Yamaha de México S.A. de C.V. Calz. Javier Rojo Gómez #1149, Col. Guadalupe del Moral C.P. 09300, México, D.F.
Português PRECAUÇÕES Antes de usar, leia este manual de montagem e use este produto de maneira segura e apropriada. * Mantenha este manual em lugar seguro para consultas futuras. ADVERTÊNCIAS Se este símbolo for ignorado e o equipamento for utilizado inadequadamente, poderão ocorrer ferimentos fatais ou graves danos. • Não permita que crianças pequenas montem ou instalem este produto sozinhas, pois elas podem se ferir. Este produto deve ser montado sempre sob a supervisão de um adulto.
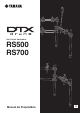
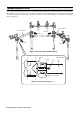
Configurando o RS500 1. Remova o rack da caixa e coloque-o de pé com a garra do módulo acionador de bateria e a perna esquerda posicionadas à direita, conforme mostrado na Figura 1. 2. Com o rack em pé, afrouxe os parafusos q localizados à esquerda e gire a perna esquerda para a sua direção até que esteja posicionada conforme a Vista superior da Figura 1. OBSERVAÇÃO • Os parafusos q podem ser encontrados na parte traseira da garra na coluna esquerda.
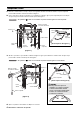
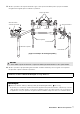
. Afrouxe o parafuso r e, conforme mostrado na Figura 3, levante o suporte de prato localizado à esquerda. Depois disso, aperte novamente o parafuso r. OBSERVAÇÃO • Enquanto aperta o parafuso, verifique se a bucha preta está posicionada dentro do orifício de montagem da garra. 6. Afrouxe os parafusos t e, conforme mostrado na Figura 3, gire para cima o suporte de prato localizado à direita. Depois disso, aperte novamente os parafusos t. 7.
Configurando o RS700 1. Remova o rack da caixa e coloque-o de pé com a garra do módulo acionador de bateria posicionado à direita, conforme mostrado na Figura 1. 2. Com o rack em pé, afrouxe os parafusos q localizados à direita e gire a perna direita no sentido horário até que esteja posicionada conforme a Vista superior da Figura 1. OBSERVAÇÃO • Os parafusos q podem ser encontrados na parte traseira da garra na coluna direita, que está localizada atrás da perna esquerda.
5. Afrouxe os parafusos dos suportes de tambor e gire os três suportes de tambor para as posições mostradas na Figura 3. Em seguida, aperte novamente os parafusos.
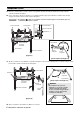
Ajustando o RS500 ou o RS700 Se o seu rack estiver instável, mesmo sobre uma superfície plana, verifique se as fendas nas garras q a r da Figura 1 estão alinhadas com as setas nos tubos horizontais, conforme mostrado na Figura 2. Caso não estejam, afrouxe cada um dos parafusos da garra t, ajuste os tubos horizontais para que as setas estejam alinhadas com as fendas e, em seguida, aperte os parafusos.
LEMBRETE RS500/RS700 - Manual do Proprietário 9
LEMBRETE 10 RS500/RS700 - Manual do Proprietário
Yamaha Electronic Drums web site: http://dtxdrums.yamaha.com Yamaha Manual Library: http://www.yamaha.co.jp/manual/ U.R.G., Digital Musical Instruments Division © 2011 Yamaha Corporation 101PO***.