
Owner's Manual

■
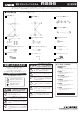
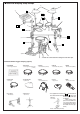
RS95 Assembly
* A screw driver (+ or -) is necessary to complete the assembly.
1
3
2
Center Pipe Assembly A
C
Tighten
Right Side Assembly
B
Center Pipe
Assembly B
D
Left Side Assembly
A
DTXTREME
Step 3-3
Step 3-2
Step 3-1
Tighten
Left Side Assembly
A
Module Holder Clamp
F
Hex Rod Cylinder
G
Module Holder
E
Step 3-4
Please make sure that the fixing bolts on each part, such as clamps, pads, etc. are firmly tightened.
Bolts that are too tight or too loose may result in damage to the part or the part dropping. Please use caution.
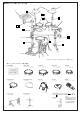
Attach the Center Pipe Assembly A
C
to the upright pipes of the Left
Side Assembly
A
and the Right Side Assembly
B
, and tighten the
wing bolts.
Attach the Center Pipe Assembly B
D
, and tighten the wing bolts.
Attach the Module Holder
E
3-1 Insert the Hex Rod Cylinder
G
into the Module Holder Clamp
F
, and tighten the fixing screw.
3-2 Attach the Module Holder Clamp
F
to the upright pipe on the
Left Side Assembly
A
.
3-3 Attach the DTXTREME to the Module Holder
E
. Using a screw
driver and the supplied screws, attach the Module Holder
E
to
the screw holes on the bottom of the DTXTREME.
3-4 Attach the Module Holder
E
, with the DTXTREME attached, to
the Module Holder Clamp
F
.
4
5
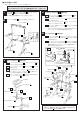
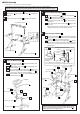
After the above assembly is complete, set the Kick Pad, Hi-Hat Control
pedal, etc. into position and connect the necessary cables. To keep
cable out of the way while playing, use the supplied Cable Bands
K
to
hold the cables to the rack system's pipes.
Tilter
Cymbal Pad
PCY10
Step 4-2
Step 5-2
Cymbal Pad
Felt (Small)*
Felt (Large)*
Washer*
Step 4-1
Step 5-1
Step 4-3
Cymbal Holder
J
Hex Rod Cylinder
G
Cymbal Holder
J
Drum Pad Clamp
(Short)
H
Drum Pad Clamp
(Long)
I
Drum Pad Clamp
(Long)
I
Tighten
Attach the Drum Pad Clamps
H
I
4-1 Insert the Hex Rod Cylinders
G
into the Drum Pad Clamps
H
and
I
, and tighten the fixing screws.
4-2 Attach the Drum Pad Clamp (short)
H
to the floor tom position.
Attach the Drum Pad Clamps (long)
I
to the high-hat and tom-
tom positions.
4-3 Attach the drum pad to the Hex Rod Cylinder
G
, align the pad
and secure.
When a large pad, such as the RHP100/120 is used, we recom-
mend that the tom holder TPCL100 (optional) be used.
Attach the Cymbal Holders
J
5-1 Insert the Cymbal Holders
J
into the cymbal holder clamps that
are positioned on the left and right sides of the Center Pipe
Assembly A
C
, and secure with the wing bolts.
5-2 Attach the cymbal pads to the Cymbal Holders
J
, align the
pads and secure. (Refer to the cymbal’s Owner’s Manual.) Also,
when the PCY10 is used, please use the parts shown in the
diagram below.
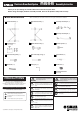
● When the PCY10 is used.
Anti-swivel brace
(supplied with the
PCY80/80S)
Change to the felt
washer
M
.
* The * indicates parts supplied with the PCY10.
* It is not necessary to use the tilter that is supplied with the PCY10.