
Owner's Manual
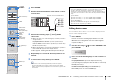
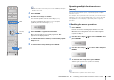

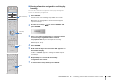
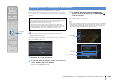
Table Of Contents
- Easy Setup Guide
- Owners Manual
- Table of Contents
- Features
- Video Signal Flow
- Supplied Accessories
- Parts & Controls
- Preparations
- Playback
- Basic playback procedure
- Selecting the input source and favorite settings with one touch (SCENE)
- Selecting the sound mode
- Listening to FM/AM radio
- Playing back iPod music
- Playing back music stored on a USB storage device
- Playing back music stored on media servers (PCs/NAS)
- Listening to Internet radio
- Playing back iTunes/iPod music via a network (AirPlay)
- Playing back videos/audio in multiple rooms (multi-zone)
- Viewing the current status
- Configuring playback settings for different playback sources (Option menu)
- Configurations
- Configuring input sources (Input menu)
- Configuring the SCENE function (Scene menu)
- Configuring sound programs/surround decoders (Sound Program menu)
- Configuring various functions (Setup menu)
- Viewing information about the unit (Information menu)
- Configuring the system settings (ADVANCED SETUP menu)
- ADVANCED SETUP menu items
- Changing the speaker impedance setting (SPEAKER IMP.)
- Turning on/off the remote control sensor (REMOTE SENSOR)
- Selecting the remote control ID (REMOTE CON AMP)
- Changing the FM/AM tuning frequency setting (TUNER FRQ STEP)
- Switching the video signal type (TV FORMAT)
- Removing the limitation on HDMI video output (MONITOR CHECK)
- Backing up/recovering the settings (RECOV./BACKUP)
- Restoring the default settings (INITIALIZE)
- Updating the firmware (FIRM UPDATE)
- Checking the firmware version (VERSION)
- Controlling external devices with the remote control
- Updating the unit’s firmware via the network
- Frequently asked questions
- Troubleshooting
- Error indications on the front display
- Information on HDMI
- Glossary
- Specifications
- Index
- Supplement for Web Control
- Supplement for SiriusXM Internet Radio
- Quick Guide for Multi-zone and Remote Control Functions
- List of Remote Control Codes
- Warranty

CONFIGURATIONS ➤ Controlling external devices with the remote control En 141
4
Press ENTER.
5
Aim the infrared transmitters of the remote controls
at each other.
6
Perform the following steps (a and b) within
10 seconds.
a On the unit, press one of the following keys to which you want to
assign a function.
For playback device: SOURCE z, menu operations keys,
DISPLAY, MODE, external device operation keys, numeric keys
For TV: TV operation keys
b On the external device, press the key from which the operation is
learned until “OK” appears in the display window.
If “NG” appears, learning has failed. Repeat from Step 4.
7
Repeat Steps 3 to 6 until all desired operations are
learned.
8
To exit from the setup menu, press SETUP.
• This remote control can learn approximately 200 functions (may be
decreased depending on the signals). If “FULL” appears in the display
window, clear unnecessary assignments to free some memory space for the
new functions.
Editing device names
You can edit the device names or scene names displayed on the
remote control’s display window.
1
Press SETUP.
Perform each of the following steps within 30 seconds.
Otherwise, the setting will be canceled. If this happens,
repeat from Step 1.
2
Use the cursor keys (q/w) to select “RENAME” and
press ENTER.
3
Press one of the following keys to select a device or
a scene.
For playback device: press the input selection key
(corresponding to the input jacks where the device is connected).
For TV: press TV z.
For AV receiver (the unit): press RECEIVER z.
For scene: press one of the SCENE keys.
SOURCE
RECEIVER
AV
AUDIO
1 2 3 4
5 6 7
V-AU X
1 2 3 4
MULTI
PHONO
USB NET
TUNER
[ C ][ A ] [ B ]
SCENE
1 2 3 4
PROGRAM
VOLUME
MUTE
Remote control of external device
5 to 10 cm (2 to 4”) apart
Note
• If you press RECEIVER z in Step 3, you can assign functions of an external
receiver to the menu operation keys, external device operation keys or
numeric keys. However, it makes these keys to control the unit impossible. If
you need to restore the remote control code for the unit, perform the following
steps.
a Press SETUP.
b Use the cursor keys (q/w) to select “CLEAR” and press ENTER.
c Use the cursor keys (q/w) to select “LEARN” and press ENTER.
d Press RECEIVER z.
e Hold down ENTER until “OK” appears on the window display.
f To exit from the setup menu, press SETUP.
RENAME
2 3
5
1
4 6
TUN./ CH
ENHANCER
SUR.
DECODE
HDMI OUT
MEMORY
INFO AM
PAR TY
FM
0
10
LEVELENT
SETUPZONE
87
SLEEP
9
SOURCE
RECEIVER
AV
AUDIO
1 2 3 4
5 6 7
V-A UX
1 2 3 4
MULTI
PHONO
USB NET
TUNER
[ C ][ A ] [ B ]
CLASSICAL
LIVE
CLUB
ENTERTAIN
MOVIE
STEREO STRAIGHT
INPUT
PURE
DIRECT
MUTE
TV
SCENE
1 2 3 4
PROGRAM
VOLUME
TV VOL
MUTE
MODE
TOP MENU
RETURN DISPLAY
POP-UP/MENU
TV CH
PRESET
ENTER
ON SCREEN
OPTION
T
U
N.
/
CH
ENHAN
CE
R
SUR
.
D
E
CO
D
E
HDMI
OU
T
MEM
O
RY
INF
O
AM
PA
RT
Y
FM
LEVE
L
Z
O
NE
S
LE
E
P
SOU
R
C
E
RE
C
EIVE
R
CLASSICAL
C
LA
SS
I
C
A
L
LIVE
C
L
UB
ENTE
RT
AI
T
T
N
MO
VI
E
S
TERE
O
S
TRAI
G
H
T
PUR
E
D
IRE
CT
PR
OGR
A
M
V
O
LUME
MUTE
PRE
S
E
T
O
N
SC
REE
N
O
PTI
O
N
SETUP
TV z
MODE
DISPLAY
ENTER
SCENE
RECEIVER z
Input selection keys
Menu operation keys
Cursor keys
TV operation keys
Numeric keys
External device
operation keys
External device
operation keys