
Owner's Manual
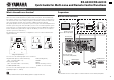
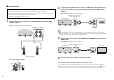
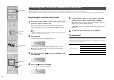


Table Of Contents
- Easy Setup Guide
- Owners Manual
- Table of Contents
- Features
- Video Signal Flow
- Supplied Accessories
- Parts & Controls
- Preparations
- Playback
- Basic playback procedure
- Selecting the input source and favorite settings with one touch (SCENE)
- Selecting the sound mode
- Listening to FM/AM radio
- Playing back iPod music
- Playing back music stored on a USB storage device
- Playing back music stored on media servers (PCs/NAS)
- Listening to Internet radio
- Playing back iTunes/iPod music via a network (AirPlay)
- Playing back videos/audio in multiple rooms (multi-zone)
- Viewing the current status
- Configuring playback settings for different playback sources (Option menu)
- Configurations
- Configuring input sources (Input menu)
- Configuring the SCENE function (Scene menu)
- Configuring sound programs/surround decoders (Sound Program menu)
- Configuring various functions (Setup menu)
- Viewing information about the unit (Information menu)
- Configuring the system settings (ADVANCED SETUP menu)
- ADVANCED SETUP menu items
- Changing the speaker impedance setting (SPEAKER IMP.)
- Turning on/off the remote control sensor (REMOTE SENSOR)
- Selecting the remote control ID (REMOTE CON AMP)
- Changing the FM/AM tuning frequency setting (TUNER FRQ STEP)
- Switching the video signal type (TV FORMAT)
- Removing the limitation on HDMI video output (MONITOR CHECK)
- Backing up/recovering the settings (RECOV./BACKUP)
- Restoring the default settings (INITIALIZE)
- Updating the firmware (FIRM UPDATE)
- Checking the firmware version (VERSION)
- Controlling external devices with the remote control
- Updating the unit’s firmware via the network
- Frequently asked questions
- Troubleshooting
- Error indications on the front display
- Information on HDMI
- Glossary
- Specifications
- Index
- Supplement for Web Control
- Supplement for SiriusXM Internet Radio
- Quick Guide for Multi-zone and Remote Control Functions
- List of Remote Control Codes
- Warranty

2
■ Connections
1
Connect the speakers in Zone2 to the EXTRA SP 2 terminals with
speaker cables.
Skip this step if you do not use Zone2.
To connect speaker cables
2
Connect the playback devices (such as CD players) in the main zone
to the analog stereo input jacks with stereo pin cables (RCA stereo
cables).
Skip this step if you do not use Zone2.
• This guide explains how to connect a playback device to the unit with an analog stereo connection for
example. If you want to connect a playback device with a digital connection (HDMI, digital optical or digital
coaxial), refer to the Owner’s Manual in the supplied CD-ROM.
3
Connect the TV in Zone4 to the HDMI OUT 2 (ZONE OUT) jack with an
HDMI cable.
Skip this step if you do not use Zone4.
4
Connect the power cable to an AC wall outlet.
To operate the unit and external devices from other rooms
You can operate the unit and external devices from other rooms using the supplied
remote control if you connect an infrared signal receiver/emitter to the unit’s REMOTE
IN/OUT jacks. For details, refer to the Owner’s Manual in the supplied CD-ROM.
Caution
• Before connecting the speakers, remove the unit’s power cable from the AC wall outlet.
• Ensure that the core wires of the speaker cable do not touch each other or come into contact with the
unit’s metal areas. This may damage the unit or the speakers.
• Connect the speakers with the correct polarity.
SPEAKERS
ZONE 2/ZONE 3/R.PRESENCE
R
L
EXTRA SP2
EXTRA SP 2 terminals
Left
Speakers (Zone2)
Right
The unit (rear)
-
+
aa
SPEAKERS
ZONE 2/ZONE 3/R.PRESENCE
R
L
EXTRA SP2
b
d
c
+ (red)
- (black)
AUDIO
OUT
R
L
R
L
L
R
L
R
Analog stereo input jacks
(such as AUDIO 1–4)
The unit (rear)
Playback device
(such as a CD player)
O
UT
(ZONE OUT)
2
HDMI IN
HDMI
HDMI
HDMI OUT 2 (ZONE OUT)
jack
The unit (rear)
TV (Zone4)