
Owner's Manual
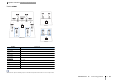
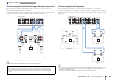
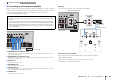
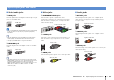
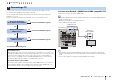
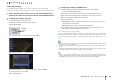
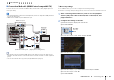
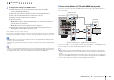
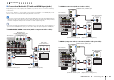
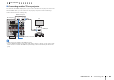
Table Of Contents
- Easy Setup Guide
- Owners Manual
- Table of Contents
- Features
- Video Signal Flow
- Supplied Accessories
- Parts & Controls
- Preparations
- Playback
- Basic playback procedure
- Selecting the input source and favorite settings with one touch (SCENE)
- Selecting the sound mode
- Listening to FM/AM radio
- Playing back iPod music
- Playing back music stored on a USB storage device
- Playing back music stored on media servers (PCs/NAS)
- Listening to Internet radio
- Playing back iTunes/iPod music via a network (AirPlay)
- Playing back videos/audio in multiple rooms (multi-zone)
- Viewing the current status
- Configuring playback settings for different playback sources (Option menu)
- Configurations
- Configuring input sources (Input menu)
- Configuring the SCENE function (Scene menu)
- Configuring sound programs/surround decoders (Sound Program menu)
- Configuring various functions (Setup menu)
- Viewing information about the unit (Information menu)
- Configuring the system settings (ADVANCED SETUP menu)
- ADVANCED SETUP menu items
- Changing the speaker impedance setting (SPEAKER IMP.)
- Turning on/off the remote control sensor (REMOTE SENSOR)
- Selecting the remote control ID (REMOTE CON AMP)
- Changing the FM/AM tuning frequency setting (TUNER FRQ STEP)
- Switching the video signal type (TV FORMAT)
- Removing the limitation on HDMI video output (MONITOR CHECK)
- Backing up/recovering the settings (RECOV./BACKUP)
- Restoring the default settings (INITIALIZE)
- Updating the firmware (FIRM UPDATE)
- Checking the firmware version (VERSION)
- Controlling external devices with the remote control
- Updating the unit’s firmware via the network
- Frequently asked questions
- Troubleshooting
- Error indications on the front display
- Information on HDMI
- Glossary
- Specifications
- Index
- Supplement for Web Control
- Supplement for SiriusXM Internet Radio
- Quick Guide for Multi-zone and Remote Control Functions
- List of Remote Control Codes
- Warranty

PREPARATIONS ➤ Connecting a TV En 37
■ Connection Method 2 (HDMI Control-compatible TV)
Connect the TV to the unit with an HDMI cable and an audio cable (digital optical or
stereo pin cable).
• The following explanation is based on the assumption that you have not changed the “HDMI” parameters
(p.124) in the “Setup” menu.
• HDMI Control is available only on the HDMI OUT 1 jack.
• By connecting a TV to the unit with an HDMI cable, any video input to the unit can be output to the TV,
regardless of the method used to connect the video device to the unit. For details, see “Video signal flow”
(p.159).
• You can connect another TV or a projector by using the HDMI OUT 2 jack (p.40).
❑ Necessary settings
To use HDMI Control, you need to configure the following settings.
For details on settings and operating your TV, refer to the instruction manual for the TV.
1
After connecting external devices (such as a TV and playback
devices) and power cable of the unit, turn on the unit, TV, and
playback devices.
2
Configure the settings of the unit.
a Switch the TV input to display video from the unit.
b Press ON SCREEN.
c Use the cursor keys to select “Setup” and press ENTER.
d Use the cursor keys (e/r) to select “HDMI”.
e Use the cursor keys (q/w) to select “HDMI Control” and press ENTER.
f Use the cursor keys to select “On”.
g Press ON SCREEN.
NETWORKDC OUT
5V
0.5A
( 3
NET
)
MONITOR OUT/
ZONE OUT
HDMI OUT
ARC
(ZONE OUT)
12
(1 BD/
D
AV 1
YPB
AV 1
A
AV 2
B
AV OUT
R
L
AV 3 AV 4AV 2AV 1
(1 BD/DVD)
OPTICAL
4
OPTICAL
3
COAXIAL
2
COAXIAL
1
PHONO
GND
OPTICAL
AUDI O 4AUDI O 3AUDIO 2AUDIO 1
(2 TV)
FRONT
SURROUND
5
COAXIAL
6
R L
FM
75Ω
ANTENNA
HD Radio
AM
(4 RADIO)
HDMI OUT
ARC (ZONE OUT)
12
HDMI
OPTICAL
AUDIO 1
(2 TV)
5
AUDIO
OPTICAL
R
L
HDMI
HDMI
OO
L
R
L
R
The unit (rear)
HDMI OUT 1 jack
AUDIO 1
(OPTICAL or AUDIO) jacks
Audio output
(digital optical or analog stereo)
TV
HDMI input
RETURN DISPLAY
ENTER
ON SCREEN
OPTION
RETURN
D
I
S
P
L
AY
OPTI
O
N
ON SCREEN
Cursor keys
ENTER
1 2
TV connection
3 4 5 6 7 8 9