
Owner's Manual
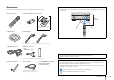

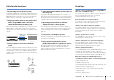
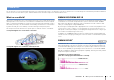
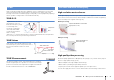

Table Of Contents
- Easy Setup Guide
- Owners Manual
- Table of Contents
- Compatibility
- Supplied Accessories
- Parts & Controls
- Features
- Preparations
- General setup procedure
- Connecting speakers
- Connecting a TV
- Connecting playback devices
- Connecting the FM/AM antennas
- Connecting a network cable or the wireless antenna
- Connecting other devices
- Connecting the power cable
- Selecting an on-screen menu language
- Optimizing the speaker settings automatically (YPAO)
- Connecting to a network device wirelessly
- Playback
- Basic playback procedure
- Selecting the input source and favorite settings with one touch (SCENE)
- Selecting the sound mode
- Listening to FM/AM radio
- Playing back iPod music
- Playing back music stored on a USB storage device
- Playing back music stored on media servers (PCs/NAS)
- Listening to Internet radio
- Playing back music with AirPlay
- Playing back videos/audio in multiple rooms (multi-zone)
- Controlling the unit from a web browser (web control)
- Viewing the current status
- Configuring playback settings for different playback sources (Option menu)
- Configurations
- Configuring input sources (Input menu)
- Configuring the SCENE function (Scene menu)
- Configuring sound programs/surround decoders (Sound Program menu)
- Configuring various functions (Setup menu)
- Viewing information about the unit (Information menu)
- Configuring the system settings (ADVANCED SETUP menu)
- ADVANCED SETUP menu items
- Changing the speaker impedance setting (SPEAKER IMP.)
- Turning on/off the remote control sensor (REMOTE SENSOR)
- Selecting the remote control ID (REMOTE CON AMP)
- Switching the video signal type (TV FORMAT)
- Removing the limitation on HDMI video output (MONITOR CHECK)
- Backing up/recovering the settings (RECOV./BACKUP)
- Restoring the default settings (INITIALIZE)
- Updating the firmware (FIRM UPDATE)
- Checking the firmware version (VERSION)
- Controlling external devices with the remote control
- Updating the unit’s firmware via the network
- Frequently asked questions
- Troubleshooting
- Error indications on the front display
- Glossary
- Supported devices and file formats
- Video signal flow
- Multi-zone output
- Information on HDMI
- Reference diagram (rear panel)
- Specs
- Index
- Supplement for Web Control
- Quick Guide for Multi-zone and Remote Control Functions
- Supplement for SiriusXM Internet Radio
- Supplement for Rhapsody
- Supplement for Pandora
- Supplement for Spotify
- List of Remote Control Codes
- Additional Information: About Dolby Atmos
- Firmware Updating Procedure
- Scan of CD-ROM
- Warranty

FEATURES ➤ What you can do with the unit En 7
Full of useful functions!
❑ Connecting various devices (p.38)
A number of HDMI jacks and various input/output jacks
on the unit allow you to connect video devices (such as
BD/DVD players), audio devices (such as CD players),
game consoles, camcorders, and other devices.
❑ Playing back TV audio in surround sound
with a single HDMI cable connection
(Audio Return Channel: ARC) (p.35)
When using an ARC-compatible TV, you only need one
HDMI cable to enable video output to the TV, audio
input from the TV, and the transmission of HDMI Control
signals.
❑ Various wireless connection methods
(p.59)
The unit supports the Wi-Fi feature that allows the unit to
connect to your wireless router (access point) without a
network cable connection. In addition, Wireless Direct
enables connecting a mobile device to the unit directly
without router.
❑ Surround playback with 5 speakers placed
in front (p.73)
If you have surround speakers but there is no space to
place them in the rear of your room, you can place them in
the front and enjoy multi-channel surround sound with the
5 speakers placed in the front (Virtual CINEMA FRONT).
❑ Operating external devices with the
supplied remote control (p.148)
You can operate external devices with the supplied
remote control by registering the remote control codes
of the external devices (such as a TV and BD/DVD
players).
❑ Low power consumption (p.141)
The ECO mode (power saving function) reduces the
unit’s power consumption.
❑ Easy operation and wireless music
playback from iPhone or Android™ device
By using the application for smartphone/tablet “AV
CONTROLLER”, you can control the unit from an
iPhone, iPad, iPod touch or Android devices. Visit the
Yamaha website for details.
HDMI Control
TV audio
Video from
external device
Wi-Fi or
Wireless Direct
Useful tips
I want to connect a playback device using HDMI for
video and non-HDMI for audio...
Use “Audio Select” in the “Option” menu to specify the
type of an audio input jack to be used for the
corresponding input source (p.110).
Video and audio are not synchronized...
Use “Lipsync” in the “Setup” menu to adjust the delay
between video and audio output (p.129).
I want to hear audio from the TV speakers...
Use “Audio Output” in the “Setup” menu to select the
output destination of signals input into the unit (p.133).
Your TV speakers may be selected as an output
destination.
I want to get more bass sounds…
Set “Extra Bass” in the “Option” menu to “On” to enjoy
enhanced bass sounds (p.109).
I want to change the on-screen menu language...
Use “Language” in the “Setup” menu to select a
language from English, Japanese, French, German,
Spanish, Russian, Italian and Chinese (p.46).
I want to update the firmware...
Use “FIRM UPDATE” in the “ADVANCED SETUP” menu
to update the unit’s firmware (p.147). If the unit is
connected to the Internet, a message will be displayed
on the TV when a firmware update is available (p.151).
Many other settings are available that let you to
customize the unit. For details, see the following pages.
• Input settings (p.112)
• SCENE settings (p.114)
• Sound program and surround decoder settings (p.117)
• Various function settings (p.121)
• Information view (such as audio signal and video
signal) (p.143)
• System settings (p.145)