
manual

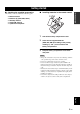
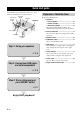
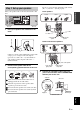

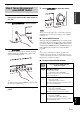
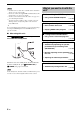
Table Of Contents
- English
- Caution: Read this before operating your unit.
- Contents
- Features
- Getting started
- Quick start guide
- Connections
- Rear panel
- Placing speakers
- Connecting speakers
- Information on jacks and cable plugs
- Information on HDMI™
- Connecting video components
- Connecting audio components
- Connecting to the VIDEO AUX jacks on the front panel
- Connecting the FM and AM antennas
- Connecting the power cable
- Turning on and off the power
- Front panel display
- Optimizing the speaker setting for your listening room (YPAO)
- Selecting the SCENE templates
- Playback
- Sound field programs
- FM/AM tuning
- Radio Data System tuning (Europe and Russia models only)
- Recording
- Set menu
- Advanced setup
- Troubleshooting
- Glossary
- Specifications
- Index
- Français
- Attention: Veuillez lire ce qui suit avant d’utiliser l’appareil.
- Table des matières
- Description
- Pour commencer
- Guide de démarrage rapide
- Raccordements
- Panneau arrière
- Disposition des enceintes
- Raccordements des enceintes
- Information sur les prises et les fiches de câbles
- Informations sur le HDMI™
- Raccordements d’appareils vidéo
- Raccordements des appareils audio
- Raccordement aux prises VIDEO AUX de la face avant
- Raccordement des antennes FM et AM
- Raccordement du câble d’alimentation
- Mise en et hors service de cet appareil
- Afficheur de la face avant
- Optimisation du réglage des enceintes pour votre salle d’écoute (YPAO)
- Sélection des modèles de SCENE
- Lecture
- Corrections de champ sonore
- Syntonisation FM/AM
- Système de diffusion de données radio (Modèle pour l’Europe et la Russie seulement)
- Enregistrement
- Menu de réglage
- Réglages approfondis
- Guide de dépannage
- Glossaire
- Caractéristiques techniques
- Index
- Italiano
- Attenzione: Leggere quanto segue prima di utilzzare l’unità.
- Indice
- Caratteristiche
- Per cominciare
- Guida di avvio rapido
- Collegamenti
- Pannello posteriore
- Messa in posizione dei diffusori
- Collegamento dei diffusori
- Informazioni su prese e cavi
- Informazioni su HDMI™
- Collegamento di componenti video
- Collegamento di componenti audio
- Collegamento alle prese VIDEO AUX del pannello anteriore
- Collegamento delle antenne FM e AM
- Collegamento del cavo di alimentazione
- Accensione e spegnimento
- Display del pannello anteriore
- Ottimizzazione delle impostazioni dei diffusori per la propria stanza di ascolto (YPAO)
- Scelta dei modelli SCENE
- Riproduzione
- Programmi di campo sonoro
- Sintonizzazione in FM/AM
- Sintonizzazione Radio Data System (solo modelli per Europa e Russia)
- Registrazione
- Menu di impostazione
- Impostazioni avanzate
- Diagnostica
- Glossario
- Dati tecnici
- Indice analitico
- Español
- Precaución: Lea las indicaciones siguientes antes de utilizar este aparato.
- Índice
- Características
- Primeros pasos
- Guía de inicio rápido
- Conexiones
- Panel trasero
- Colocación de los altavoces
- Conexión de altavoces
- Información sobre jacks y clavijas de cables
- Información activada HDMI™
- Conexión de componentes de vídeo
- Conexión de componentes de audio
- Conexión a los jacks VIDEO AUX del panel delantero
- Conexión de antenas de FM y AM
- Conexión del cable de alimentación
- Encendido y apagado de esta unidad
- Visualizador del panel delantero
- Optimización de los ajustes de los altavoces para su habitación de escucha (YPAO)
- Selección de plantillas SCENE
- Reproducción
- Programas de campos acústicos
- Sintonización de FM/AM
- Sintonización del sistema de datos de radio (Modelos de Europa y Rusia solamente)
- Grabación
- Menú de configuración
- Ajuste avanzado
- Solución de problemas
- Glosario
- Especificaciones
- Índice alfabético
- APPENDIX
- Controls Diagram

Quick start guide
8 En
*1
You must connect a cable TV or a satellite tuner to this unit in
advance. See page 16 for details.
*2
You need to connect the supplied FM and AM antennas to this
unit in advance. See page 18 for details.
*3
You have to tune into the desired radio station. See page 37 to
39 for the tuning information.
*4
To achieve the best possible reception, orient the connected
AM loop antenna, or adjust the position of the end of the
indoor FM antenna.
y
If you cannot find the desired situation, you can select and change
the assigned SCENE template for the SCENE buttons. See
page 25 for details.
■ After using this unit...
Press
A
STANDBY/ON on the front panel to set
this unit to the standby mode.
This unit is set to the standby mode. To turn on this unit
from the standby mode, press
A
STANDBY/ON (or
A
POWER). See page 19 for details.
In the standby mode, this unit consumes a small amount of power
in order to receive infrared signals from the remote control.
Notes
Note
What do you want to do with this
unit?
■ Customizing the SCENE templates
• Using various SCENE templates
☞
P. 25
■ Using various input sources
• Basic controls of this unit
☞
P. 29
• Enjoying FM/AM radio programs
☞
P. 37
■ Using various sound features
• Using various sound field programs
☞
P. 34
■ Adjusting the parameters of this unit
• Automatically optimizing the speaker
parameters for your listening room
(AUTO SETUP)
☞
P. 22
• Manually adjusting various parameters of
this unit
☞
P. 44
• Adjusting the advanced parameters
☞
P. 52
■ Additional features
• Automatically turning off this unit
☞
P. 33