
manual

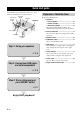
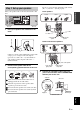

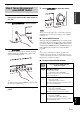
Table Of Contents
- English
- Caution: Read this before operating your unit.
- Contents
- Features
- Getting started
- Quick start guide
- Connections
- Rear panel
- Placing speakers
- Connecting speakers
- Information on jacks and cable plugs
- Information on HDMI™
- Connecting video components
- Connecting audio components
- Connecting to the VIDEO AUX jacks on the front panel
- Connecting the FM and AM antennas
- Connecting the power cable
- Turning on and off the power
- Front panel display
- Optimizing the speaker setting for your listening room (YPAO)
- Selecting the SCENE templates
- Playback
- Sound field programs
- FM/AM tuning
- Radio Data System tuning (Europe and Russia models only)
- Recording
- Set menu
- Advanced setup
- Troubleshooting
- Glossary
- Specifications
- Index
- Français
- Attention: Veuillez lire ce qui suit avant d’utiliser l’appareil.
- Table des matières
- Description
- Pour commencer
- Guide de démarrage rapide
- Raccordements
- Panneau arrière
- Disposition des enceintes
- Raccordements des enceintes
- Information sur les prises et les fiches de câbles
- Informations sur le HDMI™
- Raccordements d’appareils vidéo
- Raccordements des appareils audio
- Raccordement aux prises VIDEO AUX de la face avant
- Raccordement des antennes FM et AM
- Raccordement du câble d’alimentation
- Mise en et hors service de cet appareil
- Afficheur de la face avant
- Optimisation du réglage des enceintes pour votre salle d’écoute (YPAO)
- Sélection des modèles de SCENE
- Lecture
- Corrections de champ sonore
- Syntonisation FM/AM
- Système de diffusion de données radio (Modèle pour l’Europe et la Russie seulement)
- Enregistrement
- Menu de réglage
- Réglages approfondis
- Guide de dépannage
- Glossaire
- Caractéristiques techniques
- Index
- Italiano
- Attenzione: Leggere quanto segue prima di utilzzare l’unità.
- Indice
- Caratteristiche
- Per cominciare
- Guida di avvio rapido
- Collegamenti
- Pannello posteriore
- Messa in posizione dei diffusori
- Collegamento dei diffusori
- Informazioni su prese e cavi
- Informazioni su HDMI™
- Collegamento di componenti video
- Collegamento di componenti audio
- Collegamento alle prese VIDEO AUX del pannello anteriore
- Collegamento delle antenne FM e AM
- Collegamento del cavo di alimentazione
- Accensione e spegnimento
- Display del pannello anteriore
- Ottimizzazione delle impostazioni dei diffusori per la propria stanza di ascolto (YPAO)
- Scelta dei modelli SCENE
- Riproduzione
- Programmi di campo sonoro
- Sintonizzazione in FM/AM
- Sintonizzazione Radio Data System (solo modelli per Europa e Russia)
- Registrazione
- Menu di impostazione
- Impostazioni avanzate
- Diagnostica
- Glossario
- Dati tecnici
- Indice analitico
- Español
- Precaución: Lea las indicaciones siguientes antes de utilizar este aparato.
- Índice
- Características
- Primeros pasos
- Guía de inicio rápido
- Conexiones
- Panel trasero
- Colocación de los altavoces
- Conexión de altavoces
- Información sobre jacks y clavijas de cables
- Información activada HDMI™
- Conexión de componentes de vídeo
- Conexión de componentes de audio
- Conexión a los jacks VIDEO AUX del panel delantero
- Conexión de antenas de FM y AM
- Conexión del cable de alimentación
- Encendido y apagado de esta unidad
- Visualizador del panel delantero
- Optimización de los ajustes de los altavoces para su habitación de escucha (YPAO)
- Selección de plantillas SCENE
- Reproducción
- Programas de campos acústicos
- Sintonización de FM/AM
- Sintonización del sistema de datos de radio (Modelos de Europa y Rusia solamente)
- Grabación
- Menú de configuración
- Ajuste avanzado
- Solución de problemas
- Glosario
- Especificaciones
- Índice alfabético
- APPENDIX
- Controls Diagram

1 En
PREPARATIONINTRODUCTION
BASIC
OPERATION
ADVANCED
OPERATION
ADDITIONAL
INFORMATION
APPENDIX
English
Features ................................................................... 2
Getting started ........................................................ 3
Quick start guide .................................................... 4
Preparation: Check the items ..................................... 4
Step 1: Set up your speakers...................................... 5
Step 2: Connect your DVD player and other
components............................................................ 6
Step 3: Turn on the power and press SCENE 1
button..................................................................... 7
What do you want to do with this unit?..................... 8
Connections............................................................. 9
Rear panel .................................................................. 9
Placing speakers....................................................... 10
Connecting speakers ................................................ 11
Information on jacks and cable plugs ...................... 13
Information on HDMI™.......................................... 14
Connecting video components................................. 15
Connecting audio components................................. 17
Connecting to the VIDEO AUX jacks on the front
panel .................................................................... 18
Connecting the FM and AM antennas ..................... 18
Connecting the power cable..................................... 19
Turning on and off the power .................................. 19
Front panel display .................................................. 20
Optimizing the speaker setting for your listening
room (YPAO) .................................................... 22
Using AUTO SETUP .............................................. 22
Selecting the SCENE templates........................... 25
Selecting the desired SCENE template.................... 25
Creating your original SCENE templates................ 28
Playback ................................................................ 29
Basic operations....................................................... 29
Additional operations............................................... 30
Sound field programs ........................................... 34
Sound field program descriptions............................ 34
FM/AM tuning ...................................................... 37
Automatic tuning ..................................................... 37
Manual tuning.......................................................... 37
Automatic preset tuning........................................... 38
Manual preset tuning ............................................... 38
Selecting preset stations........................................... 39
Exchanging preset stations ...................................... 39
Radio Data System tuning
(Europe and Russia models only).................... 40
Displaying the Radio Data System information ...... 40
Selecting the Radio Data System program type
(PTY SEEK mode).............................................. 41
Using the enhanced other networks (EON) data
service.................................................................. 42
Recording .............................................................. 43
Set menu.................................................................44
Using set menu ........................................................ 45
1 SOUND MENU.................................................... 46
2 INPUT MENU...................................................... 49
3 OPTION MENU................................................... 51
Advanced setup......................................................52
Troubleshooting.....................................................53
Glossary..................................................................58
Specifications .........................................................60
Index.......................................................................61
(at the end of this manual)
Front panel................................................................i
Remote control ....................................................... ii
Contents
INTRODUCTION
PREPARATION
BASIC OPERATION
ADVANCED OPERATION
ADDITIONAL INFORMATION
APPENDIX
About this manual
• y indicates a tip for your operation.
• Some operations can be performed by using either the
buttons on the front panel or the ones on the remote
control. In case the button names differ between the front
panel and the remote control, the button name on the
remote control is given in parentheses.
• This manual is printed prior to production. Design and
specifications are subject to change in part as a result of
improvements, etc. In case of differences between the
manual and product, the product has priority.
•“
A
STANDBY/ON” or “
4
DVD” (example) indicates
the name of the parts on the front panel or the remote
control. Refer to the attached sheet or the pages at the end
of this manual for the information about each position of
the parts.
•
The symbol “☞ ” with page number(s) indicates the
corresponding reference page(s).