
Owner's Manual
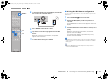
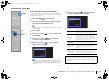


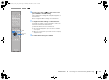


Table Of Contents
- Easy Setup Guide
- Owners Manual
- Supplied Accessories
- Table of Contents
- Features
- Preparations
- General setup procedure
- Placing speakers
- Connecting speakers
- Connecting a TV
- Connecting playback devices
- Connecting the FM/AM antennas
- Connecting to a network (wired LAN connection)
- Connecting recording devices
- Connecting the power cable
- Selecting an on-screen menu language
- Connecting to a network wirelessly (RX-V577 only)
- Optimizing the speaker settings automatically (YPAO)
- Playback
- Basic playback procedure
- Selecting the input source and favorite settings with one touch (SCENE)
- Selecting the sound mode
- Selecting a sound program suitable for movies
- Selecting a sound program suitable for music or stereo playback
- Selecting a surround decoder
- Switching to the straight decode mode
- Switching to the direct playback mode
- Enabling Extra Bass
- Enabling Compressed Music Enhancer
- Enjoying stereoscopic sound fields (CINEMA DSP 3D)
- Sound programs suitable for movies (MOVIE)
- Sound programs suitable for music/stereo playback (MUSIC)
- Enjoying sound field effects without surround speakers (Virtual CINEMA DSP)
- Enjoying surround sound with 5 speakers placed in front (Virtual CINEMA FRONT)
- Enjoying surround sound with headphones (SILENT CINEMA)
- Enjoying unprocessed playback
- Enjoying pure high fidelity sound (direct playback)
- Enhancing the bass (Extra Bass)
- Enjoying compressed music with enhanced sound (Compressed Music Enhancer)
- Listening to FM/AM radio
- Playing back iPod music
- Playing back music stored on a USB storage device
- Playing back music stored on media servers (PCs/NAS)
- Listening to Internet radio
- Playing back music with AirPlay
- Playing back music in multiple rooms (RX-V577 only)
- Viewing the current status
- Configuring playback settings for different playback sources (Option menu)
- Configurations
- Configuring various functions (Setup menu)
- Configuring the system settings (ADVANCED SETUP menu)
- ADVANCED SETUP menu items
- Changing the speaker impedance setting (SP IMP.)
- Selecting the remote control ID (REMOTE ID)
- Changing the FM/AM tuning frequency setting (TU)
- Switching the video signal type (TV FORMAT)
- Restoring the default settings (INIT)
- Updating the firmware (UPDATE)
- Checking the firmware version (VERSION)
- Updating the unit’s firmware via the network
- Frequently asked questions
- Error indications on the front display
- Glossary
- Supported devices and file formats
- Video signal flow
- Information on HDMI
- Troubleshooting
- Specs
- Index
- Supplement for Pandora
- Supplement for Spotify
- Scan of CD-ROM
- Warranty

PREPARATIONS ➤ Optimizing the speaker settings automatically (YPAO) En 40
Error messages
If any error message is displayed during the measurement, resolve the problem and perform YPAO again.
TV screen
Front display
■ Procedure to handle errors
1
Check the content of error message and
press ENTER.
2
Use the cursor keys (e/r) to select the
desired operation.
To exit the YPAO measurement:
a Select “EXIT” and press ENTER.
b Use the cursor keys (q/w) to select “Exit” and press
ENTER.
c Disconnect the YPAO microphone from the unit.
To retry the YPAO measurement from
beginning:
Select “RETRY” and press ENTER.
To proceed with the current YPAO
measurement (for E-5 and E-9 only):
Select “PROCEED” and press ENTER.
Error
message
Auto Setup
Start
Exit
ERROR
E-5:Noisy
PROCEED
5%
MUTE
ENHANCER
STEREO
TUNED
SLEEP
OUT
ECO
CHARGE
ADAPTIVE DRC
VIRTUAL
E-5:NOISY
VOL.
• Texts in parentheses denote indicators on the front display.
Error message Cause Remedy
E-1:No Front SP
(E-1:NO FRNT SP)
Front speakers are not detected.
Exit YPAO, turn off the unit, and then check the speaker
connections.
E-2:No Sur. SP
(E-2:NO SUR SP)
One of the surround speakers cannot be
detected.
E-4:SBR → SBL
(E-4:SBR → SBL)
A surround back speaker is connected to
the R side only.
When using only one surround back speaker, you need to
connect it to the SINGLE jack (L side). Exit YPAO, turn off the
unit, and then reconnect the speaker.
E-5:Noisy
(E-5:NOISY)
The noise is too loud.
Keep the room quiet and retry YPAO. If you select
“PROCEED”, YPAO takes the measurement again and
ignores any noise detected.
E-6:Check Sur.
(E-6:CHECK SUR)
Surround back speakers are connected,
but no surround speakers are connected.
Surround speakers need to be connected in order to use
surround back speakers. Exit YPAO, turn off the unit, and
then reconnect the speakers.
E-7:No MIC
(E-7:NO MIC)
The YPAO microphone has been removed.
Connect the YPAO microphone to the YPAO MIC jack firmly
and retry YPAO.
E-8:No Signal
(E-8:NO SIGNAL)
The YPAO microphone cannot detect test
tones.
Connect the YPAO microphone to the YPAO MIC jack firmly
and retry YPAO. If this error occurs repeatedly, contact the
nearest authorized Yamaha dealer or service center.
E-9:User Cancel
(E-9:CANCEL)
The measurement has been canceled. Retry or exit YPAO as necessary.
E-10:Internal Err.
(E-10:INTERNAL)
An internal error has occurred.
Exit YPAO, and turn off and on the unit. If this error occurs
repeatedly, contact the nearest authorized Yamaha dealer or
service center.
1 2 3 4 5 6 7 8 9 10 11
00_RX-V477_V577_om_U.book Page 40 Monday, November 11, 2013 1:19 PM