AV Receiver Owner’s Manual Read the supplied booklet “Safety Brochure” before using the unit.
CONTENTS Accessories . . . . . . . . . . . . . . . . . . . . . . . . . . . . . . . . . . . . . . . . . . . . . . . . . . . . . . 4 9 Selecting an on-screen menu language . . . . . . . . . . . . . . . . . . . . . . . . . 29 10 Optimizing the speaker settings automatically (YPAO) . . . . . . . . . 30 FEATURES 5 Error messages . . . . . . . . . . . . . . . . . . . . . . . . . . . . . . . . . . . . . . . . . . . . . . . . . . . . . . . . . . . . . . . . . . . . . . . . . . . . . . . . . . . .
Playing back music stored on a USB storage device . . . . . . . . . . . . . . . 54 Controlling external devices with the remote control . . . . . . . . . . . . . 86 Connecting a USB storage device . . . . . . . . . . . . . . . . . . . . . . . . . . . . . . . . . . . . . . . . . . . . . . . . . . . . . . . . . . . . . . . . . . 54 Registering the remote control code for a TV . . . . . . . . . . . . . . . . . . . . . . . . . . . . . . . . . . . . . . . . . . . . . . . . . . . . . . .
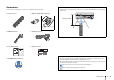
Accessories Operating range of the remote control Check that the following accessories are supplied with the product. • Point the remote control at the remote control sensor on the unit and remain within the operating range shown below. Remote control Batteries (AAA, R03, UM-4) (x2) Within 6 m (20 ft) 30° 30° Insert the batteries the right way round. DAB/FM antenna YPAO microphone Easy Setup Guide Safety Brochure • Some features are not available in certain regions.
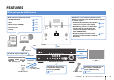
FEATURES What you can do with the unit Wide variety of supported content • iPod/iPhone/iPad . p.50 • USB . p.54 • Media server (PC/NAS) . p.57 • Internet radio . p.60 • AirPlay . p.62 Supports 2- to 5.1-channel speaker system. Allows you to enjoy your favorite acoustic spaces in various styles. • Automatically optimizing the speaker . p.30 settings to suit your room (YPAO) • Reproducing stereo or multichannel sounds with the sound fields like actual movie theaters and concert halls (CINEMA DSP) .
Full of useful functions! Useful tips ❑ Connecting various devices (p.22) ❑ Creating 3-dimensional sound fields (p.37) A number of HDMI jacks and various input/output jacks on the unit allow you to connect video devices (such as BD/DVD players), audio devices (such as CD players), game consoles, camcorders, and other devices. The Virtual Presence Speaker (VPS) function allows you to create a 3-dimensional sound field in your own room (CINEMA DSP 3D).
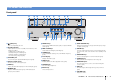
Part names and functions Front panel 1 2 3 4 5 6 7 8 9 : A YPAO MIC DIRECT INFO MEMORY PRESET FM DAB TUNING VOLUME SCENE BD DVD PHONES INPUT TV TONE CONTROL NET PROGRAM RADIO STRAIGHT SILENT CINEMA B 1 z (power) key Turns on/off (standby) the unit. 2 Standby indicator Lights up when the unit is in standby mode under any of the following conditions. • HDMI Control is enabled (p.75) • Standby Through is enabled (p.75) • Network Standby is enabled (p.
Front display (indicators) 1 2 3 4 5 ENHANCER ADAPTIVE DRC STEREO 3 TUNED OUT 6 7 SLEEP 8 VOL. MUTE L SL 9 1 HDMI Lights up when HDMI signals are being input or output. OUT Lights up when HDMI signals are being output. 2 CINEMA DSP Lights up when CINEMA DSP (p.37) is working. CINEMA DSP n Lights up when CINEMA DSP 3D (p.39) is working. 3 ENHANCER Lights up when Compressed Music Enhancer (p.41) is working. 4 ADAPTIVE DRC : 6 SLEEP Lights up when the sleep timer is on.
Rear panel 1 3 2 HDMI 1 HDMI OUT HDMI 2 HDMI 3 HDMI 4 HDMI 5 MHL 5V 1A (BD/DVD) 4 5 6 7 NETWORK (NET) ARC DC OUT 5V 0.5A ANTENNA (RADIO) COMPONENT VIDEO DAB/FM 75 PR PR PB PB Y COMPONENT VIDEO Y SPEAKERS FRONT VIDEO CENTER SURROUND MONITOR OUT OPTICAL COAXIAL COAXIAL OPTICAL AV 1 AV 2 AV 3 AV 4 ( TV ) AV 5 AV 6 8 AV OUT AUDIO SUBWOOFER PRE OUT 9 : A B 1 HDMI OUT jack For connecting to an HDMI-compatible TV and outputting video/audio signals (p.17).
Remote control 1 Remote control signal transmitter 1 Transmits infrared signals. CODE SET 2 SOURCE RECEIVER E 2 3 Changes the device (the unit or external device) that is operated with the remote control (p.87). You can operate the unit when this key lights up in orange, and an external device when this key lights up in green. 4 MHL 1 2 3 5 AV 4 5 6 V-AUX USB NET F TUNER 4 FM DAB 5 INFO MEMORY MOVIE MUSIC 7 8 9 : PRESET SUR.
PREPARATIONS General setup procedure 1 Placing speakers (p.12) Select the speaker layout for the number of speakers that you are using and place them in your room. 2 Connecting speakers (p.14) Connect the speakers to the unit. 3 Connecting a TV (p.17) Connect a TV to the unit. 4 Connecting playback devices (p.22) Connect video devices (such as BD/DVD players) and audio devices (such as CD players) to the unit. 5 Connecting the DAB/FM antenna (p.26) Connect the supplied DAB/FM antenna to the unit.
1 Speaker placement 2 3 4 5 6 7 8 9 10 1 Placing speakers Select the speaker layout for the number of speakers that you are using and place the speakers and subwoofer in your room. This section describes the representative speaker layout examples. Caution • Use speakers with an impedance of at least 6 . Speaker system (the number of channels) Speaker type Front (L) Abbr.
1 Speaker placement 2 3 4 5 6 7 8 9 10 5.1-channel system 3.1-channel system 1 9 2 1 3 9 4 2 3 5 10° to 30° 10° to 30° 4.1-channel system 2.
1 2 Speaker connections 3 4 5 6 7 8 9 10 2 Connecting speakers 5.1-channel system Connect the speakers placed in your room to the unit. The following diagrams provide connections for 5.1- system as examples. For other systems, connect speakers while referring to the connection diagram for the 5.1-channel system. Caution The unit (rear) • Remove the unit’s power cable from an AC wall outlet and turn off the subwoofer before connecting the speakers.
1 2 Speaker connections 3 4 5 6 7 8 9 10 ■ Connecting speaker cables Speaker cables have two wires. One is for connecting the negative (-) terminal of the unit and the speaker, and the other is for the positive (+) terminal. If the wires are colored to prevent confusion, connect the black wire to the negative and the other wire to the positive terminal. a Remove approximately 10 mm (3/8”) of insulation from the ends of the speaker cable and twist the bare wires of the cable firmly together.
Input/output jacks and cables ■ Video/audio jacks ■ Video jacks ■ Audio jacks ❑ HDMI jacks ❑ COMPONENT VIDEO jacks ❑ OPTICAL jacks Transmit digital video and digital sound through a single jack. Use an HDMI cable. Transmit video signals separated into three components: luminance (Y), chrominance blue (PB), and chrominance red (PR). Use a component video cable with three plugs. Transmit digital audio signals. Use a digital optical cable. Remove the tip protector (if available) before using the cable.
1 2 3 TV connection 4 5 6 7 8 9 10 3 Connecting a TV Connect a TV to the unit so that video input to the unit can be output to the TV. You can also enjoy playback of TV audio on the unit. The connection method varies depending on the functions and video input jacks available on your TV. Refer to the instruction manual of the TV and choose a connection method. Does your TV support Audio Return Channel (ARC)? Yes ■ Connection Method 1 (p.
1 2 3 TV connection 4 5 6 7 8 9 10 ❑ Necessary settings To use HDMI Control and ARC, you need to configure the following settings. 3 Configure the settings for HDMI Control. For details on settings and operating your TV, refer to the instruction manual for the TV. a Enable HDMI Control on the TV and playback devices (such as HDMI Control-compatible BD/DVD player).
1 2 3 TV connection 4 5 6 7 8 9 10 ■ Connection Method 2 (HDMI Control-compatible TV) ❑ Necessary settings Connect the TV to the unit with an HDMI cable and a digital optical cable. To use HDMI Control, you need to configure the following settings. For details on settings and operating your TV, refer to the instruction manual for the TV. • The following explanation is based on the assumption that you have not changed the “HDMI” parameters (p.75) in the “Setup” menu.
1 2 3 TV connection 4 5 6 7 8 9 10 3 Configure the settings for HDMI Control. a Enable HDMI Control on the TV and playback devices (such as a HDMI Control-compatible BD/DVD player). ■ Connection Method 3 (TV with HDMI input jacks) Connect the TV to the unit with an HDMI cable and a digital optical cable. The unit (rear) HDMI OUT jack HDMI input b Turn off the TV’s main power and then turn off the unit and playback devices. c Turn on the unit and playback devices and then turn on the TV.
1 2 3 TV connection 4 5 6 7 8 9 10 ■ Connection Method 4 (TV without HDMI input jacks) ❑ VIDEO (composite video) connection (with a video pin cable) When connecting any video device to the AV 1–2 (COMPONENT VIDEO) jacks of the unit, connect the TV to the MONITOR OUT (COMPONENT VIDEO) jacks. The unit (rear) When connecting any video device to the AV 3–6 (VIDEO) jacks or the VIDEO AUX (VIDEO) jack of the unit, connect the TV to the MONITOR OUT (VIDEO) jack.
1 2 3 4 Playback device connections 5 6 7 8 9 10 4 Connecting playback devices The unit is equipped with a variety of input jacks including HDMI input jacks to allow you to connect different types of playback devices. For information on how to connect an iPod or a USB storage device, see the following pages. – Connecting an iPod (p.50) – Connecting a USB storage device (p.
1 2 3 4 Playback device connections 5 6 7 8 9 10 ■ Component video connection ■ Composite video connection Connect a video device to the unit with a component video cable and an audio cable (digital optical or digital coaxial). Choose a set of input jacks (on the unit) depending on the audio output jacks available on your video device. Connect a video device to the unit with a video pin cable and an audio cable (digital coaxial, digital optical, or stereo pin cable).
1 2 3 4 Playback device connections 5 6 7 8 9 10 ■ Changing the combination of video/audio input jacks If the combination of video/audio input jacks available on the unit does not match your video device, change its combination according to the output jacks of your device. You can connect a video device that has the following video/audio output jacks.
1 2 3 4 Playback device connections 5 6 7 8 9 10 Connecting audio devices (such as CD players) Connecting to the jacks on the front panel Connect audio devices such as CD players and MD players to the unit. Depending on the audio output jacks available on your audio device, choose one of the following connections. Use the VIDEO AUX jacks on the front panel to temporarily connect devices such as camcorders and portable audio players to the unit.
1 2 3 4 5 DAB/FM antenna connection 6 7 8 9 10 5 Connecting the DAB/FM antenna Connect the supplied DAB/FM antenna to the unit and fix the antenna ends to a wall. DAB/FM antenna The unit (rear) HDMI 1 HDMI OUT HDMI 2 HDMI 3 HDMI 4 HDMI MHL 5V (BD/DVD) 5 1A NETWORK (NET) ARC DC OUT 5V 0.
1 2 3 4 5 6 Network connections 7 8 9 10 6 Connecting to a network Connect the unit to your router with a commercially-available STP network cable (CAT-5 or higher straight cable). You can enjoy Internet radio or music files stored on media servers, such as PCs and Network Attached Storage (NAS), on the unit. • Some security software installed on your PC or the firewall settings of network devices (such as a router) may block the access of the unit to the network devices or the Internet.
1 2 3 4 5 6 7 Recording device connections 8 Power cable connection 9 10 7 Connecting recording devices You can connect video/audio recording devices to the AV OUT jacks. These jacks output analog video/audio signals selected as the input. 8 Connecting the power cable After all the connections are complete, plug in the power cable. The unit (rear) • To copy video/audio from a video device, connect the video device to the AV 5–6 jacks or VIDEO AUX (VIDEO/AUDIO) jacks of the unit.
1 2 3 4 5 6 7 8 9 Language setting 10 9 Selecting an on-screen menu language CODE SET SOURCE RECEIVER RECEIVER z Select the desired on-screen menu language from English (default), Japanese, French, German, Spanish, Russian, Italian and Chinese. HDMI 1 2 3 4 MHL 1 2 3 5 AV 4 5 6 V-AUX USB NET 1 2 AUDIO TUNER FM DAB INFO MEMORY MOVIE MUSIC PRESET TUNING Press RECEIVER z to turn on the unit. 6 To exit from the menu, press SETUP.
1 2 3 4 5 6 7 8 9 10 Automatic speaker setup 10 Optimizing the speaker settings automatically (YPAO) CODE SET SOURCE RECEIVER RECEIVER z HDMI 1 2 3 4 MHL 1 2 3 5 AV 4 5 6 V-AUX USB NET The Yamaha Parametric room Acoustic Optimizer (YPAO) function detects speaker connections, measures the distances from them to your listening position(s), and then automatically optimizes the speaker settings, such as volume balance and acoustic parameters, to suit your room.
1 2 3 4 5 6 7 8 9 10 Automatic speaker setup CODE SET SOURCE RECEIVER • To cancel the operation, disconnect the YPAO microphone, or use the cursor keys to select “Exit” and press ENTER, before starting the measurement. SOURCE/RECEIVER HDMI 1 2 3 1 2 3 4 • A speaker with a problem is indicated by blinking of the speaker indicators in the front display. • If multiple warnings are given (when operating with the front display), use the cursor keys (q/w) to check the other warning messages.
1 2 3 4 5 6 7 8 9 10 Automatic speaker setup Error messages If any error message is displayed during the measurement, resolve the problem and perform YPAO again. Auto Setup Start ERROR E-5:Noisy Error message Exit PROCEED 5% TV screen VOL. E-5:NOISY L SL SW C R SR Front display ■ Procedure to handle errors 1 Check the content of error message and press ENTER. 2 Use the cursor keys (e/r) to select the desired operation.
1 2 3 4 5 6 7 8 9 10 Automatic speaker setup Warning messages If a warning message is displayed after the measurement, you can still save the measurement results by following on-screen instructions. However, we recommend you perform YPAO again in order to use the unit with the optimal speaker settings. Auto Setup Warning message Cause W-1:Out of Phase (W-1:PHASE) Check the cable connections (+/-) of the problem speaker.
PLAYBACK CODE SET SOURCE RECEIVER HDMI 1 2 3 1 2 3 4 MHL Input selection keys 5 Basic playback procedure AV 4 5 6 V-AUX USB NET 1 Turn on the external devices (such as a TV or BD/DVD player) connected to the unit. 2 Use the input selection keys to select an input source. 3 Start playback on the external device or select a radio station. AUDIO TUNER FM DAB INFO MEMORY MOVIE MUSIC PRESET TUNING SUR.
Selecting the input source and favorite settings with one touch (SCENE) CODE SET SOURCE RECEIVER SOURCE/RECEIVER HDMI 1 2 3 4 MHL 1 2 3 Input selection keys 5 AV 4 5 6 V-AUX USB NET The SCENE function allows you to select the assigned input source, sound program, and Compressed Music Enhancer on/off with just one touch. 1 AUDIO DAB PRESET INFO MEMORY MOVIE MUSIC TUNING By default, the following settings are registered for each scene.
Selecting the sound mode CODE SET SOURCE RECEIVER The unit is equipped with a variety of sound programs and surround decoders that allow you to enjoy playback sources with your favorite sound mode (such as sound field effect or stereo playback). HDMI 1 2 3 4 MHL 1 2 3 5 AV 4 5 6 V-AUX USB NET ❑ Selecting a sound program suitable for movies AUDIO TUNER FM DAB INFO MEMORY MOVIE MUSIC PRESET TUNING SUR.
Enjoying sound field effects (CINEMA DSP) The unit is equipped with a variety of sound programs that utilize Yamaha’s original DSP technology (CINEMA DSP). It allows you to easily create sound fields like actual movie theaters or concert halls in your room. Drama This program features stable reverberations that match a wide range of movie genres, from serious dramas to musicals and comedies. The reverberations are modest, but suitably stereophonic.
■ Sound programs suitable for music/stereo playback (MUSIC) The following sound programs are optimized for listening to music sources. You can also select stereo playback. Hall in Munich This program simulates a Munich concert hall with approximately 2,500 seats that uses stylish wood for the interior finishing. Fine, beautiful reverberations spread richly, creating a calming atmosphere. The listener’s virtual seat is at the center left of the arena.
CODE SET SOURCE RECEIVER ■ Enjoying stereoscopic sound fields (CINEMA DSP 3D) Enjoying unprocessed playback CINEMA DSP 3D creates a natural stereoscopic sound field in your room. ■ Playing back in original channels (straight decode) HDMI 1 2 3 2 3 4 You can play back input sources without any sound field effect processing. MHL 1 5 AV 4 5 6 V-AUX USB NET CINEMA DSP 3D functions when both of the following conditions are met.
■ Playing back 2-channel sources in multichannel (surround decoder) CODE SET SOURCE RECEIVER The surround decoder enables unprocessed multichannel playback from 2-channel sources. When a multichannel source is input, it works the same way as the straight decode mode. HDMI 1 2 3 1 2 3 4 MHL 5 AV 4 5 6 V-AUX USB NET For details on each decoder see “Glossary” (p.98). 1 AUDIO TUNER FM DAB PRESET INFO MEMORY MOVIE MUSIC Press SUR.DECODE to select a surround decoder.
Enjoying compressed music with enhanced sound (Compressed Music Enhancer) CODE SET SOURCE RECEIVER HDMI 1 2 3 1 2 3 4 MHL 5 AV 4 5 6 V-AUX USB NET Compressed Music Enhancer adds depth and breadth to the sound, allowing you to enjoy a dynamic sound close to the original sound before it was compressed. This function can be used along with any other sound modes. AUDIO TUNER FM DAB INFO MEMORY MOVIE MUSIC PRESET TUNING SUR.
Listening to DAB radio CODE SET SOURCE RECEIVER DAB (Digital Audio Broadcasting) uses digital signals for clearer sound and more stable reception compared to analog signals. The unit can also receive DAB+ (an upgraded version of DAB) that allows for more stations using MPEG-4 audio codec (AAC+), which has a more efficient transmission method. HDMI 1 2 3 4 MHL 1 2 3 5 AV 4 5 6 V-AUX USB NET • If no DAB radio stations are found by an initial scan, the message in Step 1 appears again.
Registering favorite DAB radio stations (presets) CODE SET SOURCE RECEIVER HDMI 1 2 3 1 2 3 4 You can register up to 40 DAB radio stations as presets. Once you have registered stations, you can easily tune into them by selecting their preset numbers. MHL 5 AV 4 5 6 V-AUX USB NET DAB AUDIO TUNER FM • You can register up to 40 favorite radio stations each for DAB and FM bands. DAB PRESET INFO MEMORY MOVIE MUSIC TUNING PRESET SUR.
■ Clearing preset DAB radio stations CODE SET Clear DAB radio stations registered to the preset numbers. SOURCE RECEIVER HDMI 1 2 3 2 3 4 MHL 1 5 AV 4 5 6 V-AUX USB NET DAB AUDIO TUNER FM DAB INFO MEMORY MOVIE MUSIC PRESET 1 2 3 TUNING Press DAB to select the DAB band. Press OPTION. Use the cursor keys to select “Clear Preset” and press ENTER. Displaying the DAB information The unit can receive various types of DAB information when it is tuned into a DAB radio station.
Checking reception strength of each DAB channel label CODE SET SOURCE RECEIVER ■ DAB frequency information The unit supports Band III (174 to 240 MHz) only. HDMI 1 2 3 1 2 3 4 You can check reception strength of each DAB channel label (0 [none] to 100 [best]). MHL 5 AV 4 5 6 V-AUX USB NET DAB AUDIO TUNER FM DAB PRESET INFO MEMORY MOVIE MUSIC TUNING SUR. DECODE STRAIGHT ENHANCER 1 2 3 DIRECT SLEEP Press DAB to select the DAB band. Press OPTION.
Listening to FM radio CODE SET SOURCE RECEIVER You can tune into an FM radio station by specifying its frequency or selecting from registered radio stations. HDMI 1 2 3 4 MHL 1 2 3 5 AV 4 5 6 V-AUX USB NET Selecting a frequency for reception FM AUDIO TUNER FM DAB PRESET INFO MEMORY MOVIE MUSIC TUNING TUNING 1 DIRECT FM 87.50MHz SCENE BD DVD TV NET RETURN 2 DISPLAY POP-UP MENU MUTE MODE MODE Use the following keys to set a frequency.
Registering favorite FM radio stations (presets) CODE SET SOURCE RECEIVER • To specify the preset number from which to start the registration, press PRESET or cursor keys (q/w) to select a preset number within 5 seconds after step 4 (while “READY” is displayed) and then press ENTER (or just wait for 5 seconds). HDMI 1 2 3 2 3 4 You can register up to 40 FM radio stations as presets. Once you have registered stations, you can easily tune into them by selecting their preset numbers.
CODE SET SOURCE RECEIVER HDMI 1 2 3 1 2 3 5 6 USB NET FM AUDIO TUNER FM DAB PRESET INFO MEMORY MOVIE MUSIC TUNING PRESET ENHANCER Press PRESET repeatedly to select the desired FM radio station. 1 2 3 You can also enter a preset number (01 to 40) directly by using the numeric keys after pressing PRESET once. PRESET DIRECT Press FM to select the FM band. Press OPTION. Use the cursor keys to select “Clear Preset” and press ENTER. VOL.
Radio Data System tuning CODE SET SOURCE RECEIVER (U.K. and Europe models only) HDMI 1 2 3 1 2 3 Radio Data System is a data transmission system used by FM stations in many countries. The unit can receive various types of Radio Data System data, such as “Program Service”, “Program Type,” “Radio Text” and “Clock Time”, when it is tuned into a Radio Data System broadcasting station.
Playing back iPod music You can play back iPod music on the unit using a USB cable supplied with the iPod. Connecting an iPod Connect your iPod to the unit with the USB cable supplied with the iPod. • An iPod may not be detected by the unit or some features may not be compatible, depending on the model or software version of the iPod. • To play back iPod videos on the unit, an Apple Composite AV Cable (not supplied) is required.
Playback of iPod content CODE SET SOURCE RECEIVER Follow the procedure below to operate the iPod contents and start playback. HDMI 1 2 3 4 • To return to the previous screen, press RETURN. • To switch between the browse and playback screens during playback, press DISPLAY. MHL 1 2 3 You can control the iPod with the menu displayed on the TV screen. 5 AV 4 5 6 V-AUX USB NET USB • Operations with TV screen are available only when your TV is connected to the unit via HDMI.
■ Playback screen CODE SET SOURCE RECEIVER 1 HDMI 1 2 3 2 3 4 1 iPod Now Playing MHL 1 ■ Operating the iPod itself or remote control (simple play) 5 4 5 6 V-AUX USB NET Album Name 2 Song Title 2:30 Press MODE to switch to the simple play mode. The TV menu screen turns off and iPod operations are enabled. Artist Name AV 5:10 To display the TV menu screen, press MODE again. AUDIO TUNER [DISPLAY] to List Browse FM DAB INFO MEMORY MOVIE MUSIC PRESET TUNING SUR.
■ Repeat/shuffle settings CODE SET You can configure the repeat/shuffle settings of your iPod. SOURCE RECEIVER HDMI 1 2 3 1 2 3 4 MHL • During simple play, configure the repeat/shuffle settings directly on your iPod or press MODE to display the TV menu screen and then follow the procedure below. 5 AV 4 5 6 V-AUX USB NET AUDIO TUNER FM DAB INFO MEMORY MOVIE MUSIC PRESET When “USB” is selected as the input source, press OPTION.
Playing back music stored on a USB storage device CODE SET SOURCE RECEIVER You can play back music files stored on a USB storage device on the unit. Refer to the instruction manuals for the USB storage device for more information. HDMI 1 2 3 4 MHL 1 2 3 5 AV 4 5 6 V-AUX USB NET USB • Disconnect the USB storage device from the USB jack when it is not in use. AUDIO TUNER FM • Stop playback of the USB storage device before disconnect it from the USB jack.
2 CODE SET SOURCE RECEIVER ■ Browse screen Use the cursor keys to select an item and press ENTER. 1 HDMI 1 2 3 2 3 If a song is selected, playback starts and the playback screen is displayed. 4 MHL 1 5 AV 4 5 6 V-AUX USB NET 2 USB Now Playing AUDIO TUNER FM PRESET INFO MEMORY MOVIE MUSIC TUNING Blues Classical Electronica Jazz Pop Rock Soundtrack Speaking 3 Artist Name DAB 4 USB Top 5 1/12 [DISPLAY] to Now Playing Album Name Song Title SUR.
■ Playback screen CODE SET ■ Repeat/shuffle settings You can configure the repeat/shuffle settings for playback of USB storage device contents. SOURCE RECEIVER HDMI 1 2 3 1 2 3 USB Now Playing 4 MHL 1 5 Artist Name AV 4 5 6 V-AUX USB NET Album Name Song Title AUDIO TUNER DAB INFO MEMORY MOVIE MUSIC PRESET SUR.
Playing back music stored on media servers (PCs/NAS) CODE SET SOURCE RECEIVER 2 3 4 MHL 1 2 3 Playback of PC music contents You can play back music files stored on your PC or DLNA-compatible NAS on the unit. HDMI 1 5 Follow the procedure below to operate the PC music contents and start playback.
3 CODE SET SOURCE RECEIVER Use the cursor keys to select an item and press ENTER. ■ Browse screen 1 HDMI 1 2 3 2 3 If a song is selected, playback starts and the playback screen is displayed. 4 MHL 1 5 AV 4 5 6 V-AUX USB NET 2 SERVER Now Playing AUDIO TUNER FM PRESET INFO MEMORY MOVIE MUSIC TUNING Blues Classical Electronica Jazz Pop Rock Soundtrack Speaking 3 Artist Name DAB 4 SERVER NAS A 5 1/14 [DISPLAY] to Now Playing Album Name Song Title SUR.
■ Playback screen CODE SET ■ Repeat/shuffle settings You can configure the repeat/shuffle settings for the playback of PC music content. SOURCE RECEIVER HDMI 1 2 3 1 2 3 SERVER Now Playing 4 MHL 1 5 Artist Name AV 4 5 6 V-AUX USB NET Album Name Song Title AUDIO TUNER DAB INFO MEMORY MOVIE MUSIC PRESET SUR.
Listening to Internet radio CODE SET SOURCE RECEIVER You can listen to Internet radio stations from all over the world. HDMI 1 2 3 4 You can control the Internet radio with the menu displayed on the TV screen. MHL 1 2 3 5 AV 4 5 6 V-AUX USB NET The browse screen is displayed on the TV. • Operations with TV screen are available only when your TV is connected to the unit via HDMI. If not, carry out operations while viewing the front display.
■ Browse screen CODE SET ■ Playback screen SOURCE RECEIVER 1 HDMI 1 2 3 1 2 3 5 AV 4 5 6 V-AUX USB NET 2 4 NET RADIO Top 4 MHL 1 NET RADIO Now Playing Bookmarks Locations Genres New Stations Popular Stations Podcasts Help 5 Station Name 2 Album Name Song Title 2:30 AUDIO TUNER FM 3 DAB PRESET INFO MEMORY MOVIE MUSIC TUNING SUR.
Playing back iTunes/iPod music via a network (AirPlay) The AirPlay function allows you to play back iTunes/iPod music on the unit via network. Playback of iTunes/iPod music contents Follow the procedure below to play back iTunes/iPod music contents on the unit. iTunes PC 1 Router The unit Starts playback on iTunes or iPod Turn on the unit, and start iTunes on the PC or display the playback screen on the iPod. If the iTunes/iPod recognizes the unit, the AirPlay icon ( ) appears.
Use the following remote control keys to control playback. CODE SET • You can turn on the unit automatically when starting playback on iTunes or iPod by setting “Network Standby” (p.82) in the “Setup” menu to “On”. SOURCE RECEIVER HDMI 1 2 3 2 3 4 • You can edit the network name (the unit’s name on the network) displayed on iTunes/iPod in “Network Name” (p.82) in the “Setup” menu.
Viewing the current status CODE SET SOURCE RECEIVER HDMI 1 2 3 1 2 3 4 MHL 5 Switching information on the front display Input source group Item 1 HDMI 1–5 AV 1–6 AUDIO V-AUX Input (input source name), DSP Program (sound mode name), Audio Decoder (decoder name*) AV 4 5 6 V-AUX USB NET AUDIO TUNER Press INFO. Each time you press the key, the displayed item changes. VOL. FM DAB INFO MEMORY MOVIE MUSIC PRESET TUNING INFO SUR.
Configuring playback settings for different playback sources (Option menu) You can configure separate playback settings for different playback sources. This menu is available on the front panel (or on the TV screen), allowing you to easily configure settings during playback. 1 Press OPTION. Option menu items • Available items vary depending on the selected input source. • Text in parentheses denotes indicators on the front display. OPTION VOL.
Item Function Page Shuffle (Shuffle) Configures the shuffle setting for the iPod (p.53), USB storage device (p.56), or media server (p.59). — Volume Interlock (Interlock) Enables/disables volume controls from iTunes/iPod via AirPlay. 68 ❑ Adaptive DRC (A.DRC) Sets whether the dynamic range (from maximum to minimum) is automatically adjusted when the volume level is adjusted. When it is set to “On”, it is useful for listening to playback at a low volume at night.
■ Volume Trim (Volume Trim) ■ Signal Info (Signal Info) Fine-adjusts volume difference between input sources or subwoofer volume. Displays information about the video/audio signal. Choices ❑ Input Trim (In.Trim) Corrects volume differences between input sources. If you are bothered by volume differences when switching between input sources, use this function to correct it.
■ Audio In (Audio In) ■ Volume Interlock (Interlock) Combines the video jack of the selected input source (HDMI 1–5 or AV 1–2) with an audio jack of others. For example, use this function in the following cases. Enables/disables volume controls from iTunes/iPod via AirPlay.
CONFIGURATIONS Configuring various functions (Setup menu) You can configure the unit’s various function with the menu displayed on the TV screen. • Operations with TV screen are available only when your TV is connected to the unit via HDMI. If not, carry out operations while viewing the front display. 1 2 Press SETUP. Use the cursor keys to select a menu and press ENTER.
Setup menu items Menu Item Configuration Speaker Function Subwoofer Selects whether or not a subwoofer is connected. 72 Front Selects the size of the front speakers. 72 Center Selects whether or not a center speaker is connected and its size. 72 Surround Selects whether or not surround speakers are connected and their size. 72 Crossover Sets the lower limit of the low-frequency component that can be output from speakers whose size is set to “Small”.
Menu Item Function Page Auto Power Standby Sets the amount of time for the auto-standby function. 78 ECO Mode Enables/disables the eco mode (power saving mode). 79 Input Rename Changes the input source name displayed on the front display. 79 Dimmer Adjusts the brightness of the front display. 80 Prevents accidental changes to the settings. 80 Selects how to supply power through the DC OUT jack. 80 Information Displays the network information on the unit.
❑ Front Speaker Selects the size of the front speakers. Configures the speaker settings manually. Settings Setup Speaker Configuration HDMI Distance Sound Level ECO Equalizer Function Test Tone Small (default) Select this option for small speakers. The subwoofer will produce front channel low-frequency components (configurable in “Crossover”). Large Select this option for large speakers. The front speakers will produce all of the front channel frequency components.
❑ Crossover Sets the lower limit of the low-frequency components that can be output from a speaker whose size is set to “Small”. A frequency sound lower than the specified value will be produced from the subwoofer or front speakers. Settings 40 Hz, 60 Hz, 80 Hz (default), 90 Hz, 100 Hz, 110 Hz, 120 Hz, 160 Hz, 200 Hz • If the volume and crossover frequency are adjustable on your subwoofer, set the volume to half and crossover frequency to maximum. ❑ Subwoofer Phase Sets the phase of the subwoofer.
■ Distance Sets the distance between each speaker and listening position so that sounds from the speakers reach the listening position at the same time. First, select the unit of distance from “Meter” or “Feet”. Choices Front L, Front R, Center, Surround L, Surround R, Subwoofer Setting range 0.30 m to 24.00 m (1.0 ft to 80.0 ft), *0.05 m (0.2 ft) increments Default Front L, Front R, Subwoofer: 3.00 m (10.0 ft) Center: 2.60 m (8.6 ft) Others: 2.40 m (8.
HDMI HDMI OUT (TV) Enables/disables the audio output from a TV connected to the HDMI OUT jack. Configures the HDMI settings. Setup Speaker Settings Off (default) Disables the audio output from the TV. On Enables the audio output from the TV. Configuration HDMI ❑ Standby Through Sound ECO Function Select whether to output videos/audio (input through HDMI jacks) to the TV when the unit is in standby mode.
❑ Standby Sync Sound Select whether to use HDMI control to link the standby behavior of the TV and the unit when “HDMI Control” is set to “On”. Configures the audio output settings. Settings Off Does not set the unit to standby mode when the TV is turned off. On Sets the unit to standby mode when the TV is turned off. Auto (default) Sets the unit to standby mode when the TV is turned off only when the unit is receiving TV audio or HDMI signals.
❑ Center Width ■ Lipsync Adjusts the broadening effect of the center sound field. Higher to enhance the broadening effect, and lower to reduce it (closer to center). This setting is effective when “bPLII Music” is selected. Adjusts the delay between video and audio output. Setting range 0 to 7 Default 3 ❑ Dimension Adjusts the difference in level between the front and surround sound fields. Higher to strengthen the front sound field and lower to strengthen the surround sound field.
■ Volume ECO Configures the volume settings. Configures the power supply settings. ❑ Dynamic Range Selects the dynamic range adjustment method for bitstream audio (Dolby Digital and DTS signals) playback. Settings Setup Speaker Auto Power Standby HDMI ECO Mode Sound ECO Maximum (default) Produces audio without adjusting the dynamic range. Function Standard Optimizes the dynamic range for regular home use.
■ ECO Mode Function Enables/disables the eco (power saving) mode. When the eco mode is enabled, you can reduce the unit’s power consumption. Configures the functions that make the unit easier to use. Settings Setup Off (default) Disables the eco mode. On Enables the eco mode. Speaker Input Rename HDMI Dimmer Sound Memory Guard ECO DC OUT Function Network Language • Be sure to press ENTER to restart the unit after selecting a setting.
4 5 To change another input source name, repeat steps 1 to 3. ■ DC OUT To exit from the menu, press SETUP. Configures the DC OUT jack setting. ❑ Power Mode ■ Dimmer Selects how to supply power to the Yamaha AV accessory connected to the DC OUT jack. Adjusts the brightness of the front display. Setting range -4 to 0 (higher to brighten) Settings Default 0 Continuous (default) Supplies power through the DC OUT jack continuously regardless of the power state (on/standby) of the unit. Power Sync.
■ IP Address Network Configures the network settings. Configures the network parameters (such as IP address). ❑ DHCP Select whether to use a DHCP server. Setup Speaker Information HDMI IP Address Sound MAC Address Filter ECO DMC Control Function Network Standby Network Network Name Language Network Update Settings Off Does not use a DHCP server. Configure the network parameters manually. For details, see “Manual network settings”.
■ MAC Address Filter ■ Network Standby Sets the MAC address filter to limit access to the unit from other network devices. Selects whether the unit can be turned on from other network devices (network standby). ❑ Filter Settings Enables/disables the MAC address filter. Off (default) Disables the network standby function. On Enables the network standby function. (The unit consumes more power than when “Off” is selected.) Settings Off (default) Disables the MAC address filter.
■ Network Update Updates the firmware via the network. Language Select an on-screen menu language. ❑ Perform Update Starts the process to update the unit’s firmware. For details, see “Updating the unit’s firmware via the network” (p.89). Setup Speaker English HDMI 日本語 Français Deutsch Español Русский Italiano ❑ Firmware Version Sound Displays the version of the firmware installed on the unit. Network ECO Function Language 中文 ❑ System ID Displays the system ID number.
Selecting the remote control ID (REMOTE ID) Configuring the system settings (ADVANCED SETUP menu) REMOTE ID ID1 Configure the system settings of the unit while viewing the front display. 1 2 Change the unit’s remote control ID so that it matches the remote control’s ID (default: ID1). When using multiple Yamaha AV receivers, you can set each remote control with a unique remote control ID for its corresponding receiver. Set the unit to standby mode.
Restoring the default settings (INIT) INIT CANCEL Restores the default settings for the unit. Choices ALL Restores the default settings for the unit. CANCEL Does not perform an initialization. Checking the firmware version (VERSION) VERSION xx.xx Check the version of firmware currently installed on the unit. • You can also check the firmware version in “Network Update” (p.83) in the “Setup” menu. • It may take a while until the firmware version is displayed.
CODE SET SOURCE RECEIVER CODE SET You can use the unit’s remote control to operate external devices (such as BD/DVD players) if you have registered the remote control code of the external device. HDMI 1 2 3 4 MHL 1 2 3 5 AV 4 5 6 V-AUX USB NET TUNER DAB INFO MEMORY MOVIE MUSIC PRESET TUNING SUR. DECODE STRAIGHT ENHANCER DIRECT NET • If the unit’s remote control is without batteries for more than 2 minutes, the registered codes may be cleared.
CODE SET SOURCE RECEIVER SOURCE z CODE SET SOURCE/RECEIVER Registering the remote control codes for playback devices HDMI 1 2 3 1 2 3 4 MHL Input selection keys 5 AV 4 5 6 V-AUX USB NET AUDIO You can use the unit’s remote control to operate playback devices if you have registered their remote control codes.
CODE SET SOURCE RECEIVER CODE SET SOURCE/RECEIVER HDMI 1 2 3 2 3 4 MHL 1 Input selection keys 5 4 5 6 USB NET You can reset a remote control code registered to each input selection key. 1 AV V-AUX Resetting remote control codes SOURCE/RECEIVER blinks twice. AUDIO TUNER FM DAB INFO MEMORY MOVIE MUSIC PRESET Perform each of the following steps within 1 minute. Otherwise, the setting will be canceled. If this happens, repeat from Step 1. TUNING SUR.
Updating the unit’s firmware via the network CODE SET SOURCE RECEIVER New firmware that provides additional features or product improvements will be released as needed. If the unit is connected to the Internet, you can download the firmware via the network and update it. HDMI 1 2 3 4 MHL 1 2 3 5 AV 4 5 6 V-AUX USB NET • To cancel the operation without updating the firmware, press SETUP. 4 Note AUDIO Use the cursor keys to select “Perform Update” and press ENTER.
APPENDIX Frequently asked questions The new speaker system does not provide an ideal sound balance... If you have changed speakers or have a new speaker system, use YPAO to optimize the speaker settings again (p.30). If you want to adjust the speaker settings manually, use “Speaker” in the “Setup” menu (p.72). Since we have small children, we want to set limitations on the volume control...
Troubleshooting Refer to the table below when the unit does not function properly. If the problem you are experiencing is not listed below or if the instructions below do not help, turn off the unit, disconnect the power cable, and contact the nearest authorized Yamaha dealer or service center. First, check the following: a The power cables of the unit, TV and playback devices (such as BD/DVD players) are connected to AC wall outlets securely.
Problem The unit cannot be controlled using the remote control. Cause The unit is out of the operating range. Use the remote control within the operating range (p.4). The batteries are weak. Replace with new batteries. The unit’s remote control sensor is exposed to direct sunlight or strong lighting. Adjust the lighting angle, or reposition the unit. The remote control is set to control external devices.
Audio Problem No sound. The volume cannot be increased. Cause Remedy Another input source is selected. Select an appropriate input source with the input selection keys. Signals that the unit cannot reproduce are being input. Some digital audio formats cannot be played back on the unit. To check the audio format of the input signal, use “Signal Info” in the “Option” menu (p.67). The cable connecting the unit and playback device is defective.
Problem No sound from the TV (when HDMI Control is used). Only the front speakers work on multichannel audio. Cause Remedy The TV is set to output audio from the TV speakers. Change the audio output setting on your TV so that the TV audio is output from the speakers connected to the unit. A TV that does not support ARC is connected to the unit only with an HDMI cable. Use a digital optical cable to make an audio connection (p.19).
DAB radio Problem Cause Remedy No DAB radio reception. An initial scan has not been performed. Perform an initial scan to receive DAB radio (p.42). Reception strength of DAB radio is poor. Check reception strength in “Tune Aid” in the “Option” menu (p.45), and adjust the antenna height or orientation, or place it in a different location. There is no DAB coverage in your area. Check with your dealer or WorldDMB online at “http://www.worlddab.org” for a listing of the DAB coverage in your area.
USB and network Problem Cause Remedy The USB device is not connected to the USB jack securely. Turn off the unit, reconnect your USB device, and turn the unit on again. The unit does not detect the USB device. The file system of the USB device is not FAT16 or FAT32. Use a USB device with FAT16 or FAT32 format. Folders and files in the USB device cannot be viewed. The data in the USB device is protected by the encryption. Use a USB device without an encryption function.
Error indications on the front display Message Cause Remedy Access denied Access to the PC is denied. Configure the sharing settings and select the unit as a device to which music contents are shared (p.57). The unit cannot access the USB device. Turn off the unit and reconnect your USB device. If the problem persists, try another USB device. The unit cannot access the iPod. Turn off the iPod and turn it on again. The connected iPod is not supported by the unit.
Glossary Audio information DTS-HD High Resolution Audio ■ Audio decoding format DTS-HD High Resolution Audio is a compressed digital audio format developed by DTS, Inc. that supports 7.1-channel and 96 kHz/24-bit audio. DTS-HD High Resolution Audio remains fully compatible with the existing multichannel audio systems that support DTS Digital Surround. This technology is used for audio on BD (Blu-ray discs).
Sampling frequency/Quantization bit Sampling frequency and quantization bits indicate the quantity of information when an analog audio signal is digitized. These values are noted as in the following example: “48 kHz/24-bit”. • Sampling frequency Sampling frequency (the number of times the signal is sampled per second) is called the sampling rate. When the sampling frequency is higher, the range of frequencies that can be played back are wider.
Yamaha technologies CINEMA DSP (Digital Sound Field Processor) Since the Dolby Surround and DTS systems were originally designed for use in movie theaters, their effect is best experienced in a theater that has many speakers designed for acoustic effects. Since home conditions (such as room size, wall material, and number of speakers) can differ so widely, it is inevitable that there are differences in the sound that you hear.
Video signal flow Information on HDMI Video signals input from a video device to the unit are output to a TV as shown below. Video device The unit TV HDMI Control HDMI Control allows you to operate external devices via HDMI. If you connect a TV that supports HDMI Control to the unit with an HDMI cable, you can control the unit (such as power and volume) with TV remote control operations.
(Example) 7 HDMI Control HDMI Control Turns on and displays video from the playback device Playback starts Press SCENE (BD/DVD) To use HDMI Control, you need to perform the following HDMI Control link setup after connecting the TV and playback devices. Check that the unit is properly synchronized with the TV by turning off the TV or adjusting the TV volume with the TV remote control. • If HDMI Control does not work properly, try unplugging the TV in Step 2 and plugging in the TV again in Step 3.
HDMI signal compatibility Audio signals Audio signal type Audio signal format Compatible media (example) 2ch Linear PCM 2ch, 32 to 192 kHz, 16/20/24 bit CD, DVD-Video, DVD-Audio Multichannel Linear PCM 8ch, 32 to 192 kHz, 16/20/24 bit DVD-Audio, BD (Blu-ray disc), HD DVD DSD 2 to 5.1ch, 2.
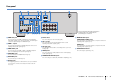
Reference diagram (rear panel) HDMI 1 HDMI OUT HDMI 2 HDMI 3 HDMI 4 HDMI 5 MHL 5V 1A (BD/DVD) NETWORK (NET) ARC DC OUT 5V 0.5A ANTENNA (RADIO) COMPONENT VIDEO DAB/FM 75 PR PR PB SPEAKERS PB FRONT Y COMPONENT VIDEO CENTER SURROUND Y VIDEO MONITOR OUT OPTICAL COAXIAL COAXIAL OPTICAL AV 1 AV 2 AV 3 AV 4 ( TV ) AV 5 AV 6 AV OUT AUDIO SUBWOOFER PRE OUT • The area around the video/audio output jacks is marked in white on the actual product to prevent improper connections.
Trademarks Android™ Android is a trademark of Google Inc. Manufactured under license from Dolby Laboratories. Dolby, Pro Logic and the double-D symbol are trademarks of Dolby Laboratories. This receiver supports network connections. The unit supports DAB/DAB+ tuning. Manufactured under license under U.S. Patent Nos: 5,956,674; 5,974,380; 6,226,616; 6,487,535; 7,212,872; 7,333,929; 7,392,195; 7,272,567 & other U.S. and worldwide patents issued & pending.
Specifications Input jacks HDMI • Analog Audio • HDMI features: Deep Color, “x.v.
Audio Section • Rated Output Power (2-channel driven) (20 Hz to 20 kHz, 0.09% THD, 6 ) Front L/R .................................................................80 W+80 W • Tone Control Characteristics Bass Boost/Cut............................. ±6 dB/0.5 dB Step at 50 Hz Bass Turnover ............................................................... 350 Hz Treble Boost/Cut..........................±6 dB/0.5 dB Step at 20 kHz Treble Turnover..............................................................3.
Index Symbols ★/★★ keys 10 Envelope icon (p) 89 Lock icon (o) 80 Automatic speaker setting optimization 30 Automatic station preset (FM radio) 47 AutoPowerStdby (ECO, Setup menu) 78 AV OUT jack 9 Configuration (Speaker, Setup menu) 72 Crossover (Speaker, Setup menu) 73 Crossover frequency setting 73 Crossover frequency setting (subwoofer) 30 Numerics B D 2.1-channel system 13 2ch Stereo (sound program) 38 3.1-channel system 13 4.1-channel system 13 4K signal (video signal resolution) 5.
Front panel (part names and functions) Front panel jack connection 25 Function (Setup menu) 79 Dolby Pro Logic II Music (surround decoder) 40 Drama (sound program) 37 DSD (Direct Stream Digital) 98 DSP Level (DSP/Surround, Option menu) 66 DSP Parameter (Sound, Setup menu) 76 DSP Program (front display information) 64 DSP/Surround (Option menu) 66 DTS Neo:6 Cinema (surround decoder) 40 DTS Neo:6 Music (surround decoder) 40 Dynamic Range (Volume, Setup menu) 78 G GEQ (Equalizer, Setup menu) 74 H Hall in M
N NAS (Network Attached Storage) 27 NAS connection 27 NAS content playback 57 Network (Setup menu) 81 Network Attached Storage (NAS) 27 Network cable 27 Network connection 27 Network information 81 Network Name (Network, Setup menu) 82 Network Standby (Network, Setup menu) 82 Network Update (Network, Setup menu) 83 No content (error indication) 97 No device (error indication) 97 No Front SP (YPAO error message) 32 No MIC (YPAO error message) 32 No Signal (YPAO error message) 32 No Sur.
STP network cable 27 STRAIGHT (sound mode) 39 Straight decode 39 Subnet Mask (Information, Setup menu) 81 Subnet Mask (IP Address, Setup menu) 81 Subwoofer (Speaker, Setup menu) 72 Subwoofer connection 15 Subwoofer Phase (Speaker, Setup menu) 73 Subwoofer Trim (Volume Trim, Option menu) 67 SUR.DECODE (sound mode) 40 Surround (Speaker, Setup menu) 72 Surround decoder 40 SW.
© 2013 Yamaha Corporation YF215A0/EN