
Owner's Manual


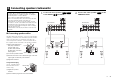
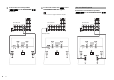
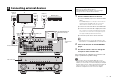
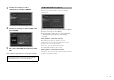


Table Of Contents
- Easy Setup Guide
- Owners Manual (Supplied on CD-ROM)
- Video Signal Flow / Conversion
- HDMI Information
- Features
- Optimizing the Speaker Settings Automatically (YPAO)
- Table of Contents
- Supplied Accessories
- Parts & Controls
- Preparations
- Speaker Layout
- Setting Speaker Impedance
- Connecting Speakers
- Jacks & Cable Types
- Connecting a TV
- Connecting Playback Devices
- Front Panel Connections
- Connecting the FM / AM Antennas
- Connecting to a Network
- Connecting an External Power Amplifier
- Connecting Recording Devices
- Connecting a Device Compatible with the Trigger Function
- Multi-Zone Connections
- Power Cable
- Selecting an On-Screen Menu Language
- Optimizing the Speaker Settings Automatically (YPAO)
- Playback
- Basic Playback Procedure
- Selecting the Input Source and Favorite Settings with One Touch (SCENE)
- Selecting the Sound Mode
- Listening to FM / AM Radio
- iPod
- USB Devices
- Playing Back Music Stored on Media Servers (PC / NAS)
- Listening to Internet Radio
- Playing Back iTunes / iPod Music via a Network (AirPlay)
- Playing Back Music in Multiple Rooms
- Viewing the Current Status
- Configuring Playback Settings for Different Playback Sources (Option Menu)
- Programming the Remote Control
- Configurations
- Updating the Unit’s Firmware
- Updating the Unit’s Firmware via the Network
- Video Signal Flow / Conversion
- HDMI Information
- Troubleshooting
- Error Messages
- FAQs
- Glossary
- Specs
- Index
- List of Remote Control Codes (Supplied on CD-ROM)
- Using the Pandora Service (Supplied on CD-ROM)
- Multi-Zone and Remote Control Functions
- Supplement for Web Control
- Using the Rhapsody Service
- Supplement for SiriusXM Internet Radio (Firmware Required for this Feature)
- Software Information
- Scan of CD-ROM
- Warranty

En 3
■ Connecting speaker cables
Speaker cables have two wires. One is for connecting the
negative (–) terminals of the unit and the speaker, and the
other is for the positive (+) terminals. If the wires are
colored to prevent confusion, connect the black wire to
the negative and the other wire to the positive terminals.
a Remove approximately 10
mm (3/8”) of insulation
from the ends of the
speaker cable and twist
the bare wires of the cable
firmly together.
b Loosen the speaker terminal.
c Insert the bare wires of the cable into the gap on the side
(upper right or bottom left) of the terminal.
d Tighten the terminal.
Using a banana plug
(U.S.A., Canada, China,
Australia and General
models only)
a Tighten the speaker
terminal.
b Insert a banana plug into the end of the terminal.
1
Connect the front speakers (1/2)
to the FRONT (//\) terminals.
2
Connect the center speaker (3) to the
CENTER terminal.
3 Connecting speakers/subwoofer
• Under its default settings, the unit is configured for 8-ohm
speakers. When connecting 6-ohm speakers, set the unit’s
speaker impedance to “6 MIN”. For details, see “Setting the
speaker impedance” in “Owner’s Manual”.
• Use a subwoofer equipped with built-in amplifier.
• Before connecting the speakers, remove the unit’s power cable
from the AC wall outlet and turn off the subwoofer.
• Ensure that the core wires of the speaker cable do not touch
each other or come into contact with the unit’s metal areas. This
may damage the unit or the speakers. If the speaker cables
short circuit, “Check SP Wires” will appear on the front display
when the unit is turned on.
• The illustrations of the unit (rear) used in this section are of the
RX-V775.
FRONT
aa
b
d
c
– (black)
+ (red)
FRONT
a
b
Banana plug
FRONT CENTER SURROUND
SINGLE
SURROUND BACK/BI-AMP
SPEAKERS
SUBWOOFER
CENTER
ZONE2/F.PRESENCE
EXTRA SP
CENTER
1
2
12
3
45
9
The unit (rear)
FRONT CENTER SURROUND
SINGLE
SURROUND BACK/BI-AMP
SPEAKERS
SUBWOOFER
CENTER
ZONE2/F.PRESENCE
EXTRA SP
CENTER
1
2
12
3
45
9
The unit (rear)