Owner’s Manual EN
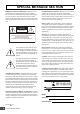
SPECIAL MESSAGE SECTION PRODUCT SAFETY MARKINGS: Yamaha electronic products may have either labels similar to the graphics shown below or molded/stamped facsimiles of these graphics on the enclosure. The explanation of these graphics appears on this page. Please observe all cautions indicated on this page and those indicated in the safety instruction section. CAUTION RISK OF ELECTRIC SHOCK DO NOT OPEN CAUTION: TO REDUCE THE RISK OF ELECTRIC SHOCK. DO NOT REMOVE COVER (OR BACK).
Explanation of Graphical Symbols CAUTION The lightning flash with arrowhead symbol within an equilateral triangle is intended to alert the user to the presence of uninsulated “dangerous voltage” within the product’s enclosure that may be of sufficient magnitude to constitute a risk of electric shock to persons. RISK OF ELECTRIC SHOCK DO NOT OPEN CAUTION: TO REDUCE THE RISK OF ELECTRIC SHOCK. DO NOT REMOVE COVER (OR BACK). NO USER-SERVICEABLE PARTS INSIDE. REFER SERVICING TO QUALIFIED SERVICE PERSONNEL.
PRECAUTIONS PLEASE READ CAREFULLY BEFORE PROCEEDING * Please keep this manual in a safe place for future reference. WARNING Always follow the basic precautions listed below to avoid the possibility of serious injury or even death from electrical shock, short-circuiting, damages, fire or other hazards. These precautions include, but are not limited to, the following: Power supply/Power cord Water warning • Only use the voltage specified as correct for the instrument.
Connections Saving data • Before connecting the instrument to other electronic components, turn off the power for all components. Before turning the power on or off for all components, set all volume levels to minimum. Also, be sure to set the volumes of all components at their minimum levels and gradually raise the volume controls while playing the instrument to set the desired listening level.
Welcome A message from the S90 XS/S70 XS Development Team Thank you for purchasing the Yamaha S90 XS/S70 XS Music Synthesizer. We’re extremely proud to introduce the new S90 XS/S70 XS as the successor to the original S90 ES. Equipped with exceptionally high-quality musical instrument sounds and a real piano-feel response, this is truly the instrument of choice for musicians and players worldwide, whatever the genre.
S90 XS/S70 XS Main Features Huge amount of waveforms and vast sound selection, including top-quality piano sounds The S90 XS/S70 XS features a whopping 142 MB of exceptionally high-quality piano waveforms, including many newly sampled sounds, and a vast variety of Voices directly derived from the flagship MOTIF XS Music Production Synthesizer-giving you a total of 456 MB of available waveforms.
About this Manual Owner’s Manual (this book) Explains operations of the top panel controls. PDF documentation (includes the Owner’s Manual CD-ROM) Reference Manual Explains in detail about the sound-related parameters and effect parameters. Data List This contains various important lists such as the Voice List, Wave List, Multi List, MIDI Implementation Chart, Performance List, Master Program List, Mixing Template List, Arpeggio Type List and Remote Control Function List.
Contents Welcome............................................................................... 6 Using a Connected Computer .................................... 36 Accessories .......................................................................... 6 Connecting to a computer ..................................................36 About the accessory disk ..................................................... 6 Using as a multi-timbral tone generator (Multi mode) ........38 S90 XS/S70 XS Main Features..
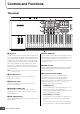
Controls and Functions Top panel ! 8 @ 7 6 # 5 $ 4 9 2 ) % ^ & * 3 A-1 B-1 C0 D0 E0 F0 G0 A0 B0 C1 C2 1 1 Keyboard 6 INPUT GAIN knob The S90 XS features a 88-key keyboard, while the S70 XS has 76 Use this to adjust the input gain of the audio signals at the MIC keys. All are equipped with a touch response feature (both initial INPUT jack. Depending on the connected microphone, you may touch and after touch).
Controls and Functions ¤ ( B H ¥ ¦ J I Ú KL M Û O D N E A F C3 Ü Ý C G C4 ß P C5 C6 C7 [PART ON/OFF] 1 – 4 buttons 9 Slider Function button These buttons turn each Part on and off. In the Voice mode, Pressing this button changes the functions assigned to the four only Part 1 is available and is always turned on. Sliders. The lamp next to the currently active parameters will [ARP ON/OFF] button Turns the “Arp Switch” (a common parameter) on/off.
Controls and Functions * TRANSPOSE [-]/[+] buttons @ ! Use these buttons to raise or lower the pitch of the note by one semitone. To restore the normal octave setting, press both buttons simultaneously. ( LCD (Liquid Crystal Display) The backlit LCD displays the parameters and values related to the currently selected operation or mode. # $ % B ^ & * E D ! Knob Function buttons C Pressing these buttons change the functions assigned to the four Knobs.
Controls and Functions E Cursor buttons K L The cursor buttons move the “cursor” around the LCD display J screen, highlighting and selecting the various parameters. F [EXIT] button O M The menus and displays of the S90 XS/S70 XS are organized N according to a hierarchical structure. Press this button to exit from the current display and return to the previous level in the hierarchy. Also use it to cancel a Job or a Store operation.
Controls and Functions P Number [1] – [16] buttons N Use of these buttons differs depending on the on/off status of the [PART], [MUTE] and [SOLO] buttons.
Controls and Functions Rear Panel 3 1 2 4 5 8 9 6 7 ) ! 1 P (Power switch) The USB TO DEVICE connector is used to connect this Press to turn power ON (O) or OFF (N). instrument to a USB storage device (hard disk drive, CD-ROM drive, flash disk, etc.) via USB. This lets you save the data 2 AC IN socket Connects to the included power cord. Use only the AC power cord supplied with the S90 XS/S70 XS.
Setting Up Power Supply Connect the supplied AC power cord in the following order. Make sure the Power switch on the S90 XS/S70 XS is set to OFF. 1 Connect the supplied power cord to the AC IN on the instrument’s rear panel. 2 Connect the other end of the power cord to an AC outlet. Connecting speakers or headphones Since the S90 XS/S70 XS has no built-in speakers, you will need to monitor the sound of the instrument by using external equipment.
Setting Up Adjusting the volume and the brightness of the display The top of the Master Play display indicates the Master program number and the status (Mode, Bank, Program Number and its name) registered to the current Master program. NOTE For details about Banks, see pages 21 and 32. Adjust the volume levels of the S90 XS/S70 XS and the connected amplifier/speaker system.
Setting Up Resetting the User Memory to the Initial Factory Settings The S90 XS/S70 XS has a Factory Set function for restoring your S90 XS/S70 XS’s memory to the factory default settings. This lets you restore the S90 XS/S70 XS’s default program, as well as its System and other settings. CAUTION When the factory settings are restored, all the data that you created in each mode or saved to internal flash memory will be erased. Take care so as not to lose important data.
Start Guide Modes There are several operation modes in the S90 XS/S70 XS, and they can be selected by using the seven mode buttons. These modes include: Voice, Performance, Multi, Master and Sequence Play. Depending on the selected mode, you can play and perform on the keyboard and create your own original music. If you want to play the keyboard conventionally, use the Voice or Performance mode. If you’re creating music, particularly multi-part arrangements, use the Multi mode.
Basic Instructions Voices—the basic building blocks of the S90 XS/S70 XS Voices—created in the Voice mode—are the basic sonic building blocks for the other modes of this instrument. The Performance and Multi programs are made up of different Voices. This instrument features an exceptionally wide variety of preset Voices for playing in virtually any musical style. Try searching through the Voices to find your favorites.
Playing the Keyboard in the Voice mode In the Voice Play display (the top display of the Voice Mode), you can select and play a single Voice. The Voices of this instrument are divided into the following two types: Voice Play display, you can select the desired Voice from various Voice Banks and play it. NOTE For details about the Voice, refer to “Basic Structure.” For a list of the Preset Voices, refer to the separate Data List PDF file.
Playing the Keyboard in the Voice mode Using the Category Search function The Voices are conveniently divided into specific Categories, irrespective of their bank locations. The categories are divided based on the general instrument type or sound characteristics. The Category Search function gives you quick access to the sounds you want. 1 Press the [CATEGORY SEARCH] button in the Voice Play display.
Playing the Keyboard in the Voice mode Selecting a Voice from the Favorite Category Changing the tonal qualities of the Voice 1 Knobs 1 – 4 let you adjust a variety of parameters for the current Voice, such as effect depth, attack/release characteristics, timbre, and others. Five functions can be assigned to each Knob, alternatively selected via the Knob Function buttons. Press the [FAVORITE] button in the Voice Play display. The list of Voices registered to the Favorite Category will be shown.
Playing the Keyboard in the Voice mode Adjusting the Element level The Edit (E) Indicator When changing the value of the parameter in the Voice/ Performance/Multi Play or Edit display, the Edit Indicator will appear on the top right corner of the LCD. This gives a quick confirmation that the current Voice/Performance/ Multi has been modified but not yet stored. To store the current edited status, follow the instructions. Voice Editing 1 Press the [EDIT] button in the Voice mode.
Playing the Keyboard in the Voice mode 4 Move the cursor to “Effect” then press the [ENTER] button. 8 The Voice Edit Effect display appears. Move the cursor to “Preset” then select the Preset by using the data dial. The Preset includes the typical settings of parameters for the currently selected Effect Type. Try out several Presets so that you can find how each Effect affects the sound.
Playing the Keyboard in the Voice mode Using the Arpeggio function The Arpeggio function automatically triggers preset arpeggio phrases, riffs, and rhythmic patterns according to the notes you play. It not only provides inspiration and full rhythmic passages over which you can perform, it gives you quality MIDI data you can use in creating songs, or fully formed backing parts to be used in your live performances. You can assign the desired five Arpeggio Types to each Voice.
Playing the Keyboard in the Voice mode 6 After finding the favorite pattern, press the [STORE] button to store the setting as a User Voice. Copying the Arpeggio Type to another Arpeggio part Follow the instruction to copy the Arpeggio Type assigned to the Arp 1 to the Arp 2 – 5. 1 Select “ARP SELECT” by pressing the Arpeggio/Effect Function button. 2 Press the Function [1] button. 3 Press one of the Function [2] – [5] buttons while holding down the [STORE] button.
Creating a New Performance by Using Your Favorite Voice (Performance Creator) This instrument features a convenient Performance Creator function which lets you create a new Performance by using favorite Voices you’ve found in the Voice mode. This function lets you copy parameter settings associated with the Voice (such as Effects) to the Performance—allowing you to quickly and easily come up with precisely the sound you want.
Creating a New Performance by Using Your Favorite Voice (Performance Creator) Split—Playing two different Voices with your left and right hands 4 This section shows you how to create a Performance in which the keyboard is divided into two sections—the lefthand section and the right-hand. The lowest note of the right-hand section is referred to as the “Split Point.” By creating such a Performance, you can play a bass part with your left hand, and a piano part with your right, for example.
Creating a New Performance by Using Your Favorite Voice (Performance Creator) Drum Assign—Layering a drum Part with the current Voice This section explains how to create a Performance in which you can trigger a drum pattern (via the Arpeggio function) in addition to the current Voice. 1 Select a Voice in the Voice mode. Changing the drum pattern (Arpeggio Type) Executing the Drum Assign function will assign the Drum Voice to Part 4 and set the Arpeggio of Part 4 to on.
Creating a New Performance by Using Your Favorite Voice (Performance Creator) 9 Find your favorite pattern by changing the Main Category/Sub Category/Type with the data dial. 5 Select the desired character by using the data dial and cursor buttons then press the [INC] button to enter the selected character. To cancel the selected character, press the [DEC] button. You can enter up to 20 alphanumeric characters. You can change the pattern of the Arp 2 – 5 via the same operation.
Playing the Keyboard in the Performance Mode Selecting a Performance Selecting a Performance is done in basically the same way as selecting a Voice. The Category Search function is available also in the Performance Play mode. Note that the S90 XS/S70 XS has no Preset Performances and provides only three User Banks.
Singing with a Connected Microphone By connecting a microphone to the MIC INPUT jack (combo jack) located on the rear panel of this instrument, you can enjoy singing along with your own performance. You can also apply the built-in Effects to this signal input via the MIC INPUT jack, including the distinctive Vocoder Effect. The example below assumes you want to sing while playing the keyboard. 1 Connect the microphone to the MIC INPUT jack on the rear panel.
Recording/Playing Back with a USB Storage Device (Audio Record/Play Mode) The Audio Record/Play mode lets you record your keyboard performance as audio data. The recorded audio data will be saved as an audio file to the root directory of the external USB storage device or internal flash memory, allowing you to play back the audio file from the specified storage. Recording 4 In this section, you’ll learn how to record your keyboard performance as a stereo Wave file (of 44.1kHz/16-bit).
Recording/Playing Back with a USB Storage Device (Audio Record/Play Mode) 8 Press the [ENTER] button when the “Save Audio Rec file?” message appears. Playing back the recording Your performance is saved as an audio file to the root Now that you’ve recorded the audio of your keyboard performance, try playing back the file. directory of the USB storage device. Completing the save operation calls up the Audio Play display.
Using a Connected Computer By connecting this instrument to a computer, you can take advantage of the following functions and applications. • External tone generator for DAW software and MIDI keyboard • Remote Controller of the DAW software • More detailed Voice Editing from the computer (S90 XS/S70 XS Editor) Connecting to a computer 3 The USB cable and USB-MIDI Driver are necessary to connect the S90 XS/S70 XS to the computer. Follow the instructions below.
Using a Connected Computer Precautions when using the USB TO HOST terminal You must observe the following points when connecting the S90 XS/S70 XS to your computer via the USB TO HOST connector. Failure to do so can cause the instrument and/or the computer to hang up (freeze), possibly causing corruption or loss of data. If the computer or S90 XS/S70 XS freezes, turn the power to the S90 XS/S70 XS off and then on, then restart the computer.
Using a Connected Computer Using as a multi-timbral tone generator (Multi mode) Remote-controlling the software (Remote mode) The instructions below show how to use this instrument as a MIDI tone generator. In this case, actual MIDI sequence data is transmitted from a DAW or sequencer on the computer, allowing you to avoid using software synths and save processing power on your computer.
Using a Connected Computer Setting up for Remote Control NOTE Before making the setup of DAW Remote, make sure to install the USB-MIDI Driver and the S90 XS/S70 XS Remote Tools correctly. SONAR 1 Pull down the [Options] menu and select [MIDI Devices] to call up the “MIDI Devices” window. 2 Add “Yamaha S90 XS (S70 XS)-2” to the Input Device, then add “Yamaha S90 XS (S70 XS)-2” to the Output Device. 3 Pull down the [Options] menu and select [Control Surfaces] to call up the Control Surface window.
Using a Connected Computer Editing a Control Template Use the S90 XS/S70 XS Remote Editor for editing the Control Template. The S90 XS/S70 XS Remote Editor can be downloaded from the following URL: http://www.yamahasynth.com/download/ For instructions on using the S90 XS/S70 XS Remote Editor, refer to the PDF manual included with the software.
Playing the Keyboard Along with Playback of the MIDI File The Multi mode/Sequence Play mode should be used when you want to play the keyboard along with playback of the MIDI file. This instrument is equipped with a 16-track sequencer for playback, allowing you to play back MIDI data of up to 16 tracks. Before executing the instructions below, prepare the MIDI file (via DAW software or other means) then save it to a USB storage device. You should also create an appropriate Multi for playback.
Playing the Keyboard Along with Playback of the MIDI File 9 Press the [EXIT] button a number of times to go back to the Sequence Play mode. Audio file selection can be done via the same operation. 10 Move the cursor to the Chain Step 003 by using the cursor buttons then select “end” by using the data dial and [DEC]/[INC] button. 11 Select the Part for your keyboard performance by pressing one of the [1] – [16] buttons.
Using as a Master Keyboard (Master Mode) The Master mode lets you: • Create and store up to 128 programs, each containing a Voice, a Performance or a Multi, and of which can be instantly called up for use. • Assign up to four separate Zones in each Master program for use as a master keyboard. You can use the Master mode to memorize the settings you use most often including the information on which mode is used, and call up these settings instantly anytime you need them with a single button press.
Using as a Master Keyboard (Master Mode) 3 Press the [EDIT] button. 8 The Master Edit Select display appears. Select “Zone 1” by using the cursor buttons then press the [ENTER] button. The Zone Edit Select display appears. 4 Select “Common” then press the [ENTER] button. 9 The Common Edit display appears. 5 Make the settings of the Zone 1 in the respective Transmit, Note, Preset and Knb/ Sldr displays. Transmit display Select “Zone Sw” then press the [ENTER] button.
Making Global System Settings (Utility Mode) In the Utility mode, you can set parameters that apply to the entire system of this instrument. To enter the Utility mode, press the [UTILITY] button. Pressing the [EXIT] button returns to the original display. This section describes some useful functions in the Utility mode. Setting the default mode when turning the power on Micro Tuning General Power on Mode Tunes the individual notes of the keyboard.
Making Global System Settings (Utility Mode) Changing the panel lock settings Panel Lock Determines the buttons which are “locked” or become unavailable when pressing the [PANEL LOCK] button on the panel. When the check mark is removed from the check box, the corresponding button is available even if Panel Lock is turned on. Quick Setup Quick Set This lets you call up the parameter settings about the external connection in the Performance mode/Multi mode simply by selecting the one from the Preset.
Saving/Loading Data (File Mode) In the File mode, you can save/load the data such as Voice and Performance created on this instrument. To enter the File mode, press the [FILE] button. This section explains how to save/load all the data on the user memory of this instrument as an “All” file (extension: X2A). Saving the settings to a USB storage device 5 Select the desired directory then press the [ENTER] button.
Saving/Loading Data (File Mode) Loading the settings from a USB storage device 6 Select the desired data type then press the [ENTER] button. To load all the Voices or Performances to all the internal User Banks, select “Voice” or “Performance” then press the 1 [ENTER] button. To load a specific Voice Bank or Connect a USB storage device to the USB TO DEVICE terminal of this instrument.
Saving/Loading Data (File Mode) USB storage devices Connection Examples USB storage device such as hard disk drive USB flash memory or USB TO DEVICE terminal S90 XS/S70 XS Compatible USB devices Connect only a USB storage device (such as hard disk, CD-ROM, flash memory and other drives) to the USB TO DEVICE connector. Other USB devices such as a computer keyboard or mouse cannot be used. Both buspowered (powered by the host device) or self-powered (battery or external power supply) types can be used.
Appendix Display Messages LCD Indication All data is initialized upon power-on. Continue? Confirms whether you want to turn on the “Power on auto factory set switch” parameter or not. Are you sure? Confirms whether you want to execute a specified operation or not. Assign Vocoder Voice to Part 1.
Display Messages LCD Indication Description Load All. Are you sure? Confirms whether you want to load the “All” or not in the File mode. Load Seq Chain file. Are you sure? Confirms whether you want to load the “Seq Chain file” or not in the File mode. MIDI buffer full. Failed to process the MIDI data because too much data was received at one time. MIDI checksum error. An error occurred when receiving bulk data. Mixing Voice full.
Troubleshooting The following table provides troubleshooting hints and page references for some common problems. You may solve your problem by executing the Factory Set (page 18) after backing up your data to an external storage device. If the problem persists, then contact your Yamaha dealer or service center (page 63). No Sound Is the S90 XS/S70 XS properly connected to related external equipment (e.g.
Troubleshooting Are the parameter settings such as Element Switch, Part Switch, Note Limit and Velocity Limit appropriate? [VOICE] [EDIT] [MUTE] (lighting) Number [9] – [16] buttons [PERFORM] [PART ON/OFF] [PERFORM] [EDIT] Part selection Play Mode Note Limit Lo/Hi [PERFORM] [EDIT] Part selection Play Mode Velocity Limit Lo/Hi When the Performance/Multi produces no sound, has a Voice been assigned to each Part? [PERFORM] [EDIT] Part selection Voice [MULTI/SEQ PLAY] (select
Troubleshooting Playback continues without stopping When the [ARP ON/OFF] button is turned on, press it so that its lamp is turned off. In Sequence Play Mode, press the [START/STOP] button. When the click (metronome) sound continues, hold down the [SHIFT] button and press the [START/STOP] button to stop the sound. The sound is distorted Are the effect settings appropriate? Use of an effect at certain settings may produce distortion.
Troubleshooting Wrong pitch or unexpected pitch Is the Tune parameter in the Utility mode set to a value other than “0”? [UTILITY] General Tune Is the Note Shift parameter in the Utility mode set to a value other than “0”? [UTILITY] General Note Shift When the Voice produces a wrong pitch, is the appropriate tuning system selected from Micro Tune parameter in the Voice Edit mode? [UTILITY] Micro Tune When the Performance/Multi produces a wrong pitch, is the Note Shift parameter of each
Troubleshooting Cannot start the Arpeggio Check whether the [ARP ON/OFF] button is turned on or off. Is the MIDI Sync parameter set to auto or internal (using internal clock)? [UTILITY] MIDI MIDI sync Have you selected a User Arpeggio type (with no User Data)? To use the User Arpeggios, the User Arpeggio data created in the MOTIF XS must be loaded to the S90 XS/S70 XS.
Troubleshooting MIDI bulk data transmission/reception does not work properly Is the Receive Bulk parameter set to off? Set the Receive Bulk parameter to on. [UTILITY] [MIDI] Receive Bulk If the data was saved with the Bulk Dump function of the S90 XS/S70 XS, you need to set the Device Number to the same number before Bulk Dump transmission. [UTILITY] [MIDI] Device No.
Specifications Keyboard Tone Generator S90 XS S70 XS 88 keys, Balanced Hammer Effect Keyboard (Initial Touch/Aftertouch) 76 keys, Balanced Hammer Effect Keyboard (Initial Touch/Aftertouch) AWM2 with Expanded Articulation Maximum polyphony Multi-Timbral Capacity 456 MB (when converted to 16-bit linear format), 2,772 waveforms Voice Preset: 1,024 normal voices + 64 drum kits GM: 128 normal voices + 1 drum kits User: 128 x 4 (Bank 1 – 3: selected and copied from Preset bank) Normal Voice + 32 drum ki
Index A G Arp 1 – 5 ........................................................................ 26 Arp 1 – 5 Type ............................................................... 26 [ARP ON/OFF] ............................................................... 26 ARP SELECT.................................................................. 27 Arp Select ...................................................................... 26 Arpeggio........................................................................
Index O W Owner’s Manual CD-ROM ............................................... 8 Write-protect .................................................................. 57 P Z [PANEL LOCK] .............................................................. 46 Panel Lock ..................................................................... 46 [PART SELECT] ............................................................. 32 PDF documentation ......................................................... 8 Performance ...
ATTENTION SOFTWARE LICENSE AGREEMENT PLEASE READ THIS SOFTWARE LICENSE AGREEMENT (“AGREEMENT”) CAREFULLY BEFORE USING THIS SOFTWARE. YOU ARE ONLY PERMITTED TO USE THIS SOFTWARE PURSUANT TO THE TERMS AND CONDITIONS OF THIS AGREEMENT. THIS AGREEMENT IS BETWEEN YOU (AS AN INDIVIDUAL OR LEGAL ENTITY) AND YAMAHA CORPORATION (“YAMAHA”). BY BREAKING THE SEAL OF THIS PACKAGE YOU ARE AGREEING TO BE BOUND BY THE TERMS OF THIS LICENSE.
FCC INFORMATION (U.S.A.) 1. IMPORTANT NOTICE: DO NOT MODIFY THIS UNIT! This product, when installed as indicated in the instructions contained in this manual, meets FCC requirements. Modifications not expressly approved by Yamaha may void your authority, granted by the FCC, to use the product. 2. IMPORTANT: When connecting this product to accessories and/or another product use only high quality shielded cables. Cable/s supplied with this product MUST be used. Follow all installation instructions.
For details of products, please contact your nearest Yamaha representative or the authorized distributor listed below. Pour plus de détails sur les produits, veuillez-vous adresser à Yamaha ou au distributeur le plus proche de vous figurant dans la liste suivante. NORTH AMERICA CANADA Yamaha Canada Music Ltd. 135 Milner Avenue, Scarborough, Ontario, M1S 3R1, Canada Tel: 416-298-1311 U.S.A. Yamaha Corporation of America 6600 Orangethorpe Ave., Buena Park, Calif. 90620, U.S.A.
Yamaha Web Site (English only) http://www.yamahasynth.com/ Yamaha Manual Library http://www.yamaha.co.jp/manual/ U.R.G., Pro Audio & Digital Musical Instrument Division, Yamaha Corporation © 2009 Yamaha Corporation WR49520 909MWDH?.