
User Manual
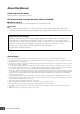
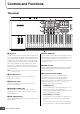
Table Of Contents
- Welcome
- Accessories
- About the accessory disk
- S90 XS/S70 XS Main Features
- About this Manual
- Contents
- Controls and Functions
- Setting Up
- Start Guide
- Modes
- Basic Instructions
- Playing the Keyboard in the Voice mode
- Creating a New Performance by Using Your Favorite Voice (Performance Creator)
- Playing the Keyboard in the Performance Mode
- Singing with a Connected Microphone
- Recording/Playing Back with a USB Storage Device (Audio Record/Play Mode)
- Using a Connected Computer
- Playing the Keyboard Along with Playback of the MIDI File
- Using as a Master Keyboard (Master Mode)
- Making Global System Settings (Utility Mode)
- Saving/Loading Data (File Mode)
- Appendix
- Display Messages
- Troubleshooting
- No Sound
- No sound from the MIC INPUT jack
- Split does not work via the external MIDI device
- Playback continues without stopping
- The sound is distorted
- Sound is cut off
- Only one note sounds at a time
- Wrong pitch or unexpected pitch
- No effect is applied
- Vocoder does not work when selecting a Vocoder Voice
- The Edit Indicator appears, even when parameters are not being edited
- Cannot start the Arpeggio
- Cannot stop the Arpeggio
- The Voice assigned to the Performance produces a different sound from the one in the Voice mode
- Data communication between the computer and the S90 XS/S70 XS does not work properly
- The S90 XS/S70 XS does not sound properly even when playing back the song data on the computer or the MIDI instrument connected to the S90 XS/S70 XS
- MIDI bulk data transmission/reception does not work properly
- Cannot save data to the external USB storage device
- Cannot play an audio file
- Cannot enter the Edit mode
- Specifications
- Index

S90 XS/S70 XS Owner’s Manual
10
Controls and Functions
Top panel
1 Keyboard
The S90 XS features a 88-key keyboard, while the S70 XS has 76
keys. All are equipped with a touch response feature (both initial
touch and after touch). With initial touch, the instrument senses
how strongly or softly you play the keys, and uses that playing
strength to affect the sound in various ways, depending on the
selected Voice. With after touch, the instrument senses how
much pressure you apply to the keys while playing, and uses
that pressure to affect the sound in various ways, depending on
the selected Voice.
NOTE
The keyboard range of the S90 XS is A -1 to C7; the range of the
S70 XS is E0 to G6.
2 Pitch Bend wheel
Controls the pitch bend effect. You can also assign other
functions to this controller.
3 Modulation wheel
Controls the modulation effect. You can also assign other
functions to this controller.
4 MASTER VOLUME slider
Adjusts the volume of the overall sound. Move the slider
upwards to raise the output level from the OUTPUT L/R jacks
and the PHONES jack.
5 [MIC ON/OFF] button
Press the [MIC ON/OFF] button to switch the on/off status of the
MIC INPUT jack.
6 INPUT GAIN knob
Use this to adjust the input gain of the audio signals at the MIC
INPUT jack. Depending on the connected microphone, you may
need to adjust this for optimum level. The volume level is
increased as the knob is rotated to the right and decreased as it
is rotated to the left.
7 PEAK indicator
This indicator lights up when the input signal level is 3dB below
clipping. Adjust the INPUT GAIN so that the indicator rarely
lights up at signal peak.
8 Performance Control buttons
These buttons let you control the functions that affect
Performances and Multis. You can select the part to be
controlled by the knobs and set the Arpeggio-related
parameters for each Part. In the Multi mode, the four parts to be
edited will correspond to 1 – 4, 5 – 8, 9 – 12 or 13 – 16
(depending on the currently selected Part).
[COMMON] button
In the Performance mode, pressing this button lets you use
the knobs to control the Common parameters.
In the Performance Edit mode, pressing this button will call
up the Common Edit Select display.
[PART SELECT] 1 – 4 buttons
In the Performance mode and Multi mode, pressing one of
these buttons will select the Part to be controlled by the
knob.
In the Voice Edit mode, pressing one of these buttons will
select the Element to be edited via the Quick Edit function.
C1E0 F0 G0 A0 B0C0 D0A-1 B-1 C2
1
23
4
6
9
^
8
7
)
&
!@
$
*
#
%
5