S90 XS/S70 XS Editor Owner’s Manual Contents What is the S90 XS/S70 XS Editor? ........................................2 Studio Manager ........................................................................2 Studio Connections .................................................................2 About Open Plug-in Technology .............................................3 Data Structure of the S90 XS/S70 XS Editor ..........................4 Starting the S90 XS/S70 XS Editor...................................
What is the S90 XS/S70 XS Editor? What is the S90 XS/S70 XS Editor? S90 XS/S70 XS Editor is a convenient tool which lets you edit and save the various parameters of your S90 S90 XS/S70 XS Music Synthesizer. These include Voice and Mixing parameters (edited in the Voice or Multi mode of the S90 XS/S70 XS) such as Volume, Pan, EG, and Cutoff and other settings.
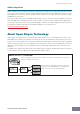
About Open Plug-in Technology Audio Integration Plug-in software such as software synthesizers and software samplers are exceptionally convenient in that they let you easily change the various settings and parameters within the host application. However, control over hardware is not so easy—with the need for various setups such as audio connections, driver settings and MIDI port connections.
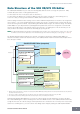
Data Structure of the S90 XS/S70 XS Editor Data Structure of the S90 XS/S70 XS Editor The S90 XS/S70 XS Editor lets you create the following data and save them as a single file (extension: .X2E).
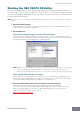
Starting the S90 XS/S70 XS Editor Starting the S90 XS/S70 XS Editor Install the driver USB-MIDI Driver, Studio Manager and S90 XS/S70 XS Editor by following the respective Installation Guides, then install the host application such as Cubase if necessary. After making the required connection and setting the MIDI IN/OUT parameter to “USB” in the Utility mode, follow the instructions below to start the S90 XS/S70 XS Editor.
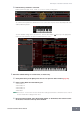
An Example of S90 XS/S70 XS Editor in Use An Example of S90 XS/S70 XS Editor in Use There is no single way to use the many components in the S90 XS/S70 XS Editor. Your editing needs and preferences may differ; however, the following example gives you a simple step-by-step guide in how to use the S90 XS/S70 XS Editor.
An Example of S90 XS/S70 XS Editor in Use CAUTION Regarding the data transfer for synchronization, the setting here takes precedence over that specified in Studio Manager. Make sure to set the desired data transfer direction, regardless of the setting on the Studio Manager, in order to avoid data loss. 4. From the Auto Sync window, click [Start] at the bottom. The data synchronization will be started if the Port settings are correct.
An Example of S90 XS/S70 XS Editor in Use 5-4 Edit the Voice parameters as desired. Edit the parameters (EQ, chorus, reverb, etc.) in the “V” row by clicking them. To confirm how the parameter edit affects the Voice sound, click any note on the virtual keyboard or the S90 XS/S70 XS keyboard. To make detailed settings of the selected Voice, click the arrow button next to the main window to call up the Detailed Parameter section. at the top of the right panel 6.
An Example of S90 XS/S70 XS Editor in Use 6-4 Click [Store] to store the edited Voice to the selected number in the selected Bank. Performing this operation will store the Voice data to the User Voice Bank in the S90 XS/S70 XS instrument as well as that within the Editor. CAUTION When you execute the Store operation, the settings for the destination memory (of both the Editor and instrument) will be overwritten.
An Example of S90 XS/S70 XS Editor in Use 7-3 On the “G” row of the Global/Multi section, click the Multi name or Voice name to call up the MULTI LIBRARY window. The MULTI LIBRARY lists the Multi programs which is stored in the S90 XS/S70 XS instrument when the S90 XS/S70 XS Editor is in ONLINE status. You can call up the Multi setup simply by selecting one of these listed template programs. n The MULTI LIBRARY is not available when the S90 XS/S70 XS Editor is in “OFFLINE” status.
An Example of S90 XS/S70 XS Editor in Use 8. Store the edited Voice or a Multi, as necessary. 8-1 Select the [Store Mixing] under the [Edit] menu to store the edited Multi. n You can also store the edited Multi with the Store operation on the S90 XS/S70 XS instrument. For details, refer to the Owner's Manual of the S90 XS/S70 XS.
S90 XS/S70 XS Editor Window: Overall section S90 XS/S70 XS Editor Window Overall section 1 2 3 1 File, Edit, Bulk, Help Refer to page 36. 2 Voice/Multi mode Determines the mode of the S90 XS/S70 XS, Voice or Multi. As soon as “Voice” or “Multi” is selected here, the mode of the S90 XS/S70 XS instrument changes accordingly and the Auto Sync window (page 51) opens.
S90 XS/S70 XS Editor Window: Mixer section (when the Voice/Multi is set to “Voice”) Mixer section (when the Voice/Multi is set to “Voice”) 1 3 2 1 Global This strip lets you edit the main parameters in the Voice mode, such as effect-related ones. Clicking “G” turns this section on as illustrated below. n When editing any of the Global parameters described below, a small square appears at the top right of the “G” box until you save the edited data as a file.
S90 XS/S70 XS Editor Window: Mixer section (when the Voice/Multi is set to “Voice”) 3 Voice When the [Voice] is selected: Edits the Voice parameters. Clicking the “V” row turns this section on as illustrated below. n When editing any of the Voice parameters described below, a small square appears at the top right of the “V” box until you save the edited data as a file or you store the edited data as a Voice. This indication is the same as the blue [V] indicator (page 29).
S90 XS/S70 XS Editor Window: Mixer section (when the Voice/Multi is set to “Voice”) 3 [+]/[–] buttons Click the [+] button to open all the folders so that all Voices appear in all folders. Click the [–] button to close all folders. 4 Folder (Category or Bank) Click each folder to open or close it. 5 Voices Indicates the Voices included in the folder. You can select the Voice temporarily by clicking it. When double-clicking a Voice, the Voice is actually selected and this window closes.
S90 XS/S70 XS Editor Window: Mixer section (when the Voice/Multi is set to “Voice”) When the [AD Part] is selected: This section lets you edit parameters for the A/D Part in the Voice mode. Clicking “AD” row turns this section on as illustrated below. Cho, Rev, Pan (Chorus, Reverb, Pan) Adjusts the Chorus Send level, Reverb Send level and stereo Pan position for the A/D Part in the Voice mode by using the graphic knobs. Volume Adjusts the Volume for the A/D Part.
S90 XS/S70 XS Editor Window: Mixer section (when the Voice/Multi is set to “Multi”) Mixer section (when the Voice/Multi is set to “Multi”) 1 3 2 1 Global This strip lets you edit the main parameters in the Multi mode, such as effect-related ones. Clicking “G” turns this section on as illustrated below. n When editing any of the Global parameters described below, a small square appears at the top right of the “G” box until you save the edited data as a file.
S90 XS/S70 XS Editor Window: Mixer section (when the Voice/Multi is set to “Multi”) Multi program At the right of the “G” indication, the name of the Multi program which includes the parameter settings for all the Parts 1 – 16 is shown when the [Part 1-16] tab (page 19) is selected. Clicking the Multi program name will call up the MULTI LIBRARY which lets you select the desired Multi program.
S90 XS/S70 XS Editor Window: Mixer section (when the Voice/Multi is set to “Multi”) 2 [Part 1-16]/[AD Part] tab Selects the Parts to be edited from [Part 1-16] and [AD Part]. The illustration below indicates that the [Part 1-16] tab is selected. 3 Part When [Part 1-16] is selected: This section lets you edit parameters for each Part. Clicking any of 1 – 16 turns the corresponding Part on. In the example illustration below, Part 1 is active.
S90 XS/S70 XS Editor Window: Mixer section (when the Voice/Multi is set to “Multi”) Rcv Channel (Receive Channel) Determines the MIDI Receive Channel for each Part. Output Select Determines the specific output(s) for the individual Part. The following settings are available.
S90 XS/S70 XS Editor Window: Parameter Category section (when the Voice/Multi is set to “Voice”) Parameter Category section (when the Voice/Multi is set to “Voice”) You can edit detailed parameters for the current Part by clicking the button (located near the top right of the window, just below the model name) to call up the Detailed Parameter section. Calling up the Detailed Parameter section moves the Parameter Category Section rightward as shown below.
S90 XS/S70 XS Editor Window: Parameter Category section (when the Voice/Multi is set to “Voice”) The indicated categories in the Parameter Category section differ depending on the selected row: G, V, or AD Part, as illustrated below. Clicking each of Categories calls up the corresponding parameters in the Detailed Parameter section. The “G” indication shown below appears when clicking the “G” row.
S90 XS/S70 XS Editor Window: Parameter Category section (when the Voice/Multi is set to “Voice”) 4 Element or Drum Key This is shown when the “V” row is selected in the Mixer section. When a Normal Voice is selected (“Element” is shown in the Parameter Category section) and you select an Element number (from 1 – 16), then clicking each of the parameter categories calls up the corresponding Element parameters in the Detailed Parameter section.
S90 XS/S70 XS Editor Window: Parameter Category section (when the Voice/Multi is set to “Multi”) Parameter Category section (when the Voice/Multi is set to “Multi”) You can edit detailed parameters for the current Part by clicking the button (located near the top right of the window, just below the model name) to call up the Detailed Parameter section. Calling up the Detailed Parameter section moves the Parameter Category Section rightward as shown below.
S90 XS/S70 XS Editor Window: Parameter Category section (when the Voice/Multi is set to “Multi”) The indicated categories in the Parameter Category section differ depending on the selected Part type: G, Part 1 – 16, or AD Part. Clicking each of the Categories calls up the corresponding parameters in the Detailed Parameter section. The “G” indication shown below appears when clicking the “G” row.
S90 XS/S70 XS Editor Window: Detailed Parameter section (when the Voice/Multi is set to “Voice”) Detailed Parameter section (when the Voice/Multi is set to “Voice”) This section indicates the detailed parameters of the selected category for the current Voice or Global settings. This section introduces what parameters belong to each of the Parameter Categories. For details about each parameter, refer to the Owner’s Manual of the S90 XS/S70 XS.
S90 XS/S70 XS Editor Window: Detailed Parameter section (when the Voice/Multi is set to “Voice”) Global Settings This Parameter category which is called up by selecting the “G” row in the Mixer section consists of the following sub categories. Master FX/EQ (Master Effect/EQ) Clicking this in the Parameter Category section calls up the Master Effect/EQ parameters in the Detailed Parameter section.
S90 XS/S70 XS Editor Window: Detailed Parameter section (when the Voice/Multi is set to “Voice”) Element or Drum Key This Parameter Category is called up by selecting the “V” row in the Mixer section. The “Element” is shown when the Normal Voice is selected while the “Drum Key” is shown when the Drum Voice is selected. The parameters belonging to this category lets you make the settings applied to each of the Elements or Drum Keys individually. The following sub categories are included.
S90 XS/S70 XS Editor Window: Detailed Parameter section (when the Voice/Multi is set to “Multi”) Detailed Parameter section (when the Voice/Multi is set to “Multi”) This section indicates the detailed parameters of the selected category for the current Part and the Voice assigned to the current Part, or the Global settings. This section introduces what parameters belong to each of the Parameter Categories. For details about each parameter, refer to the Owner’s Manual of the S90 XS/ S70 XS.
S90 XS/S70 XS Editor Window: Detailed Parameter section (when the Voice/Multi is set to “Multi”) Micro Tuning Clicking this in the Parameter Category section calls up the Micro Tuning parameters in the Detailed Parameter section. On the S90 XS/S70 XS instrument, these parameters are the same as those called up by selecting “Micro Tune” on the Utility Select display. Multi Common This Parameter category, called up by selecting the “G” row in the Mixer section, consists of the following sub categories.
S90 XS/S70 XS Editor Window: Detailed Parameter section (when the Voice/Multi is set to “Multi”) Effect Clicking this in the Parameter Category section calls up the parameters related to the Insertion Effect for the current Part and System Effect applied to all the Parts in the Detailed Parameter section. Element or Drum Key This Parameter Category is called up by selecting any of the “1” – “16” rows in the Mixer section.
S90 XS/S70 XS Editor Window: Bottom section Bottom section 3 1 4 5 6 2 7 1 Controller Set status This section indicates which controller of the S90 XS/S70 XS (either built-in or connected) is used as the Control Source of the Controller Set edited in the RCV/Control Set window. 2 1 3 1 Part Indicates the current Part. When [Voice]/[Multi] is set to “Voice” (Voice mode is enabled), in the Voice mode, this indication is fixed to “1.
S90 XS/S70 XS Editor Window: Bottom section 3 Knobs This section lets you adjust various parameters assigned to the Knobs on the front panel of the S90 XS/ S70 XS instrument. 1 2 1 [TONE]/[EG]/[EQ]/[Effect]/[MIC] Same as the Knob Function buttons on the panel of the S90 XS/S70 XS. 2 Knobs 1 – 4 Same as the four knobs on the panel of the S90 XS/S70 XS. 4 ARP (Arpeggio) Allows you to change the Arpeggio related setup (on/off status and selecting 1 – 5).
Basic Operations Basic Operations This section covers basic operations of the S90 XS/S70 XS Editor. Naming a Voice You can assign an original name of your choice to the edited Voice on the VOICE LIBRARY window, GENERAL window in the Part Common General, and the Store window. From the VOICE LIBRARY window (page 14), select a User Voice or Mixing Voice then click the selected Voice so that you can edit the name.
Basic Operations Selecting a value Clicking inside the value box like such as that shown above calls up the list box, from which you can select the desired value. You can also select the value also by clicking the arrow at right end of this box. Using a knob Dragging or clicking the knob such as that shown above changes the value of the corresponding parameter. After clicking this, you can edit the value by using the cursor key or / key.
Menu: [File] menu Menu [File] menu New Creates and opens a new file containing the default Mixing setup and Voice data. Open... Opens an already saved file of the S90 XS/S70 XS Editor. The following file types can be selected and opened. • S90 XS/S70 XS Editor (.X2E) • S90 ES Multi Part Editor (.M6E) • S90 XS/S70 XS All Files (.X2A) CAUTION Unlike files of other applications such as word processors, only a single file can be opened and edited on the S90 XS/S70 XS Editor.
Menu: [File] menu Import Imports the Voice data (a specific Voice in a specific folder or all Voices in a specific folder) from a different file to the current file.
Menu: [File] menu 5 [Import] button Click this to actually import the Voice(s) selected in the Source Voice list (8) to the specified location in the Destination Voice list (9). n You can also import Voice data without the use of this button by dragging the desired Voice or folder from the Source Voice list then dropping it to the Destination Voice list. n A Normal Voice cannot be imported to the User Drum Voice Bank. Likewise, a Drum Voice cannot be imported to the User Normal Voice Bank.
Menu: [File] menu Setup Determines the basic setup of the S90 XS/S70 XS Editor. After setting necessary parameters, click [OK] to actually apply the settings to the S90 XS/S70 XS Editor. 1 3 4 2 5 6 7 8 9 ) ! @ # 1 [X] (Close) button Click this to close this window without applying the settings. This button is the same as the [Cancel] button (#). 2 [Detail] button You can make detailed settings for the Input Port and Output Port by setting this button to “On.
Menu: [File] menu 5 Auto Sync Setting This section lets you set how the data synchronization between the S90 XS/S70 XS Editor and the S90 XS/S70 XS instrument is executed when “OFFLINE” is changed to “ONLINE.” Actual data synchronization is executed from the Auto Sync window (page 51) called up automatically under certain circumstances such as clicking the [OFFLINE] button, starting the S90 XS/S70 XS Editor and opening a new file on the Editor.
Menu: [File] menu 6 Knob Guide Determines whether or not the Knob Guide (knob editing area) appears when adjusting a knob. Setting this to On conveniently enlarges the knob editing area (as shown), making it much easier to edit a knob’s parameter. Knob Guide: On Knob Guide: Off 7 Knob Mouse Control Determines how the knob illustrated at right responds to your mouse control. Circular When this is selected, you can jump to a specific value by clicking at a point within the Knob editing area.
Menu: [File] menu ) Inc/Dec Action Determines how the triangular buttons ([▲]/[▼]/[L]/[M]) located at the parameter boxes as illustrated below work. Inc/Inc: When this is selected, clicking the [▲] button increases the value by 1 while clicking the [L] button moves the cursor downward by one item. Inc/Dec: When this is selected, clicking the [▲] button increases the value by 1 while clicking the [L] button moves the cursor upward by one item.
Menu: [File] menu Hardware Utility From the Hardware Utility window called up by selecting this menu, you can make the settings related to the parameters in the Utility mode of the S90 XS/S70 XS. Editing the parameter on this window will affect the parameter having the same name of the S90 XS/S70 XS instrument. After making the settings, click [Store] at the bottom of this window to store the settings as Global data.
Menu: [Edit] menu [Edit] menu Voice mode Multi mode Undo Cancels the changes you made in your most recent editing. [Undo] menu will be black and cannot be selected depending on the most recent edited parameter. Redo Redo is available only after using Undo, and lets you restore the changes you made before undoing them. Copy Copies the selected items such as characters of the Voice name in the text box, Voice(s) in the VOICE LIBRARY window and entire Part setup to the clipboard.
Menu: [Edit] menu When a Drum Voice is edited: 1 2 4 3 5 6 1 [X] (Close) button Click this to close the window without executing Initialization. 2 [All]/[Clear] button Clicking [All] turns all the checkboxes in this window on while clicking [Clear] turns them off.
Menu: [Edit] menu Initialize Current Mixing (only in the Multi mode) Select this menu to call up the Initialize Current Mixing window, set the parameters as necessary, then click [Start] to initialize the Voice data assigned to the current Part. 1 2 4 3 5 6 7 1 [X] (Close) button Click this to close the window without executing Initialization. 2 [All]/[Clear] button Clicking [All] turns all the check boxes in this window on while clicking [Clear] turns them off.
Menu: [Edit] menu Store Global Simply selecting this menu will store the Global settings. The Global settings will be stored only to the internal memory of the S90 XS/S70 XS instrument. Store Voice From the window selected via this menu, you can store the edited Voice. The current Voice is stored in the Voice mode while the Voice assigned to the current Part is stored in the Multi mode.
Menu: [Edit] menu 5 Bank folder This section indicates the following Banks to which you can store the edited Voice. • Normal User 1 • Normal User 2 • Normal User 3 • Normal User 4 • Drum User • Mixing Clicking on each Bank folder opens it and all the Voices stored in the Bank appear as illustrated above (from the left illustration to the right one). When clicking the Bank folder again, it closes as illustrated above (from the right illustration to the left one).
Menu: [Bulk] menu [Bulk] menu Data Sync Select this menu to call up the Initialize Data Sync window, set the parameters as necessary, then click [Start] to transmit the specified data from/to the S90 XS/S70 XS Editor to/from the S90 XS/S70 XS instrument. 1 3 2 4 5 6 1 [X] (Close) button Click this to close this window without executing Data Sync. 2 [Transmit]/[Receive] checkboxes Determines whether the S90 XS/S70 XS Editor transmits data to the S90 XS/S70 XS or receives data from the S90 XS/S70 XS.
Menu: [Help] menu 4 Progress Bar Shows how much of the data has been transmitted. 5 [Start] button After setup is completed, click the [Start] button to actually execute data transmission. 6 [Stop] button This button is available only when data transmission is being executed and allows you to cancel the transmission. [Help] menu Manual Selecting this menu calls up this manual in PDF format. About Selecting this menu calls up information such as the version number of the S90 XS/S70 XS Editor.
Menu Auto Sync window This window is used for changing the status of the Editor from “OFFLINE” to “ONLINE.” While editing a parameter on the Editor affects the same parameter on the S90 XS/S70 XS instrument and vice versa in the Online status, you can disable the “mirroring” of parameter changes between the devices by switching to Offline status. The Auto Sync window can be called up by clicking “OFFLINE” on the Editor window when the Editor is in the Offline status.
Troubleshooting Troubleshooting If you encounter problems such as no sound output or abnormal behavior, verify the connections before checking the following. Sound does not change when using the knobs or sliders. • Is “ONLINE” indicated on the Editor window? • Is the lamp at left of “ONLINE” indicator turned on? If it is turned off, the settings related to communication between the S90 XS/S70 XS and a computer may be wrong.