
User Manual


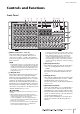

Table Of Contents

Introduction
Owner’s Manual
7
Introduction
Thank you for choosing the Yamaha Rio3224-D/Rio1608-D
I/O Rack. The Rio3224-D is a Dante-compatible I/O rack,
featuring 32 analog inputs, 16 analog outputs, and 8
AES/EBU outputs. The Rio1608-D is a Dante-compatible
I/O rack, featuring16 analog inputs and 8 analog outputs.
To take full advantage of the superior functions and
performance offered by the Rio3224-D/Rio1608-D, and to
extend the useful life of the product, be sure to read this
owner’s manual carefully before operation.
NOTE
• Where specifications for the Rio3224-D differ from the
Rio1608-D, this manual places specifications that apply
only to the Rio1608-D in curly brackets { } (e.g., [INPUT]
connectors 1-32 {1-16}).
• Unless otherwise noted, illustrations for the Rio3224-D are
used.
• If certain specifications are common to both the Rio3224-D
and Rio1608-D, both units are collectively called “Rio.”
Features
Long-distance Dante Network Capability
Low-latency, low-jitter audio can be transferred over
distances up to 100 meters* between devices via standard
Ethernet cables using the Dante network protocol. The Rio
can be used as a general-purpose I/O box for the Dante
network. Supported sampling rates are 44.1 kHz, 48 kHz,
88.2 kHz, and 96 kHz.
* Maximum practical distance may vary according to the cable used.
Remotely Controllable Internal Head
Amplifiers
Internal head amplifier parameters can be remotely
controlled from a compatible device, such as the CL series,
or from a computer application “R Remote.”
Digital Outputs (Rio3224-D only)
The Rio3224-D features XLR-3-32 type balanced
connectors for AES/EBU format digital audio outputs.
Gain Compensation Function
If the Rio’s Gain Compensation function is enabled from a
supported device that lets you set gain compensation (such
as CL series products), the subsequent fluctuations in
analog gain will be compensated for by internal digital
gain. The audio signal will be output to a Dante network
with a gain level that was fixed immediately before the Gain
Compensation function was enabled. In this way, you can
set the gain individually for FOH and MONITOR even if
they share the same channel.
Direct Audio In/Out With a Connected
Computer
Connecting the Rio with a standard Ethernet cable to a
computer that has a Dante Virtual Soundcard installed
enables you to directly input or output audio signals
without using an audio interface device.
Firmware Updates
This product enables you to update the unit firmware to
improve operations, add functions, and correct possible
malfunctions. The following two types of firmware are
available for the unit.
• Unit’s firmware
• Dante module firmware
Details on updating the firmware are available on the
following website:
http://www.yamahaproaudio.com/
For information on updating and setting up the unit, please
refer to the firmware update guide available on the website.
NOTE
When you update Dante firmware on the unit, be sure to
update Dante firmware on other Dante-compatible devices
connected to the Rio.
Precautions for Rack Mounting
This unit is rated for operation at ambient temperatures
ranging from 0 to 40 degrees Celsius. When mounting
the unit with other Rio unit(s) or other device(s) in an
EIA standard equipment rack, internal temperatures can
exceed the specified upper limit, resulting in impaired
performance or failure. When rack mounting the unit,
always observe the following requirements to avoid heat
buildup:
• If three or more Rio units are mounted without
space in the same rack, set the fan speeds to HIGH.
• If multiple units are mounted in the same rack with
their fan speeds set to LOW, leave a 1U rack space
between every two units. Also either leave the open
spaces uncovered or install appropriate ventilating
panels to minimize the possibility of heat buildup.
• When mounting the unit in a rack with devices such
as power amplifiers that generate a significant
amount of heat, leave more than 1U of space
between the Rio and other equipment. Also either
leave the open spaces uncovered or install
appropriate ventilating panels to minimize the
possibility of heat buildup.
• To ensure sufficient airflow, leave the rear of the rack
open and position it at least 10 centimeters from
walls or other surfaces. If the rear of the rack can’t be
left open, install a commercially available fan or
similar ventilating option to secure sufficient
airflow. If you’ve installed a fan kit, there may be
cases in which closing the rear of the rack will
produce a greater cooling effect. Refer to the rack
and/or fan unit manual for details.