Example Program for AMX - Setup Guide - February, 2010
Example Program for AMX - Setup Guide - Introduction This guide is a step-by-step setup guide to setting up the Yamaha Commercial Audio demonstration programming for AMX. The program was written to demonstrate the capabilities of Yamaha remote control enabled devices at exhibitions. We have made the code available to assist programmers with example code. You are free to use this code in your own project.
Example Program for AMX - Setup Guide - Tested Firmware Versions NI-700 processor NXT-1200VG touch panel : v3.41.414 : v2.60.25 The program has been tested using the above firmware combination. Different firmware combination could cause unexpected behaviour. Please refer to the AMX website to check firmware update history. File list Please download and unzip all of these files: YamahaCA_AMX_ExampleV1.0_Programming.zip NetLinx Studio files for compiling and uploading to the processor.
Example Program for AMX - Setup Guide - Step by step setup 1. Assemble the hardware and connect up both the AMX & Yamaha components together as shown in the system diagram. 2. Verify all devices have power. 3. Verify all devices are upgraded to the latest firmware versions. 4. Verify there is network activity by looking at the link/activity lights on the network switch. 5. For mixers, configure the MIDI settings as shown in the screenshots below.
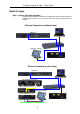
Example Program for AMX - Setup Guide - Detail of steps Step 1: System Schematic diagrams The diagram below shows all possible connections with Yamaha devices which are available in this program. You may connect as few or as many Yamaha devices as required.
Example Program for AMX - Setup Guide - Step 1: System Schematic diagrams (continued) Serial Connections DME24N BD-S2900 Blu-ray player Port 2 Port 1 AMX NI-700 processor MIDI Connections LS9 01V96 OUT IN OUT IN IN A IN B THRU OUT AXLINK AMX AXB-MIDI AMX NI-700 OUT IN M7CL 5
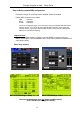
Example Program for AMX - Setup Guide - Step 4: Mixing console MIDI configuration Parameter change TX and RX should be enabled. All others disabled. Default MIDI channels are as follows: LS9 – channel 1 M7CL – channel 2 01V96 – channel 3 The device configuration page on the touch panel has pre-configured MIDI channels for Yamaha devices. You need to set these identical MIDI channels in to the connected Yamaha devices.
Example Program for AMX - Setup Guide - Step 8: Touch panel program configuration 1. Press and hold for 5 seconds. 2. Enter the secret configuration PIN number 4520 If you get the PIN number wrong, you will be returned to the previous screen. 3. Configure the available languages The touch panel is multi-lingual and can support up to 10 languages at the same time. This was designed for Yamaha’s exhibition use.
Example Program for AMX - Setup Guide - Press one of the 10 languages buttons. Then select a language flag from the available translations (up to 24) to choose the language used by that button: Select “BLANK” to clear out a language you don’t want to be present. 4. Configure the available products Purpose: Configure the products shown on the touch panel to match the product you wish to use. Press “Products”. There are 10 product buttons, so up to 10 products can be present simultaneously.
Example Program for AMX - Setup Guide - Then select a product from the available products to choose the product used by that button: 5. Verify devices ports, IP addresses and MIDI channels Press “Devices”. Here you can view and change which serial ports are for which products, view what IP addresses should be configured on the connected products and view which MIDI channels are for which products. N.B. At the time of writing all settings are fixed except for the choice of device for the serial port.
Example Program for AMX - Setup Guide - 6. Configure Options - Screensaver Here you can set the screensaver. The purpose of the screensaver is not to save the screen, but to enable moving images to attract the attention of exhibition attendees. The options are Blank: No screensaver. Touch panel will go to black when not in use. Slides: A display of product pictures will cycle around with the words “Touch to start” displayed.
Example Program for AMX - Setup Guide - Step 9: AMX file extracting, compiling and transferring Extract AMX files which are zipped in YamahaCA_AMX_ExampleV1.0_Programming.zip, YamahaCA_AMX_ExampleV1.0_TP.zip and YamahaCA_AMX_ExampleV1.0_DynamicContentsRev1.2.zip. The files in YamahaCA_AMX_ExampleV1.0_DynamicContentsRev1.2.zip should be put in a folder called “images” which is located in “/doc:user/images” as shown below by FTP transfer. These files are used for multi-lingual capability.
Example Program for AMX - Setup Guide - Known issues The following issues are known limitations: BD-S2900 Blu-ray player Pressing a transport button (play, stop etc), the touch panel takes 5 seconds to update the display, due to the feedback speed from the BD-S2900. Troubleshooting tips / FAQ Tip: logo, the touch panel will return to the screensaver, If you momentarily press the without waiting for the time out. This is useful at the end of a demonstration to a customer.