
User Manual


Example Program for AMX - Setup Guide -
3
Step by step setup
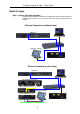
1. Assemble the hardware and connect up both the AMX & Yamaha components together
as shown in the system diagram.
2. Verify all devices have power.
3. Verify all devices are upgraded to the latest firmware versions.
4. Verify there is network activity by looking at the link/activity lights on the network switch.
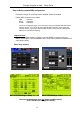
5. For mixers, configure the MIDI settings as shown in the screenshots below.
To save time, we have also prepared Studio Manager files which contain scenes and
MIDI configuration settings.
6. For all devices, store scenes or load pre-prepared scenes.
15 are available on the touch panel for the M7CL
15 are available on the touch panel for the 01V96
5 are available on the touch panel for the LS9
8 are available on the touch panel for the DME24N/DME64N/DME4io-C
16 are available on the touch panel for the IMX644, but only 4 memories are necessary
as the front panel has 4 memories.
(Note that if you select a scene button on the touch panel and there is no scene on the
device nothing will happen, which is not very exciting!)
7. Configure IP addresses of the DME4io-C.
8. For DME models, synchronise the provided DME Designer files using DME Designer.
9. Extract AMX files which are zipped in:
- YamahaCA_AMX_ExampleV1.0_Programming.zip
- YamahaCA_AMX_ExampleV1.0_TP.zip
- YamahaCA_AMX_ExampleV1.0_DynamicContentsRev1.2.zip.
Then, compile and transfer.
10. Configure the setup pages of the AMX system as detailed below.
11. Setup completed.
Steps which need further explanation have more information below.