
User Manual


5.
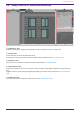
Verify that the devices are shown in the "Network" area.
If they are not shown, check the connections with the devices, and use the "Network Setup" dialog box to
verify that the correct network card is connected to the devices.
6.
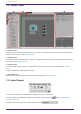
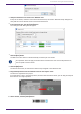
In the "Network" area, click the [Unit ID] button.
The "Change Unit ID" dialog box will appear.
7.
Click the [Auto] button.
The UNIT ID of each device is set automatically so that they do not conflict.
This operation does not apply to the MTX series or XMV series units. Use the dip switches on
the rear panel to set the Unit ID.
8.
Click the [OK] button.
The devices will restart, so wait until the devices amps reappear in the "Network" area.
9.
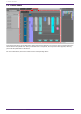
Drag and drop a device from the "Network" area into the "Project" sheet.
The device is registered in the project.
If you hold down < Shift >, click the top device, and then click the bottom device, you can drag and drop all
these devices in a single operation.
10. On the tool bar, click the [Online] button.
3. The basics of using ProVisionaire Design
ProVisionaire Design User Guide | 17