
User Manual

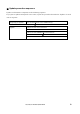


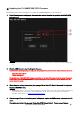
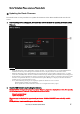

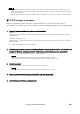
Table Of Contents
- ■ Important Notice
- ■ Precautions (Please be sure to read this section first!)
- ■ Checking the version number
- ■ Preparing for the update
- ■ Update procedure sequence
- ■ Updating the CL series firmware
- ■ Updating the CL NAME SUB CPU Firmware
- ■ Updating the Dante Firmware
- ■ Updating the Dante firmware by using PC application.
- ■ Preparing for the update
- ■ Update procedure sequence
- ■ Install the Dante Firmware Update Manager
- ■ TCP/IP settings of computer
- ■ Updating the Dante firmware
- ■ About Failsafe Mode
- ■ Preparing for recovery
- ■ Recovery procedure sequence
- ■ Install the Dante Firmware Update Manager
- ■ TCP/IP settings of computer
- ■ Recovery of the Dante module

CL5/CL3/CL1Firmware Update Guide 10
・ The “Windows Security” dialog box may appear. In such case, click [Install this driver software anyway].
・ You may be prompted to restart the computer after the installation is complete. Before proceeding to update,
restart the computer.
・ When installing the Dante Firmware Update Manager, temporarily disable any running anti-virus software.
■
TCP/IP settings of computer
Before you update the Dante firmware, you must modify your computer’s TCP/IP settings.
After the firmware update procedure is complete, return the TCP/IP settings to their original settings.
1.
Open the Network and Sharing Center as described below.
Windows 7
Select [Start] → [Control Panel], then click or double-click [Network and Sharing Center] or [View network
status and tasks].
Windows 8 and Windows 8.1
[Windows]+[X] → [Control Panel], then click or double-click [Network and Sharing Center] or [View network
status and tasks].
The “Network and Sharing Center” is displayed.
2.
Click [Manage network connection] or [Change Adapter settings] from the “Tasks” list located in the
left side of “Network and Sharing Center” window, then double-click [Local Area Connection].
The "Local Area Connection Status" dialog box will be displayed.
・The "User Account Control" dialog box may appear. Click [Continue] or [Yes].
・If the "Local Area Connection properties" dialog box appears, skip ahead to step 4.
3.
Click [Properties].
The “Local Area Connection properties” dialog box will be displayed.
・The "User Account Control" dialog box may appear. Click [Continue] or [Yes].
4.
Select [Internet Protocol Version 4 (TCP/IPv4)], then click [Properties].
The "Internet Protocol Version 4(TCP/IPv4) Protocol" dialog box will be displayed.
5.
Click [Obtain an IP address automatically].