
User Manual
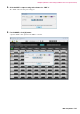
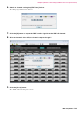
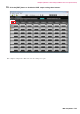
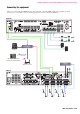
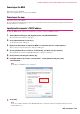
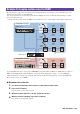
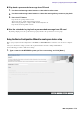
Table Of Contents
- Cover
- Introduction
- Setup workflow
- Example 1) Ballroom where the Room Combiner can be used
- Example 2) Remote conferencing system that also uses Speech Privacy
- Using the Device Configuration Wizard to create your device setup
- Configuring the settings on the MRX
- Making EXT. I/O settings
- Connecting the equipment
- Powering-on the MRX
- Powering-on the amp
- Specifying the computer’s TCP/IP address
- Sending the Speech Privacy environmental sound
- Taking MTX-MRX Editor online
- Verifying that the settings were applied
- Example 3) A paging system using the PGM1
- Using the Device Configuration Wizard to create your device setup
- Specifying the MRX configuration
- Making EXT. I/O settings
- Connecting the equipment
- Powering-on the PoE-equipped gigabit network switch
- Specifying the MCP1’s UNIT ID
- Power-on equipment other than amps and powered speakers
- Power-on amps and powered speakers
- Specifying the computer’s TCP/IP address
- Taking MTX-MRX Editor online
- Verifying that the settings were applied
- Q&A
- Uninstalling the software (Removing the application)

MRX Setup Manual 109
Place the “Paging” components, and assign broadcast destinations (zones, zone groups) or pre-recorded messages to the
zone/message select buttons of the PGM1 units.
You can use the buttons to select the broadcast destination (multiple selections are allowed) and play back pre-recorded
messages from the SD card.
On the SD card that you’ll insert into the MRX, save the audio files for the Opening Chime, Closing Chime, and messages.
Up to four PGM1 units can be connected to an MTX/MRX system that includes an MRX. One PGM1 unit can control one
MRX, and this PGM1 together with the MRX are collectively called a Paging Device Group. One of the PGM1 units
within the Paging Device Group is the 1st Priority Mic; this unit can broadcast taking priority over the other PGM1 units.
There are three ways to use the PGM1.
Broadcast from the mic.
1.
Use the zone/message select buttons to select the broadcast area.
2.
Press the PTT button.
If specified, the Opening Chime is heard.
3.
When the status indicator is lit red, speak into the mic.
4.
When you finish speaking, press the PTT button.
If specified, the Closing Chime is heard.
Example 3) A paging system using the PGM1
P
P
PGX1
ID=0
PGX1
ID=1
PGM1
ID=60
PGX1
ID=0
PGX1
ID=1
PGM1
ID=61
PGX1
ID=0
PGX1
ID=1
PGM1
ID=62
MRX7-D ID=01
MTX5-D ID=02
PGX1
ID=0
PGX1
ID=1
PGM1
ID=63
SWR2100P-10G
Paging Device Group 1
Paging Device Group 2
=Priority microphone
P